French Apple Tart Recipe
SHARE THIS RECIPE!


When apples are in season there is nothing more impressive than a Classic French Apple Tart Recipe. It’s one of my favorite dessert recipes that is as pretty as it is delicious! Apple tarts are easier to make than you might think and guests will always think you bought it at a fancy French bakery! It’s that impressive!
Looking for more apple recipes? You may also enjoy my Old-Fashioned Cinnamon Apple Cake or my Apple Cinnamon Pastries, or my Apple Crisp with Oat Topping. All are equally delicious!
Would you like to save this?
Step 1: Make The Pastry Dough
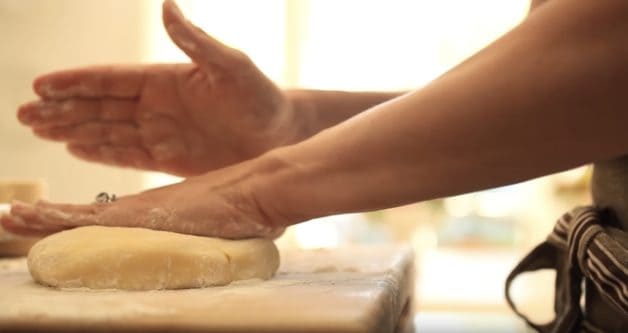
- In a food processor, you will combine flour, salt, and sugar, then slowly add butter until a coarse meal forms.
- Since this tart has such a beautiful fluted edge, I take the time to make the dough in the food processor. It will create a more delicate crust and prettier pastry.
- Then you’ll add an egg beaten with ice water and a dough will form.
- Press the dough into a disk and then wrap in plastic and refrigerate for at least 1 hour. Refrigerating the dough will prevent your crust from shrinking as it bakes.
Can You Freeze the Tart Dough?
- Yes! Once made, wrap it in plastic wrap, then in foil, and freeze.
- Then defrost the dough placing it in the refrigerator overnight to thaw.
- This is handy for making extra dough that you could put to good use in my Pear Almond Tart Recipe.
What’s the difference between a tart and a pie?
A tart has only the bottom crust, and a pie has the bottom crust as well as a top layer of dough over the filling. Personally, I think apple tarts tend to be more elegant, we can thank the French for that.
Whereas, an apple pie tends to be more rustic. Both are equally delicious so it really comes down to the type of presentation you are after.
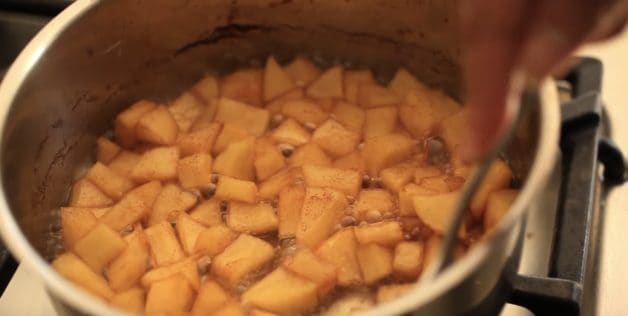
Step 2: Make the Apple Compote
- The second step to this French Apple Tart is the apple compote which adds a wonderful homemade sweetness and to this tart recipe.
- If you are really pressed for time you can swap the homemade for store-bought apple sauce, but the homemade, in my opinion, is SO worth the effort! Since it’s so delicious.
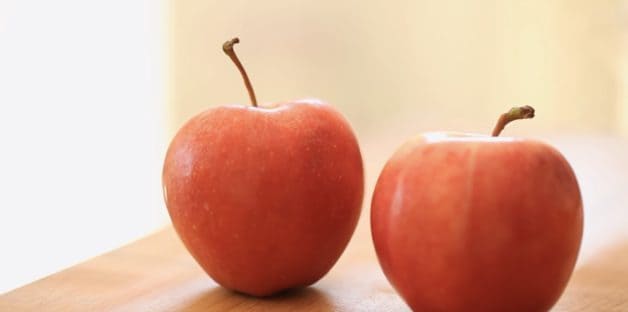
What are the best apples to use for baking?
- The best type of apple to use for baking depends on how tart you like your apples and what the apple is being used for.
- Personally, for most apple recipes, this apple tart included I prefer a Gala apple. They are sweet and don’t need much cooking time to enhance their sweetness.
- Other good apples to use for baking include Golden Delicious, Granny Smith, and Honey Crisp.
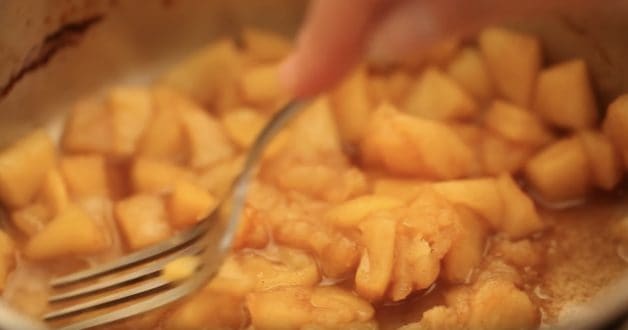
Creating the Apple Compote
You’ll cook the apples in a heavy-bottom saucepan with the sugar, cinnamon, lemon juice, and apple juice for about 10 minutes. Once they are tender, you can mash the apples up with a fork, just until coarse compote forms.
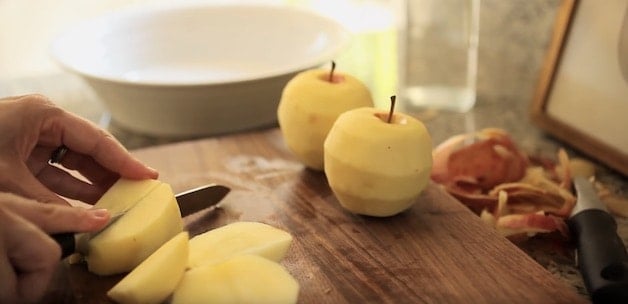
Step 3: Slice the Decorative Apples
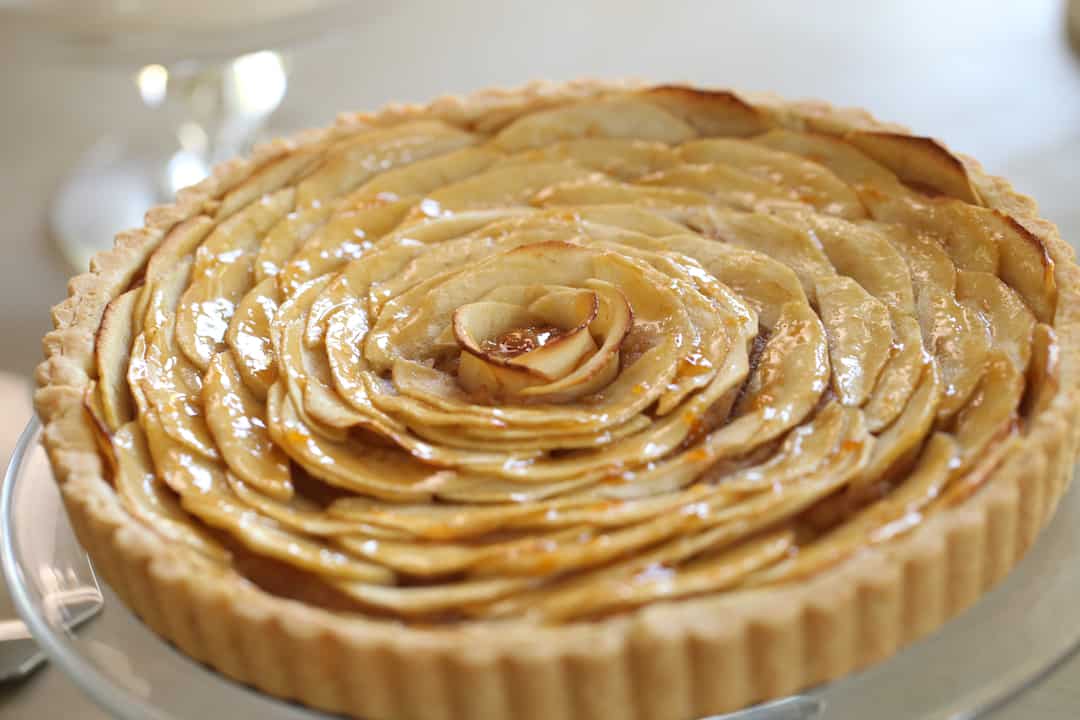
The arrangement of the apples on an apple tart is really what makes this dessert a true “showstopper”. This is where you can let your artistry flourish! I won’t lie it takes time, but none of it is hard and the results are well worth the effort!
If you’d like a recipe that is a bit quicker, but equally impressive then you must try my Easy Pear Tart recipe. This one has the same “escargot pattern” but it’s made with puff pastry is comes together in a flash!
How Do You Slice Apples for a French Apple Tart?
- The apple slicing is key for making sure that all the apples are roughly the same size. This will help you arrange the apples in a more decorative fashion.
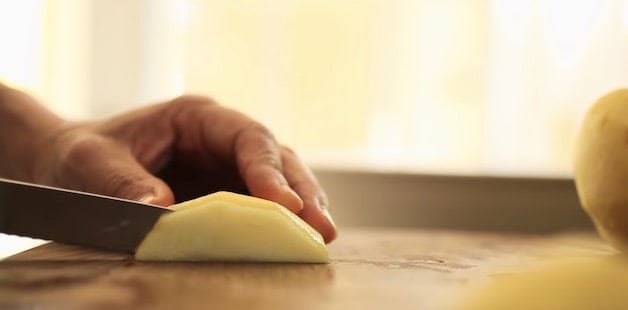
- Once your apples are peeled, the best way to begin is by cutting off all 4 sides of the apples.
- I think of these as the “apple cheeks”. This will leave you with a square core.
Can You Leave the Skin on The Apples?
Sure! If you are trying to save time, feel free to leave the skin on the apples, and slice them. It would actually create a pretty pop of red color to your tart, and look a bit like my Easy Pear Spice Cake which has the skins left on and creates a beautiful pop of color.
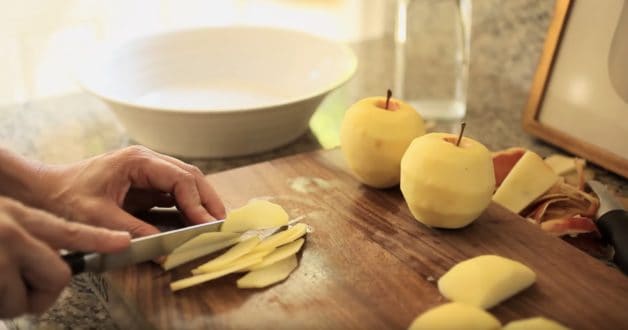
Slicing the Apples
- Then place each of the four apple sides on their flat side and thinly slice the apples so that each slice is about 1/8″ thick.
- You want the apples sliced thinly so that they cook quickly. It helps to do this with a slightly serrated knife.
- The serrated knife will grip the apple in a way that helps to stabilize it which will result in uniform slices.
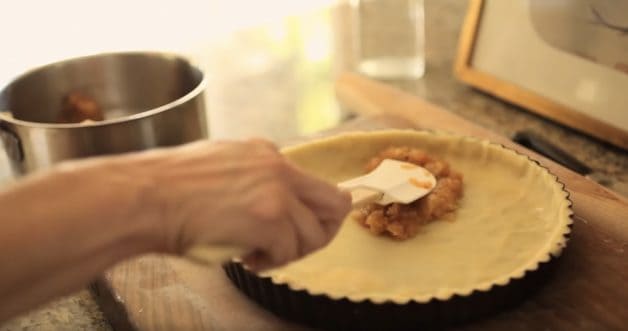
Step 4: Add the Apple Compote
Then you can fit your tart tin with the pastry dough and trim the edges so that they are flush with the tin.
Selecting the Right Pan
Smooth out the compote to cover the tart bottom. For best results, you’ll also want to invest in a 9″ removable bottom tart tin. This will allow you to release the tart easily and show off the decorative fluting once it’s baked.
What does a tart pan look like?
- The difference between a pie tin and a tart pan is the shape and depth.
- Tart pans usually have steeper sides and are more shallow than pie tins.
- Most tart pans are metal and have fluted sides. The best ones have removable bottoms for easy release of the tart after it’s baked.
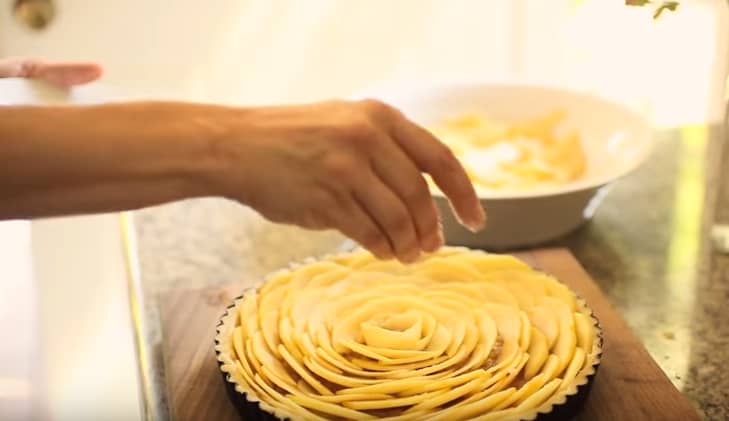
Step 5: Arrange the Apples
The easiest way to decorate an apple tart is to begin at the outer perimeter of the tart, adding the apple slices all around the tin slightly overlapping the apples, and assuring they are the same height.
TIP: Make sure your apple slices are the same height. This will add to the beauty of your tart. You can slice off the flat bottom part of the apple slices to make them shorter if need be.
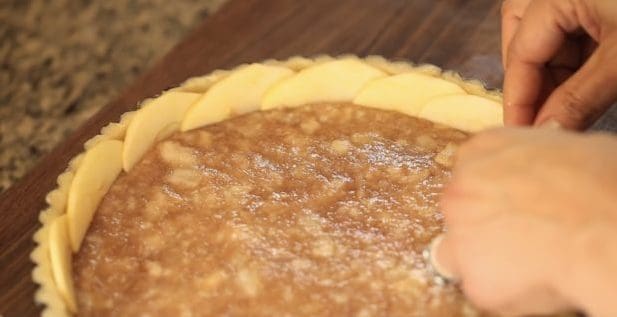
Continue adding apples staggering each row to create a more decorative design.
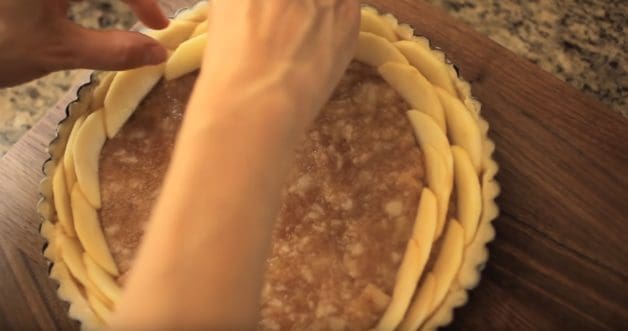
Once you get to the center you’ll have a small hole.
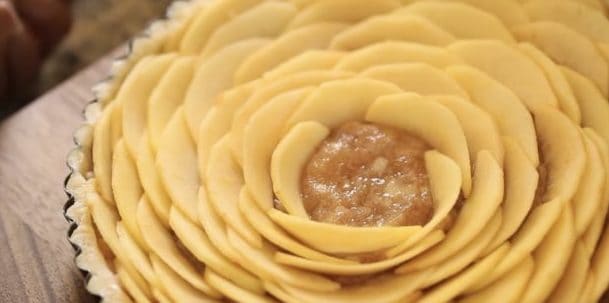
Then fill that hole with 2 paper-thin apple slices, slightly bent, in opposite directions. This will create the illusion of a decorative rose in the center.
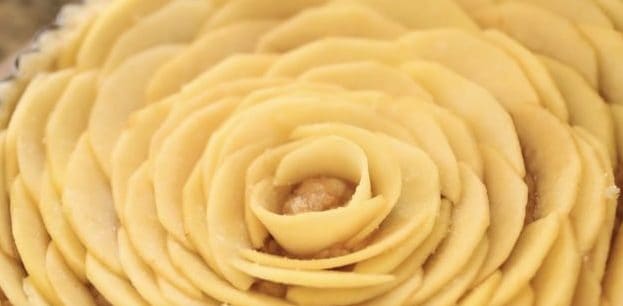
Then sprinkle white sugar on top to caramelize the apples when they bake.
If you are thinking ahead to Christmas morning, you can make a simpler version of this tart with my French Apple Breakfast Pastries. Always wows a crowd!
Step 6: Bake the Apple Tart
- You’ll bake the apple tart at 400F (200C) degrees to begin, this will set the pastry, then reduce to 350F (175C) degrees and continue baking.
- Starting at a higher temperature allows you to skip the “blind baking” step with this tart recipe and prevents your tart shell from shrinking too much. Just remember to reduce the temperature! (full instructions below!)
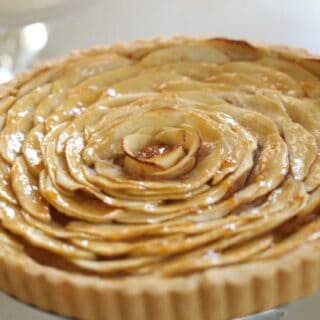
Step 7: Brush The Apple Tart with Jelly
- The mark of a classic French Apple Tart is the shiny topping. This can be achieved by heating apple jelly or apricot jelly in the microwave and then brushing the tart with the liquified jelly after it’s baked.
- I prefer the apricot jelly because I think it adds a nice sweet-tart flavor on top. Just be sure to get the jelly (which is clear and smooth) as opposed to the “jam” which has bits of whole fruit in it and will be too chunky for brushing.

Serving Tips:
It’s best to leave your apple tart out at room temperature before serving. you can serve it with homemade whipped cream or vanilla ice cream.
Can You Freeze The Tart?
Personally, I wouldn’t freeze an apple tart because the apples don’t do so well when thawed out. Instead, freeze the dough and the compote and thaw them in the refrigerator the day before you plan to bake your tart.
How To Make This Tart Ahead of Time
- Make the tart dough 1-3 days before and pop in the fridge OR make it a week before, freeze and thaw overnight in the refrigerator.
- Make the compote the 1-3 days before. Allow to cool and place in the refrigerator
- Make the whipped cream 1 day before and keep refrigerated
- The morning of or the day before, assemble and bake the tart. Allow it to cool in its tin.
- Keep the tart at room temperature loosely covered with foil, tented a bit so the foil doesn’t touch the jelly topping
- Keep the tart in its tin until ready to serve. This will prevent the pastry from drying out
- Moments before serving, transfer the tart to your cake stand and serve with the whipped cream!
More French Desserts!
If You Enjoyed This Recipe
Please Leave a Rating and a Review Below!
French Apple Tart Recipe
Impress your friends and family with this classic French Apple Tart Recipe perfect for entertaining. Much easier than it looks!
Ingredients
FOR CRUST
- 1 ¼ cups flour (150 g)
- 1 tbsp sugar (12 g)
- ¼ tsp salt (1.5 g)
- 1 stick cold unsalted butter, cubed (120 g)
- 1 egg yolk
- 2 tbsp ice water (30 ml)
FOR COMPOTE:
- 3 gala apples, peeled, cored and cut into chunks
- 2 tbsp sugar (25 g)
- ¼ cup of apple juice (60 ml)
- ¼ cup of water (60 ml)
- 1/8 tsp of cinnamon (2 g)
- zest of 1 lemon
FOR TOPPING:
- 2 gala apples, peeled, cored and sliced 1/8 " thin
- ½ tsp of sugar (2 g)
- 2 tbsp apricot jam, heated until liquefied (30 ml)
- juice of ½ a lemon
FOR WHIPPED CREAM:
- 2 cups of heavy cream (480 ml)
- 2 tbsp powdered sugar (13 g)
- 1 tsp vanilla extract (5 ml)
Instructions
- In a bowl of a food processor combine flour, salt, and sugar and pulse until combined. And butter cubes a few at a time, pulsing quickly until dough resembles a coarse meal. Beat the egg together with water. Add egg mixture, slowly, pulsing just until the dough comes together. Turn out onto a floured surface and roll into a ball and then pat down into a disk. Wrap disk in plastic and refrigerate for 30 minutes (or pop in the freezer for 10)
- Meanwhile, place apple chunks, sugar, juice, water cinnamon, and zest in a heavy-bottomed saucepan. Cover and bring to a boil and let cook for 10 mins.
- Simmer uncovered until most of the liquid is evaporated. Mask apples into a paste with a fork. Allow to cool completely, it will thicken as it cools.
- Roll out dough onto a floured surface and fit into a 9" tart pan. Spread a single layer of compote on the bottom, and place in the freezer while you prep your apples.
- Peel, core, and slice apples very thin, about 1/8 " thick. Place in a bowl and squeeze with lemon juice to prevent browning.
- Remove tart from the freezer. When placing the apples the idea is to create an escargot pattern. Starting from the outside and working your way into the center. Layer each apple, cut side down, one slightly overlapping the other, making your way all around the tart until you reach the center.
- Then place two really thin apples in the center, curved and facing each other to form a little "rosette" refer to the video above to see how this is done.
- Then sprinkle the apples with the 1/2 tsp (2.5ml) or sugar.
- Bake at 400F (200 c) for 15 minutes and then reduce heat to 350F (175 c) and bake for 20 more minutes, or until golden brown. Then place under the broiler for 1-2 minutes just until the apples begin to get lightly charred.
- Place the jam in the microwave and heat on high for 15 secs or until melted. Brush tart with jam to create a nice shine. Et voila!
- Serve with vanilla ice cream or a dollop of homemade whipped cream.
- For whipped cream place all ingredients in the bowl of an electric mixer and whip on high until soft peaks form.
Notes
Make sure your compote has completely cooled before doing this or it will melt your chilled pastry.
Starting at the higher temperature allows you to skip the "blind baking" step with this tart and prevents your tart shell from shrinking too much. Just remember to reduce the temperature!
This tart is really best served the day it is made. However, you can prepare the components ahead of time to save on the "day of prep".
Here's the Game Plan.
- Make the tart dough 1-3 days before and pop in the fridge OR make it a week before, freeze and thaw overnight in the refrigerator.
- Make the compote the 1-3 days before. Allow to cool and place in the refrigerator
- Make the whipped cream 1 day before and keep refrigerated
- The morning of or the day before, assemble and bake the tart. Allow it to cool in its tin.
- Keep the tart at room temperature loosely covered with foil, tented a bit so the foil doesn't touch the jelly topping
- Keep the tart in its tin until ready to serve. This will prevent the pastry from drying out
- Moments before serving, transfer the tart to your cake stand and serve with the whipped cream!
Nutrition Information:
Yield: 8 Serving Size: 1Amount Per Serving: Calories: 508Total Fat: 34gSaturated Fat: 21gTrans Fat: 1gUnsaturated Fat: 11gCholesterol: 121mgSodium: 114mgCarbohydrates: 48gFiber: 4gSugar: 27gProtein: 5g

What do you suggest in place of a food processor for the crust? My 40 year old cuisinart just died. Thank you
Ahh yes, well you go pivot to this recipe, which is very similar but doesn’t need a food processor, or just use the crust recipe and technique with the Apple Tart Recipe. I hope you enjoy!
Your directions were AWESOME!! Love the steps for make ahead…so helpful.
I’ve made this twice….My takes 30 minutes at 350….I don’t know why?? Looks
beautiful. My crust wasn’t getting done of nothing was golden brown at 350…
any suggestions??? I know all ovens are different. Thanks Beth!! Susan
So glad to hear it! Sounds like you might need an oven thermometer, they are super helpful for making sure your oven runs at temperature! 🙂 You’d be surprised how off they can be.
Love to make the apple galette it’s always a crowd favorite though I make it on a 16″ pizza pan to serve a large group.
Oh wow love that idea!! Nice one!
Hi Beth!!! I’ve always loved baking, and taught my girls how to bake. The thought of making this one day thrills me! I will let you know how it turns out.
Hi Beth! I’ve made and loved this recipe for years now. It will probably always be my party trick for a dessert with instant wow power. I need to make an eggless version — what substitute do you recommend I use for the crust? I know flaxseed egg is common but I worry it’ll mess with the texture. Thanks!
Ah Ok you could leave the egg out and just use 1 tablespoon more of ice water to bring it together. Most tart shells don’t use the egg, I use it so the crust is a bit more crisp and stable, but it will still work without the egg. So glad to hear it has been such a hit!
Wonderful! Thanks for this. I’ll give it a go 🙂
Can you let us know what size tart pan you use? I couldn’t find that info anywhere. Thanks!
Oh sure it’s a 9″ pan. Thanks for pointing the omission out I’ll update that ASAP!
Hi – I’m new to tart baking… How do you remove the tart from the pan? Do you grease and flour the tart pan?
Actually, the best way to make a flawless tart is to use a non-stick removable bottom tart tin, that’s how they glide right out. Otherwise, it would be hard to remove it, even with greasing and flouring because of the fluting.
Hi hi, Im going to try it this weekend. For the sliced apples, do i need to put them in salt water to prevent it from turning brown? Also, is it a must to brush the tart with jam? Thanks a million
Great! Hope you enjoy it. Do not put the apples n saltwater or they will absorb the flavor of the salt and make your tart too salty. There’s no need to prevent them from browning if it’s the last thing you do before placing them in the oven, they will brown a bit as they bake too. I do think the jam is a must for a shiny color and sweet finish, otherwise, the tart can also appear a bit too dry without it. You don’t need to put much, just a light coating. Hope you enjoy it!
Super easy recipe to follow. It’s cooling down and can’t wait to slice it! My tart tin was 11” so I did 1.5 recipe and it worked just fine.
So good to know! I’m glad it was enough 🙂 Hope you enjoy it as much as we do at our house 🙂
This looks delicious. Thanks for sharing. I’d like to ask you if you’ve ever tried combing marzipan/almond paste with the apple tart? I love the combination in cakes but not sure how it would come out in a tart? Please share if you could suggest if this variation could work?
Oh sure you could do that too! I have a version of that with Pear, so you could follow my Pear Tart recipe and use Apple if you prefer 🙂 Hope you enjoy!
I’ve made this in a larger tart pan and it was a hit! Do you think it would be possible to make mini individual tarts with the same recipe/oven temp/baking time?
Sure you could make probably (4-5) 4″ tarts with this recipe, the baking time may vary though since they are smaller. I would start at 20 minutes and then keep checking them every 5 mins or so until done. Hope you enjoy!
I made this and it was equally delicious and beautiful! I was able to stretch the crust just enough to fit a 12 inch tart pan, although the outer crust was shallow and it was a thinner tart than the recipe intended. Still turned out great!
YAY! I’m so glad to hear that! This is one of my favorite tarts too!:)
Hi! I’m excited to make this and wondered if it can be made with puff pastry, please? If so, would it need tweaking at all? Thanks very much!
Oh sure you could do that too! it would be similar to this recipe with the pear 🙂
This is my first time in baking. I am very satisfied with my apple pie. I followed all your steps. I also watched your video. It is very helpful. I can’t wait to bake my next cake. Thank you!
Tried this recipe and I am not much of a baker. Easy to follow instructions and it turned out beautiful and tasted amazing. I will definitely make it again. Cutting and arranging the apples is the hardest part!
Absolutely amazing! This is my new go-to dessert recipe. It’s delicious, gorgeous and unbelievably simple to make. I like to make the crust and compote the night before then assemble and bake the next day. Bakes up beautifully as everything is really cold. I use Calvados instead of apple juice – never have apple juice on hand.
Very delicious! My wife and son loved it!
YAY! So glad it was such a hit! 🙂
So happy to find this recipe as I no longer have the cookery book I used to use for French apple tart. It is practically identical, although I think my original recipe had an egg yolk in the compote. I may be imagining that! Anyway, i was thrilled with the result and was proud to give some to my French neighbours.
Aww I’m so glad it was such a hit! 🙂 Your French neighbors must have been very impressed! 🙂
It’s so good. My 3 daughters love it very much. Thank you.
So glad to hear it! Yay!
Can the compote be made ahead of time?
Oh yes of course. That’s a great idea! At least 2 days before 🙂
Can the dough be made ahead and refrigerated for a day or two?
Also I could only find am 11 inch tart pan will this be enough dough?
Ah yes you’ll just make it 🙂
Oh sure no prob!
Hi, have just found you and love the videos and recipes. Is this apple tart good for freezing?
So glad you found me! Welcome! I wouldn’t freeze the whole tart but rather freeze the dough and the compote and then assemble and bake when needed. I think freezing the whole tart might make it too soggy when thawed. Hope you enjoy!
Just FYI (and you dont need to approve this comment) 🙂 But there’s sugar in the ingredient list for the compote but it’s not listed in the directions. No biggie…just making sure you knew!
Oh so sorry about that! Thank you for letting me know, I’ll fix that ASAP! 🙂 Happy Baking!
Same with the juice of 1/2 a lemon for the topping. But either way still very delicious! 🙂
I’m making this today and I’m so excited to see how it turns out! I love your video too!! Such a help 🙂
I’m making this today and I’m so excited to see how t turns out! I love your video too!! Such a help 🙂