Hummus and Pita
SHARE THIS RECIPE!


This homemade hummus and pita recipe is a fantastic, appetizer recipe for any occasion! It comes together in minutes and once you try homemade hummus, you will never buy store-bought again! It’s that good!
The texture is creamier, the flavor is so much better, and when paired with some warm, freshly grilled pita bread, it will disappear in minutes! For a wonderful springtime twist on this recipe try my Beet Hummus and Veggie Platter Recipe.
It’s a make ahead appetizer idea that just needs to be served as soon as guests arrive! For more make-ahead appetizer ideas, try my Honey Roasted Cashews or Green Goddess Dip.
Would you like to save this?
Why You Will Love This?
- Homemade hummus dip takes just a few ingredients and a food processor to get restaurant-quality results!
- It’s so much better than store-bought in every way! The texture, the creaminess, the silky, smooth consistency.
- The flavor is more pronounced too! Garlicky, lemony with the smokiness of cumin.
- Oh, and it’s just SO easy too!
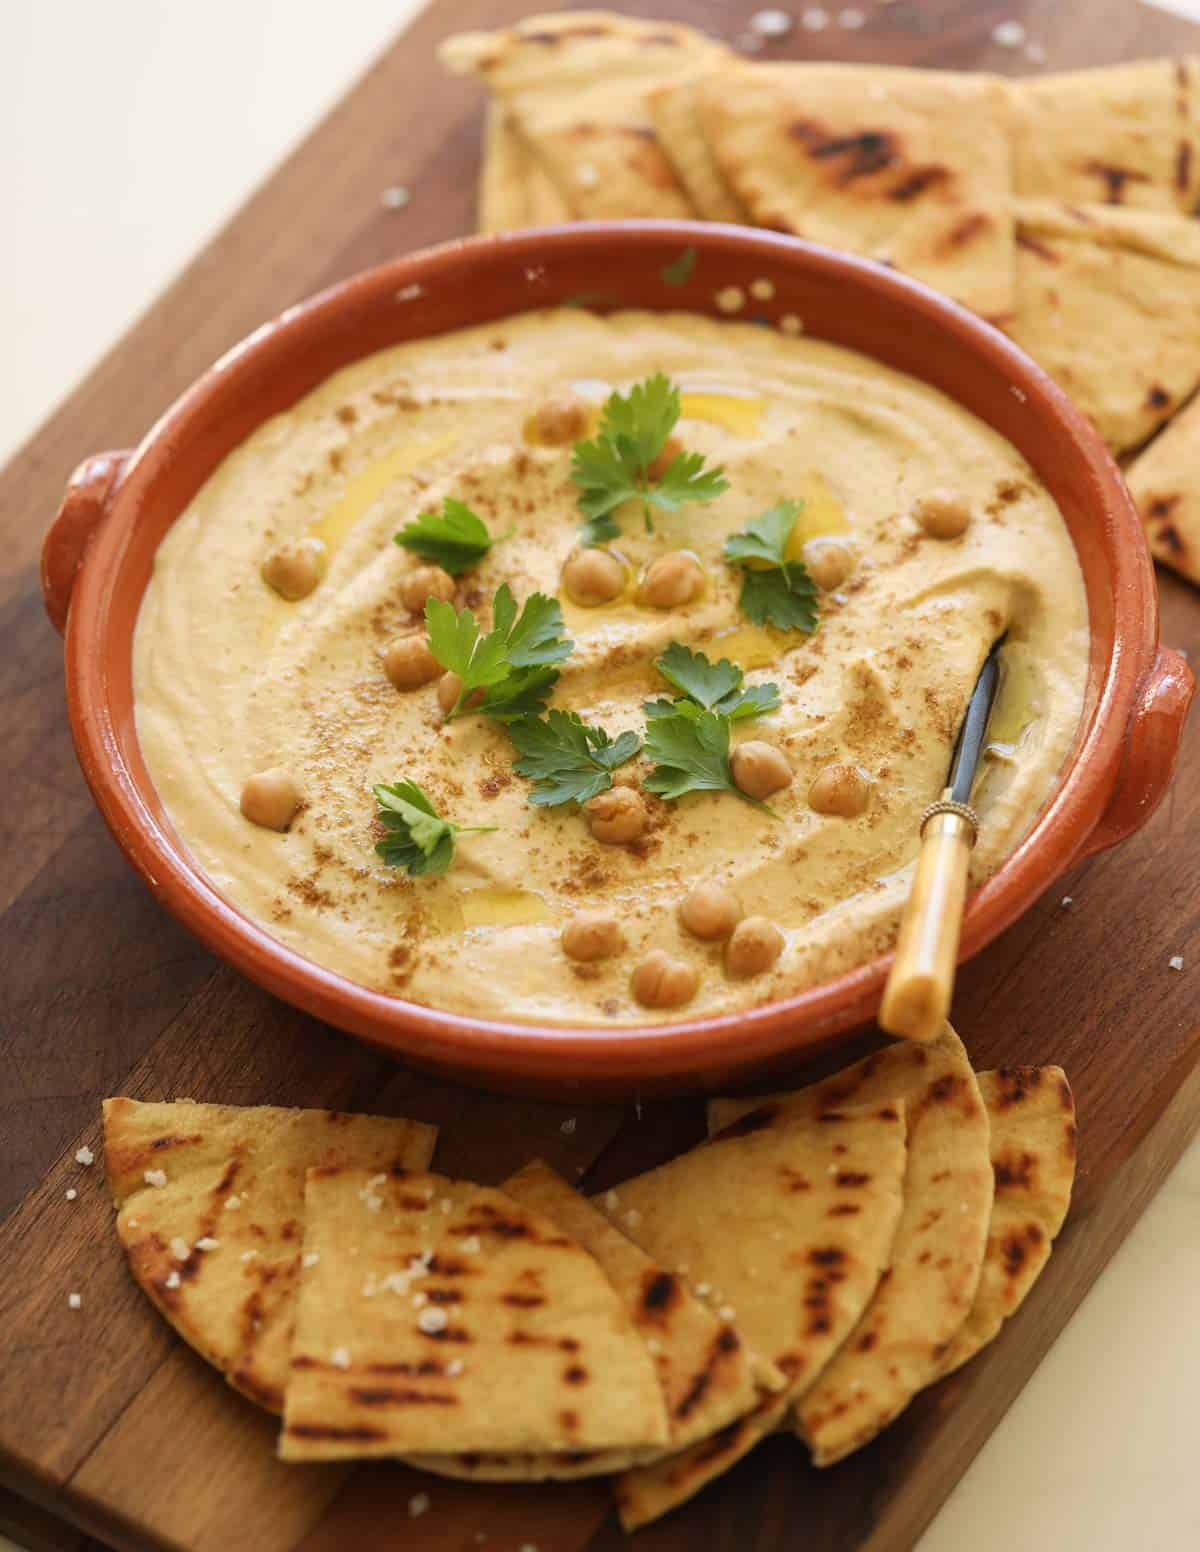
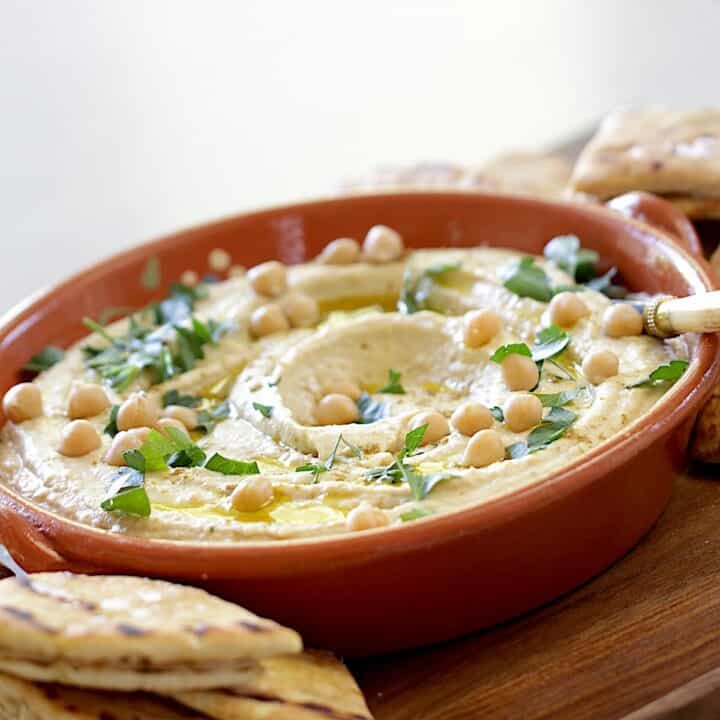
Save a Few Beans for the Garnish
- Homemade hummus always looks pretty when garnished with fresh parsley, olive oil, and a few stray beans on top.
- Remember to reserve about 1 tablespoon for this purpose before blending them up in the food processor because, after that, there’s no turning back!
Ingredients:
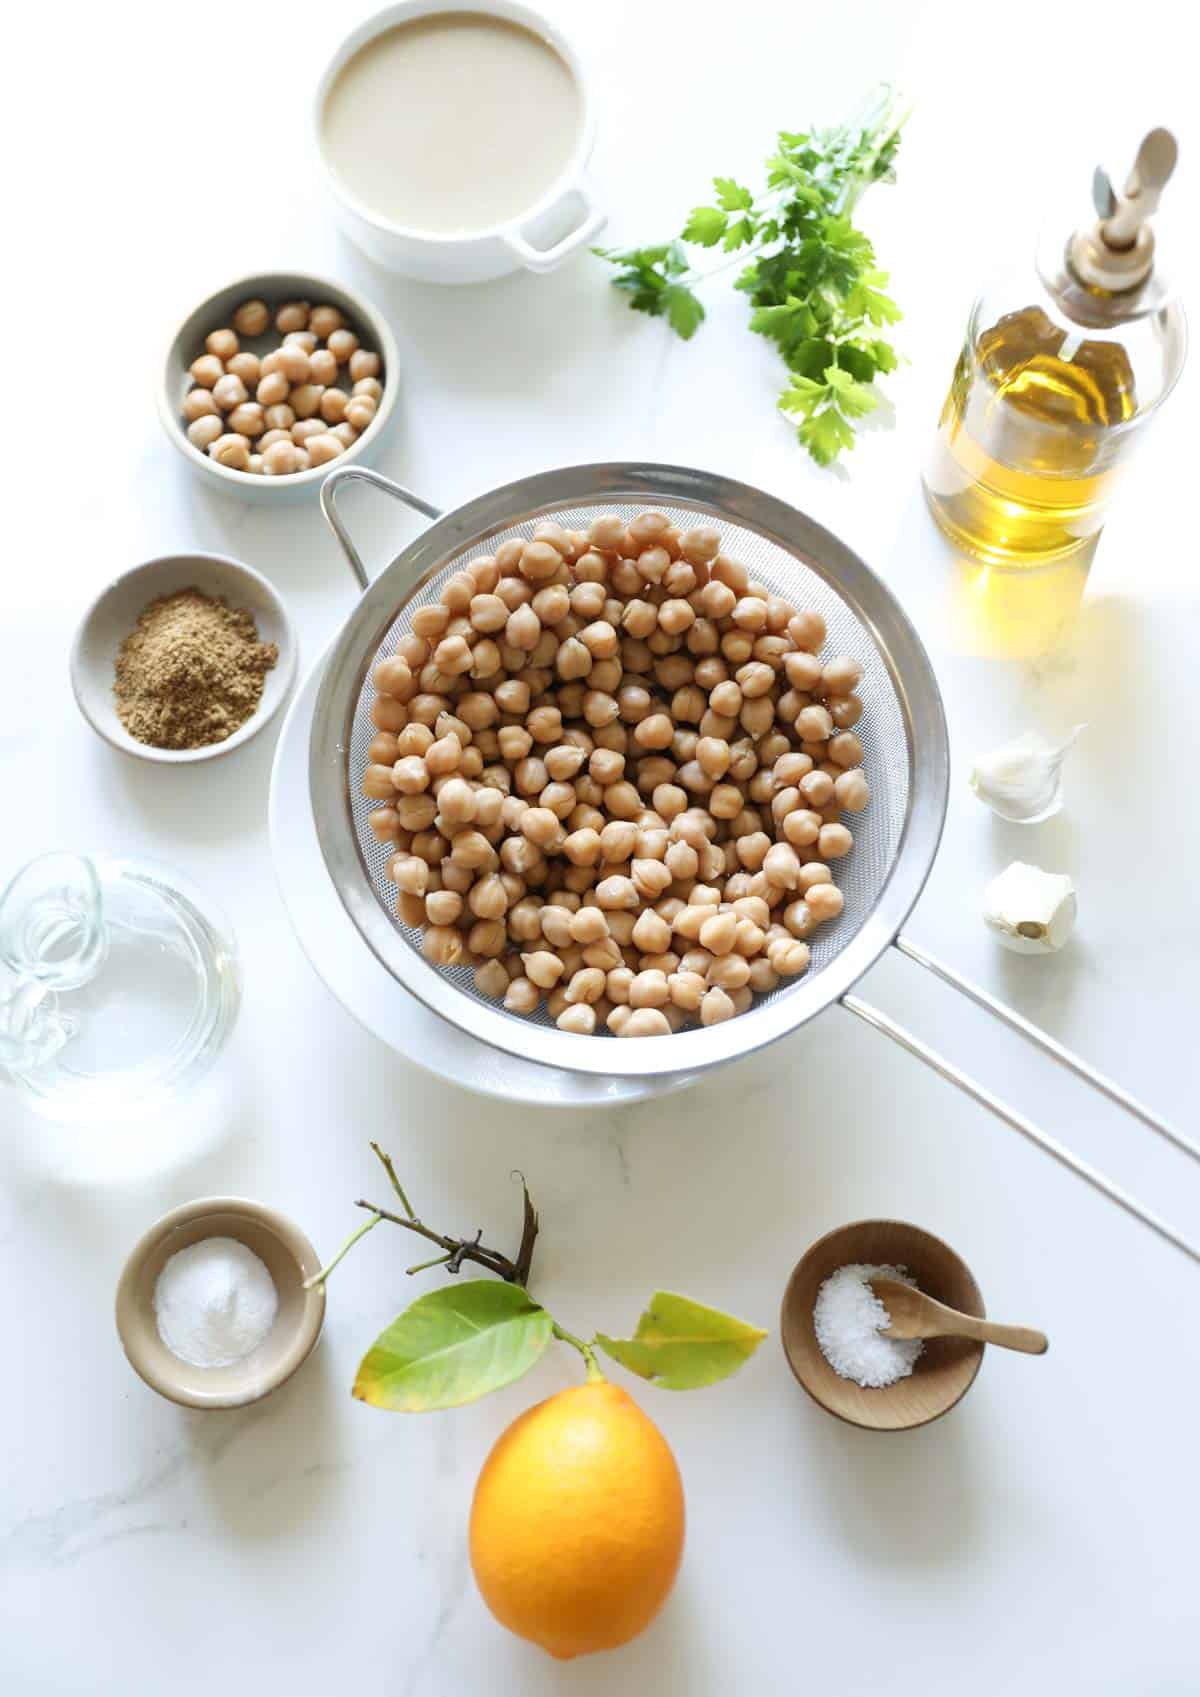
- Canned Garbanzo Beans Be sure to drain and rinse them before using!
- Baking Soda This is the secret ingredient for the creamiest, smoothest hummus! See note below!
- Tahini Paste Personally, I think hummus is best with a little tahini in it. It adds to the creamy texture. If you find that you have tried to make hummus at home before and your hummus was not creamy, chances are it didn’t have tahini paste in it. It’s sold next to the peanut butter in most U.S. grocery stores.
- Garlic This really can be “to taste” start with two cloves and feel free to add more if you like.
- Lemon Juice This is also to taste. I like to start with 1/4 cup and add more as needed.
- Ground Cumin Will give your homemade hummus a nice smoky, earthy taste. Cumin is also great when added to marinades like my Carne Asada marinade or my Slow Cooker Beef Tacos.
- Salt To punch up all the favors
- Olive Oil Will provide flavor but also create a nice emulsion, giving your hummus a whipped, creamy texture.
- Fresh Parsley I use the fresh parsley as a garnish, but you could also add toasted pine nuts, or roasted tomatoes or paprika too.
Step#1: Rinse the Garbanzo Beans Before Simmering
- Be sure to rinse the garbanzo beans before using them! I cannot stress this enough.
- They have been sitting in water and sometimes have a weird sliminess to them. So it’s always best to give them a good rinse!
- You could use dried garbanzo beans, but I find that process takes too much time, unless you are willing to plan ahead!
- But here’s the best way to get your canned garbanzo beans to have the best texture, simmer them in water with baking soda before blending them.
What Does Baking Soda do to Chickpeas When Making Hummus
- For the creamiest hummus texture I now add 1/2 teaspoon to every can of chickpeas I use when making hummus.
- I learned this trick after seeing this article by Bon Appetit Magazine in reviewing the World of Israeli Cookbook by Michael Solomonov.
- It really does make all the difference! Apparently, it raises the pH in the water which breaks down the chickpeas and makes them nice and tender.
- It also helps softens the garbanzo bean skins which can be a bit coarse, and lead to chunkier hummus if you skip the baking soda step.
- But if you really don’t have time for the simmering and baking soda trick, watch my video demo below in the recipe card, to see how you can make homemade hummus without it.
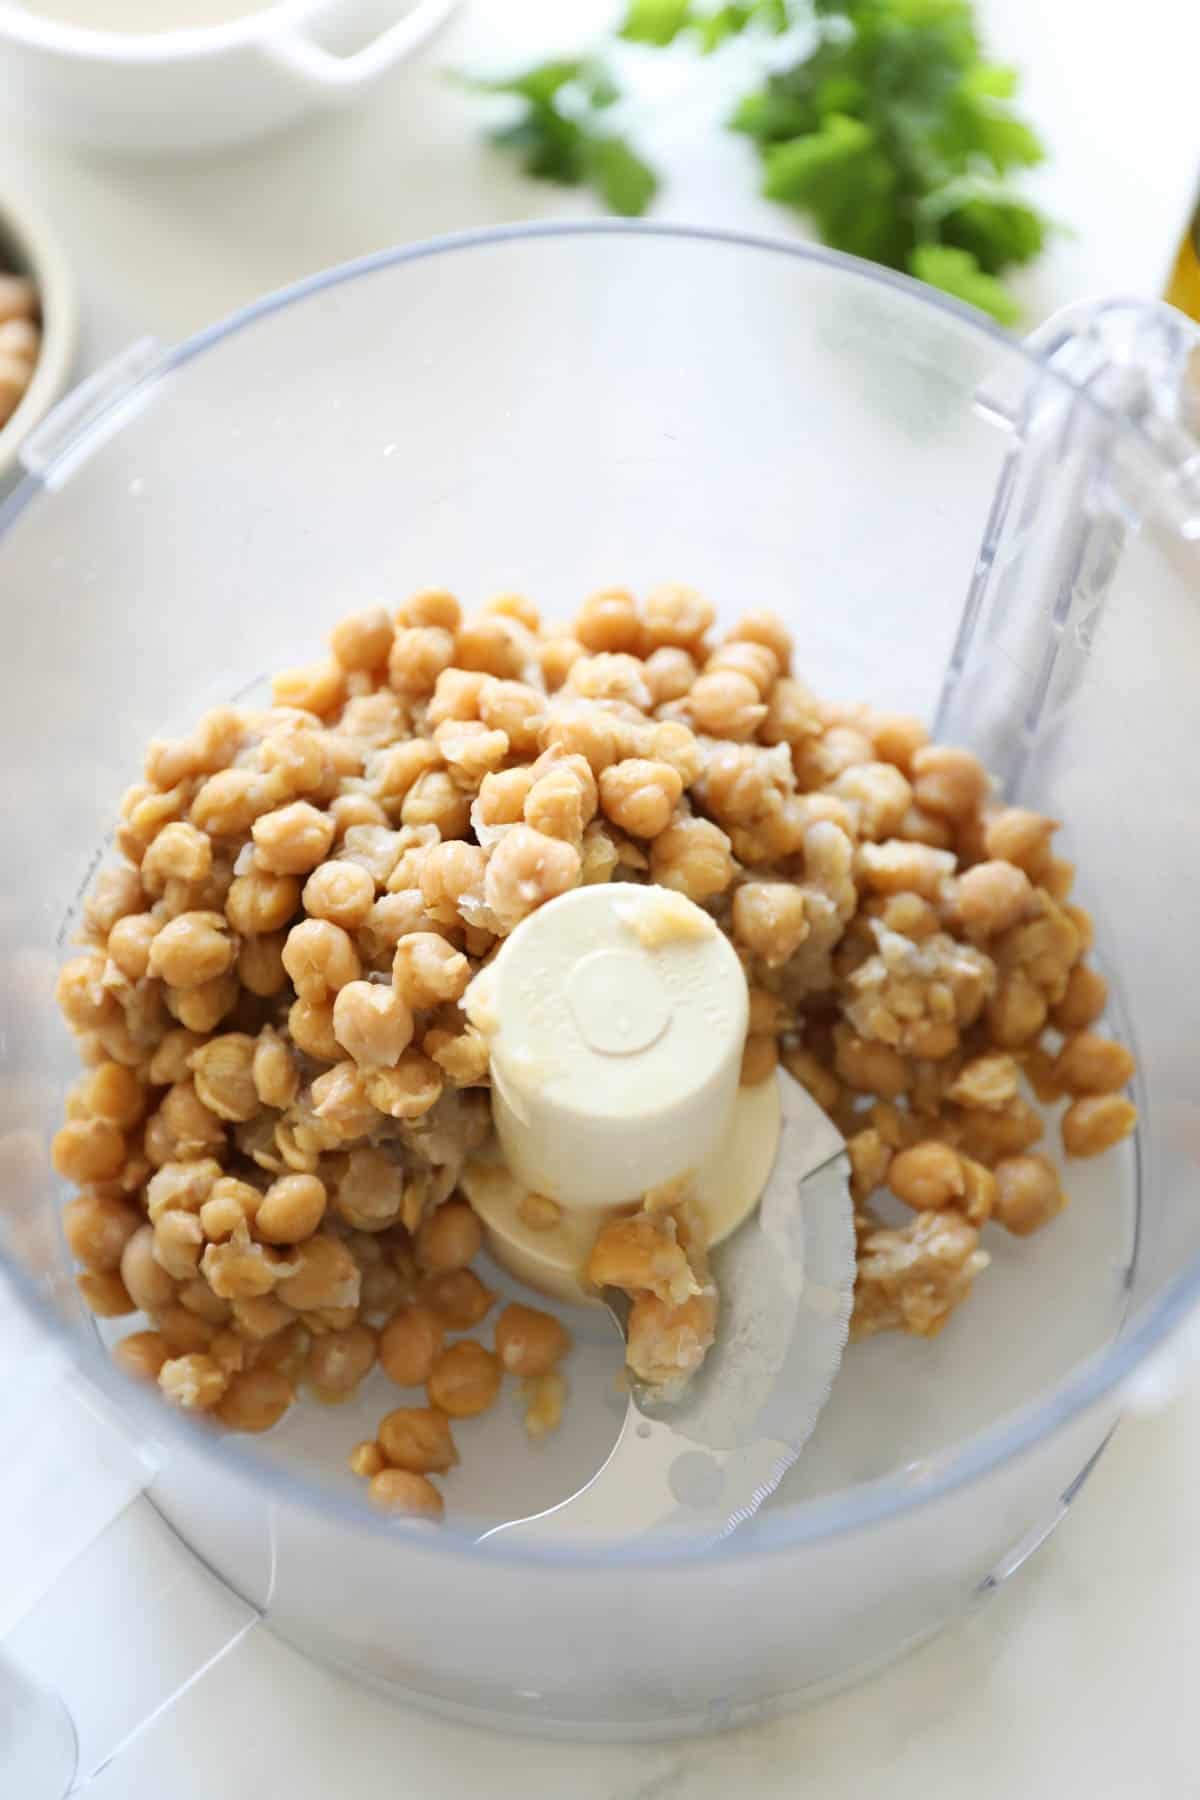
Step#2: Process the Beans
- The easy thing about making homemade hummus is the fact that it can all be mixed up in the food processor.
- But it’s best to do it in stages. The first stage involves processing the beans with the water first until you get a smooth paste.
Step#3: Add the Flavor
- Then you’ll add the tahini, lemon, garlic, and cumin. Don’t skip the tahini!
- It’s worth seeking out for the smoothness it provides. And nowadays Tahini is so widely available.
- They even sell it at Trader Joe’s. At most major supermarkets they sell it next to the nut butters.
Step#4: Slowly Add the Olive Oil
- The final step is to add the olive oil, slowly, like salad dressing.
- It’s essentially the same concept of making an “emulsion” that incorporates the oil slowly to ensure it not only combines but also creates a slight volume to the mixture.
Step#5: The Garnish
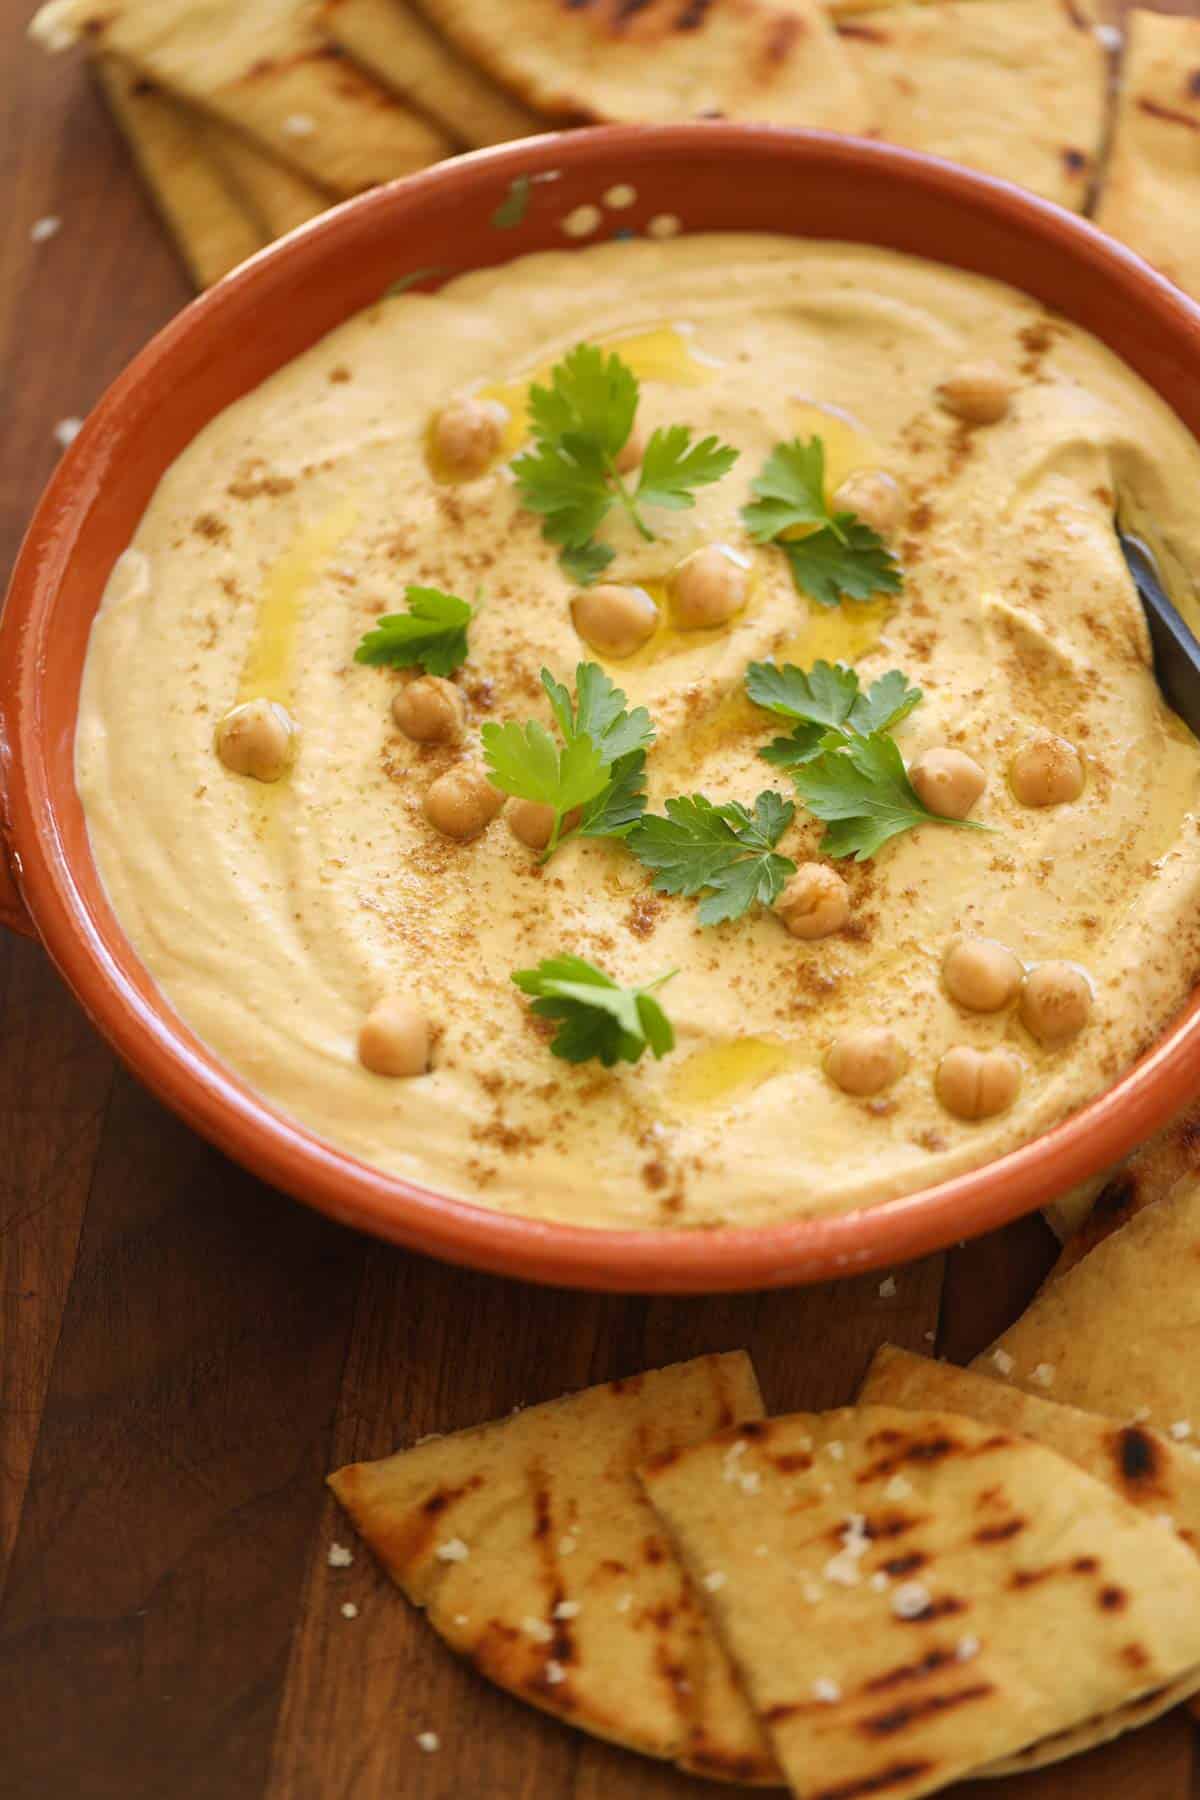
Once your hummus is smooth and creamy, transfer it to a shallow bowl, and add a drizzle of olive oil. This will create pools for your other garnishes to rest upon. And it tastes great too!
Serving Tips:
- You can serve some grilled flatbreads with your hummus, brushed with olive oil, and sprinkled with sea salt, which is my favorite way to enjoy this recipe!
- It’s completely worth the extra effort to grill the pita first.
- The pita ends up warm and chewy, with crispy edges and the extra kick of the sea salt is so good!
- It’s also great as a side dish to my Grilled Chicken Recipe or my Lemony Chicken Brochette Recipe.
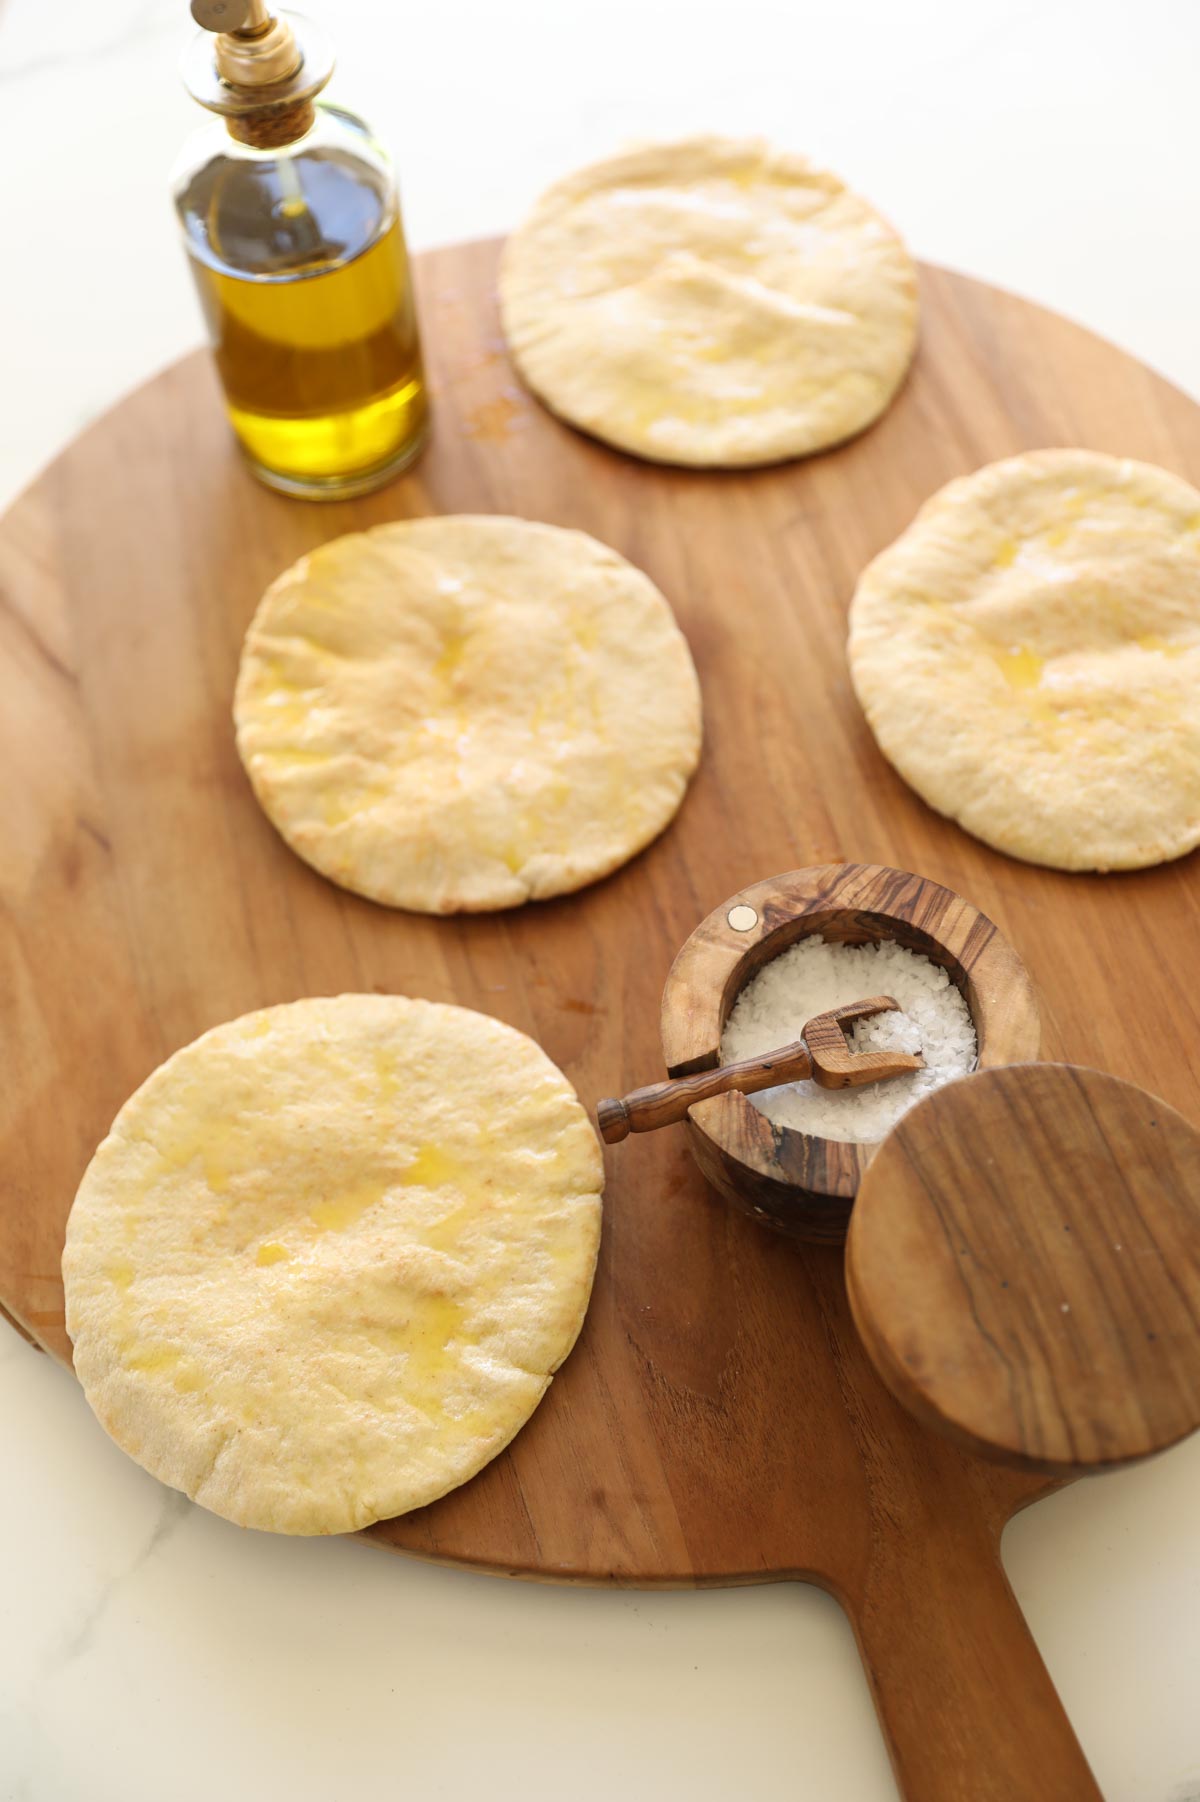
What Type of Pita Works Best?
- Buy the more “artisan” pita typically sold in the store’s bakery section (as opposed to the bread aisle) it’s softer and a bit puffier.
- It grills up so well! Then slice it into quarters and sprinkle it with sea salt. Or you could also serve it with some raw vegetables as well.
- It also can be made hours ahead of time, making it ideal for entertaining. Enjoy!

“Best hummus recipe (and I have tried several dozen), and the claim is true – you will never want to buy in the store again.”
Hummus and Pita Recipe
Hummus and Pita is a classic party appetizer worth mastering! Once you try homemade hummus, you will never buy store-bought hummus again!
Ingredients
- 30 ounces (844 g) of canned chickpeas, drained
- 1 tsp (5 ml) baking soda
- 2/3 cup (160 ml) of tahini
- 1/4 cup (60 ml) freshly squeezed lemon juice
- 2 garlic cloves
- 1 (5 ml) tsp salt
- 2 tsp (10 ml) cumin
- ½ cup (120 ml) of olive oil + 1 tbsp (15 ml) for pita bread
- 2 tbsp (30 ml) of liquid for thinning (lemon juice, water or more olive oil) if needed
- 1 tbsp (15 ml) of Italian Flat Leaf Parsley, roughly chopped
- 1 package of your favorite pita bread
- A sprinkling of fleur de sel sea salt for the pita
Instructions
- Drain and rinse chickpeas. Set aside 1 tablespoon (15 ml) of chickpeas for garnish. And keep the two cans.
- Place the chickpeas in a medium-sized pot, fill the 2 chickpea cans with 2 cans of water. Add the baking soda. Stir and simmer uncovered for 15 minutes.
- Drain the chickpeas and rinse with cold water to remove any baking soda taste. Place them in a food process with the tahini and process until smooth.
- Add lemon juice, garlic, salt and cumin. Pulse until combined and smooth. While the machine is running, slowly add ½ cup (120 ml) of the olive oil.
- Transfer into a serving bowl, drizzle with a little more olive oil, garnish with fresh parsley and sprinkle with cumin.
- Brush pita bread with remaining oil and grill on a grill pan of BBQ, on both sides. Sprinkle with sea slat. Stack the pita and cut into quarters and serve.
- Serve grilled bread with the hummus.
Nutrition Information:
Yield: 4 Serving Size: 1Amount Per Serving: Calories: 746Total Fat: 29gSaturated Fat: 4gUnsaturated Fat: 25gSodium: 1719mgCarbohydrates: 97gFiber: 19gSugar: 11gProtein: 31g

Can I make this hummus the day before……..
Yes of course! In fact it’s even better made ahead since it allows the flavors to marry 🙂 Hope you enjoy!
The best hummus! Beth, your recipes never fail!
YAY! So glad you enjoyed it too! Isn’t it yummy?! You must try this one next, equally good!
Watched your video on this recipe a while back and finally got to make it tonight. I’ve made hummus once before using a different recipe and it doesn’t even compare! Your hummus is a-maz-ing!!! Thanks for sharing!!!
YAY! So glad it was a hit! 🙂