Eggless Chocolate Mousse Recipe
SHARE THIS RECIPE!


My Eggless Chocolate Mousse is as easy as it gets. It’s a cream cheese chocolate mousse made with cocoa powder. There is no cooking involved and no raw eggs! It’s an easy chocolate mousse recipe that the kids and the whole family will love.
If you are looking for dessert recipes that are quick and no-fuss for a weeknight treat, this one is it!
Need a no-bake dessert for a fancy occasion? Try my Summer Berry Cheesecake with No-Bake Filling! Or a no-bake dessert for Thanksgiving? Try my No-Bake Pumpkin Mousse!

Why You’ll Love This:
- When piped into elegant champagne glasses it looks a lot more impressive than it actually is, making it a great recipe for entertaining!
- It’s easy to make ahead of time and then pipe into glasses and place in the refrigerator 2-4 hours ahead of serving
- It’s a delicious and decadent chocolate mousse recipe without raw eggs!
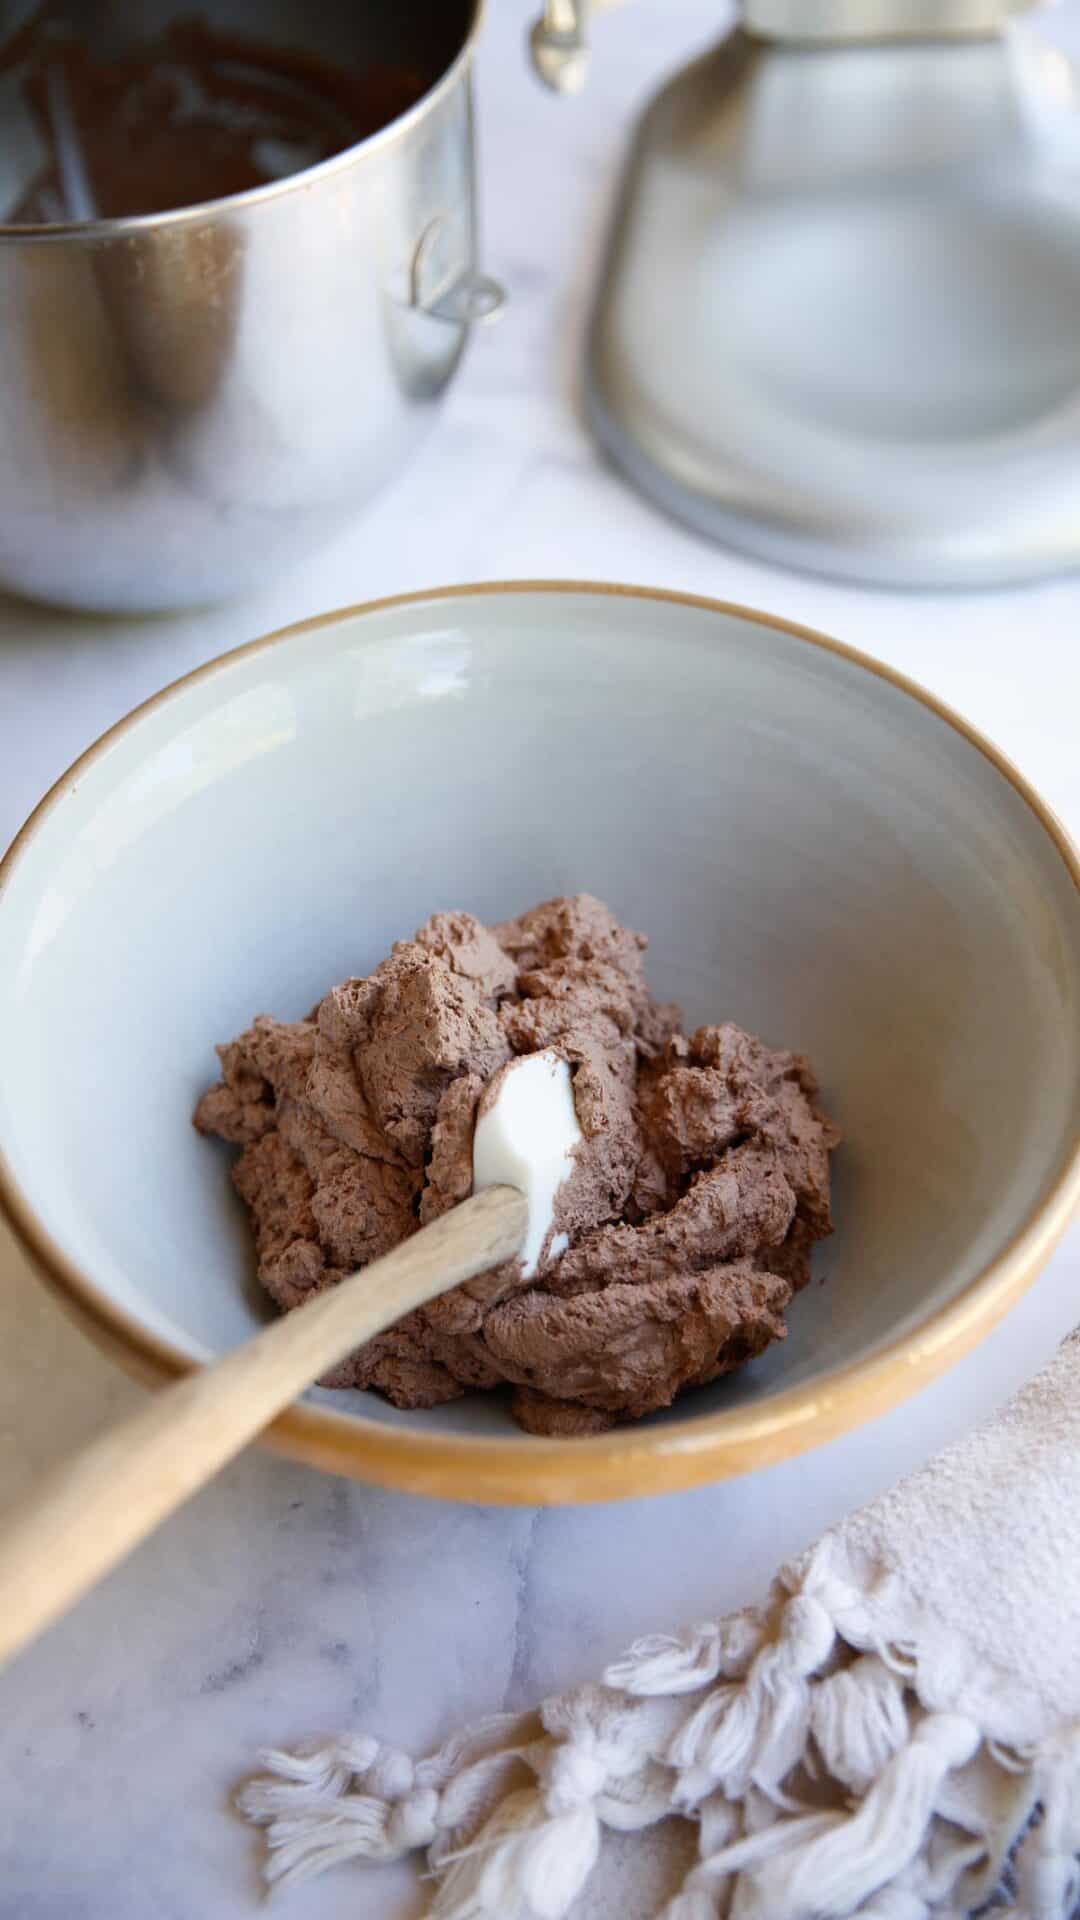
Step#1: Make the Chocolate Whipped Cream
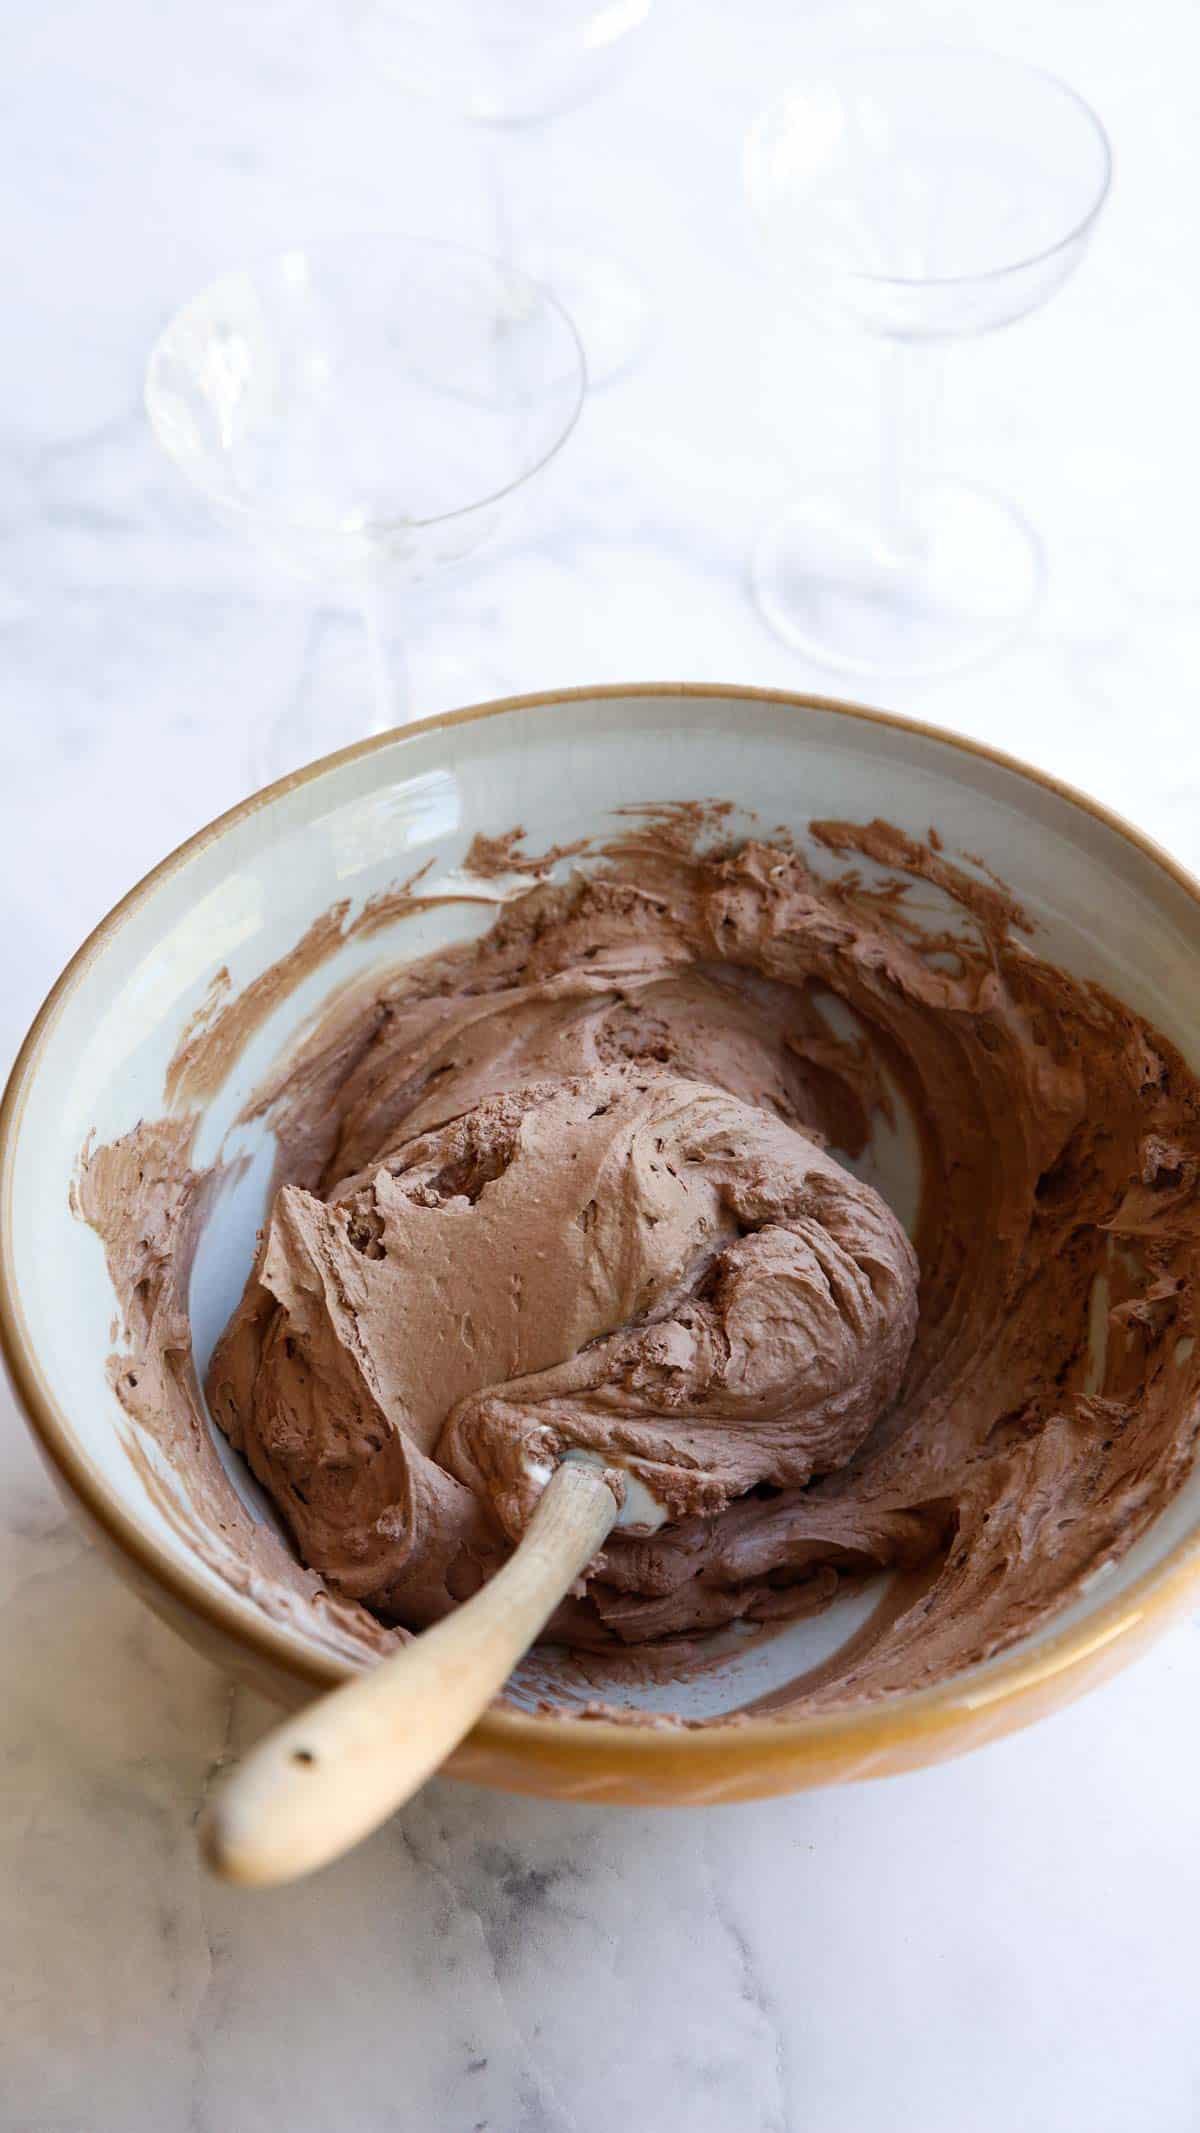
- This recipe is basically a simple process of creating two mixtures and combining them together.
- The first mixture you’ll create is the chocolate whipped cream, which is just heavy cream, powdered sugar, and unsweetened cocoa powder.
- The whipped cream is what will give the mousse its light and airy texture, while the cream cheese will give the mousse its structure.
- It also creates a nice tang to the chocolate mousse making it more of a chocolate cheesecake mousse.
- If you don’t have a stand mixer you can also use a hand mixer too.
- Then you’ll transfer the chocolate whipped cream to a large bowl and set it aside while you make the cream cheese mixture.
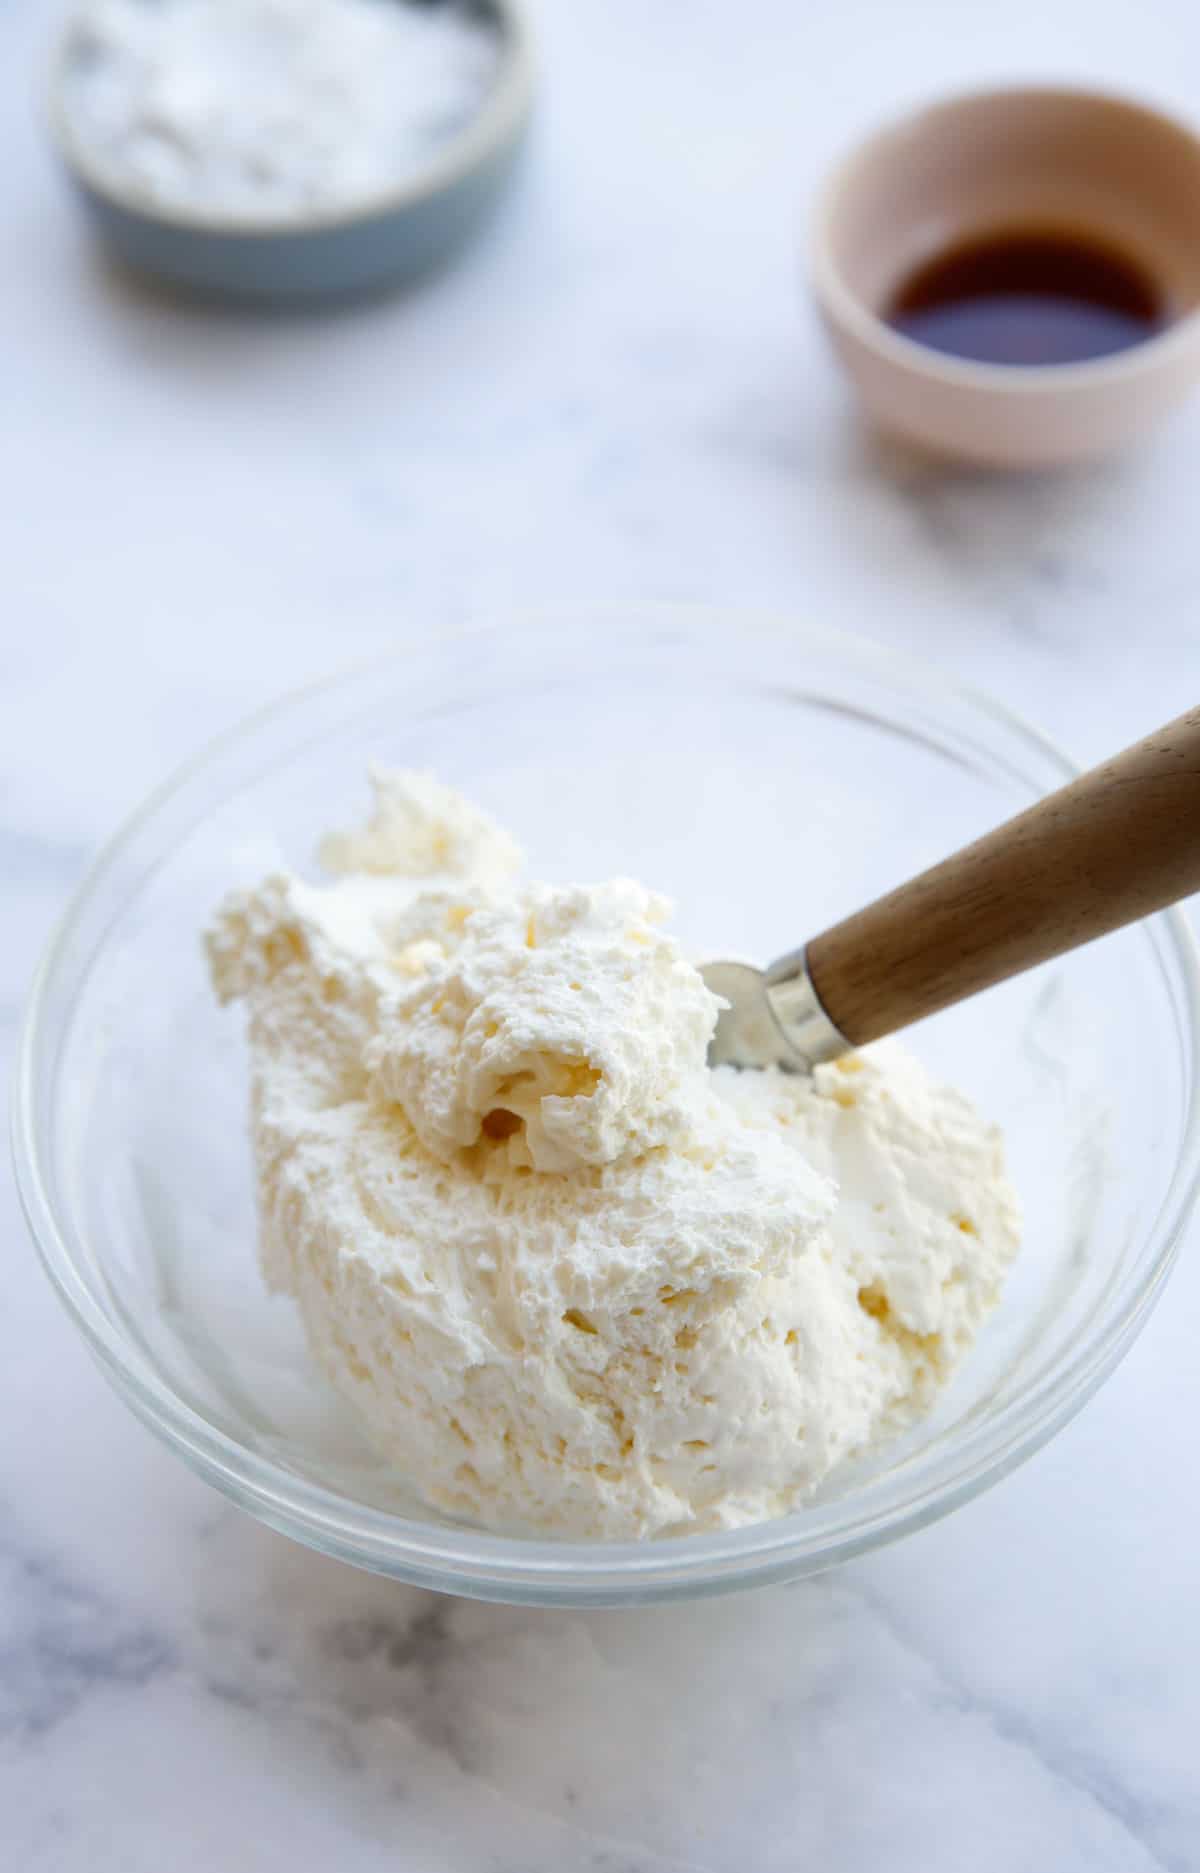
Step#2: Sweeten the Cream Cheese
- Here’s the best part, you don’t even have to clean out the bowl of the mixer.
- Since these two mixtures will ultimately combine into one mixture it doesn’t matter if your bowl is clean or not.
- So I just keep going and add the cream cheese, sugar, and vanilla to the same bowl.
Whipped Cream Cheese vs. Brick Cream Cheese
- I think the whipped cream cheese works a bit better for chocolate mousse because there’s already a lot of air in it already. It’s the cream cheese of choice I use for my Raspberry Cheesecake Recipe, which makes for a creamier and lighter cheesecake too.
- If you can’t find the whipped cream cheese, you can use the brick cream cheese, and just beat the cream cheese a bit longer and scrape down the bowl more frequently.
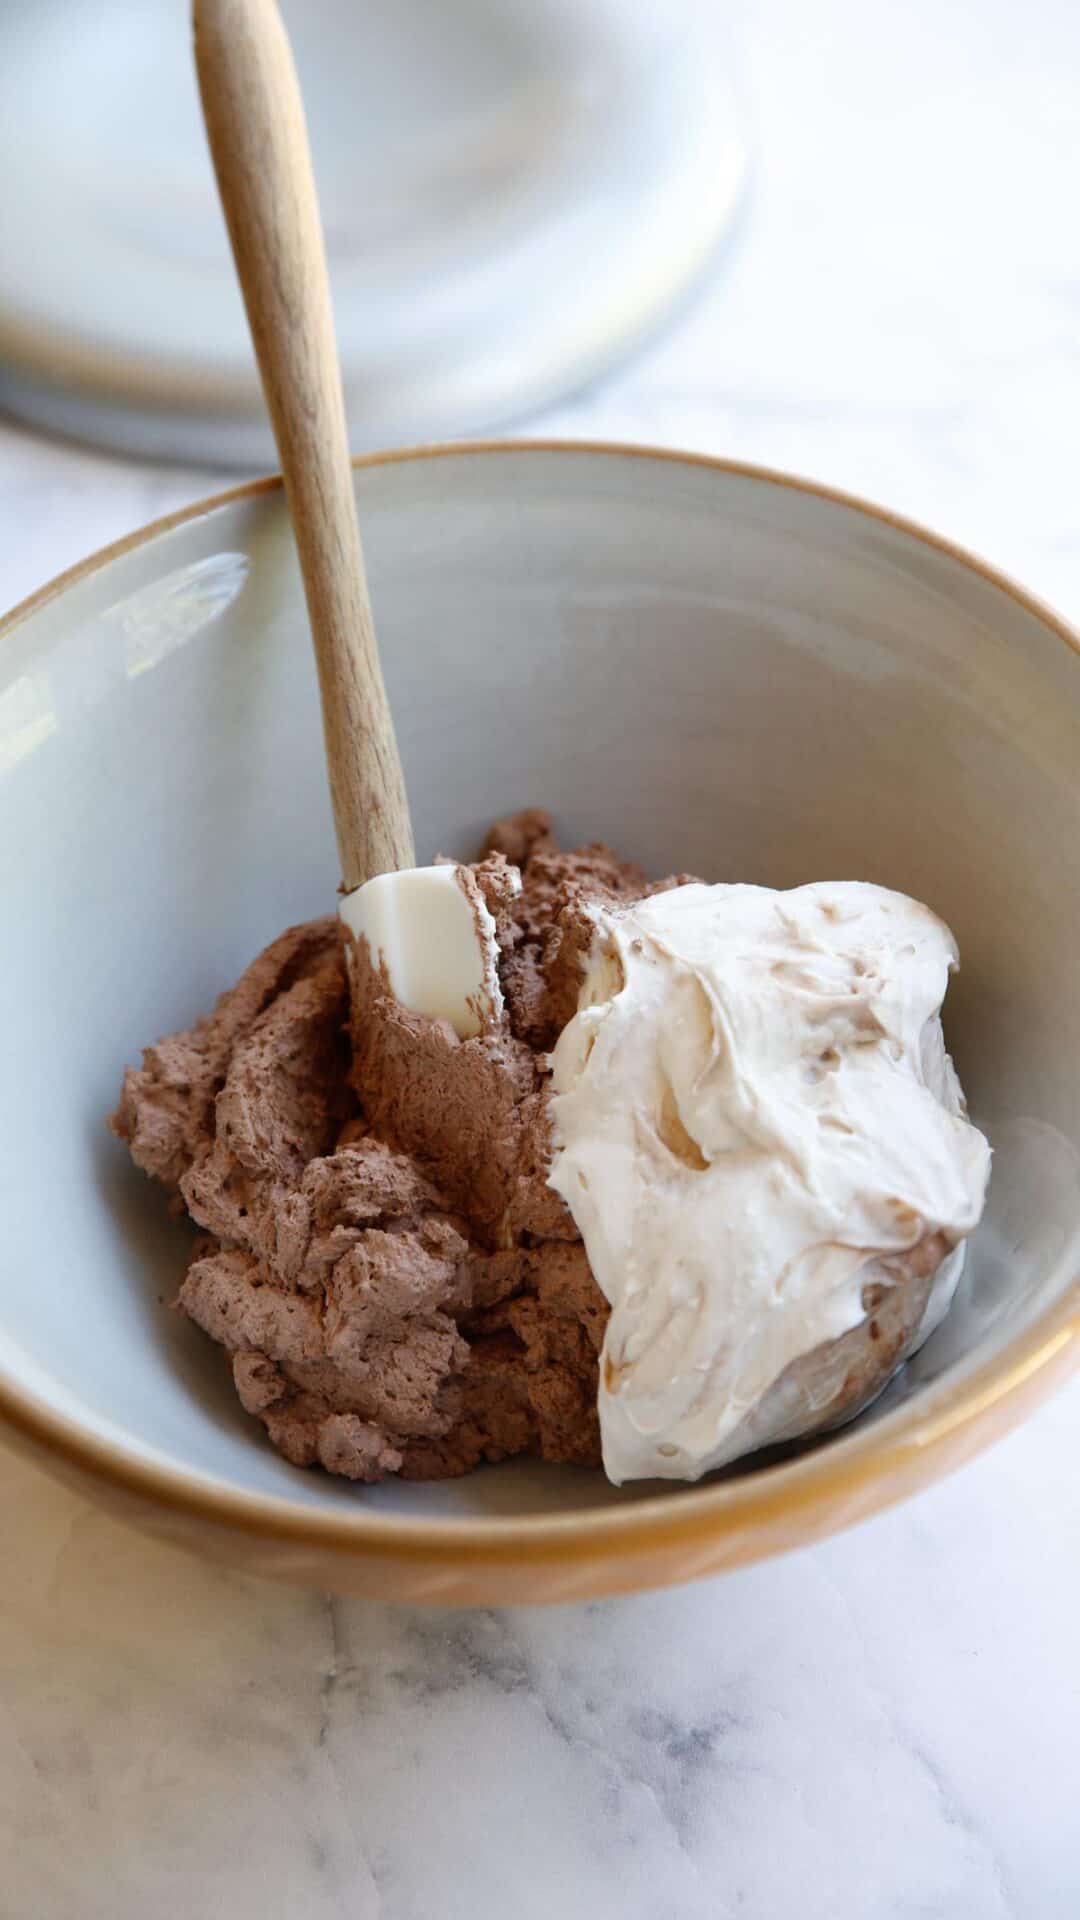
Step#3: Combine the Two Mixtures
- Then you fold the two mixtures together, making sure the cream cheese mixture is being lightened by the whipped cream mixture.
- This is a very similar process to my No-Bake Cheesecake recipe which is a great cheesecake recipe for Easter or Mother’s Day.
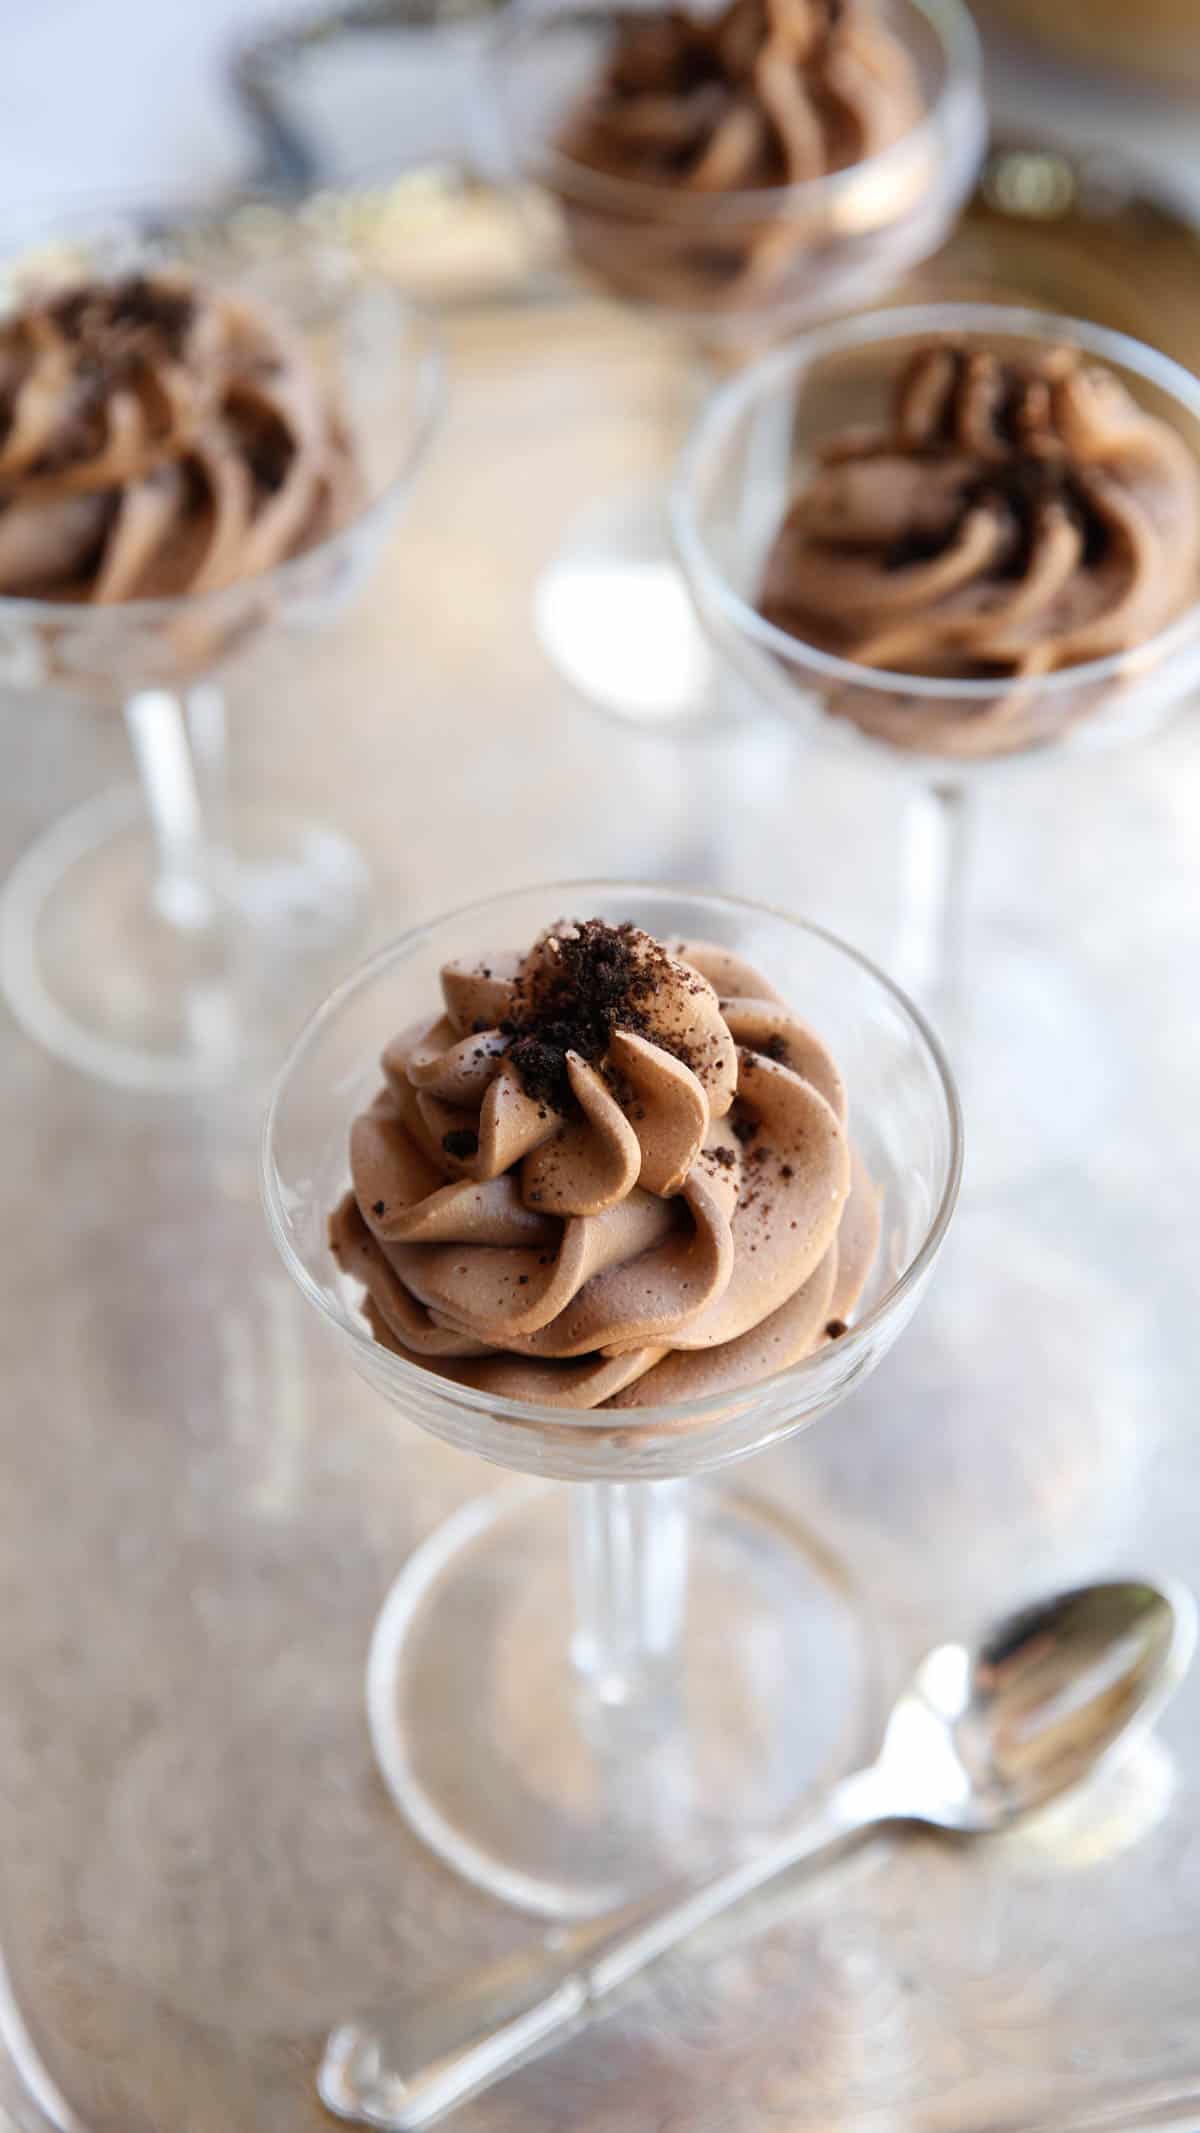
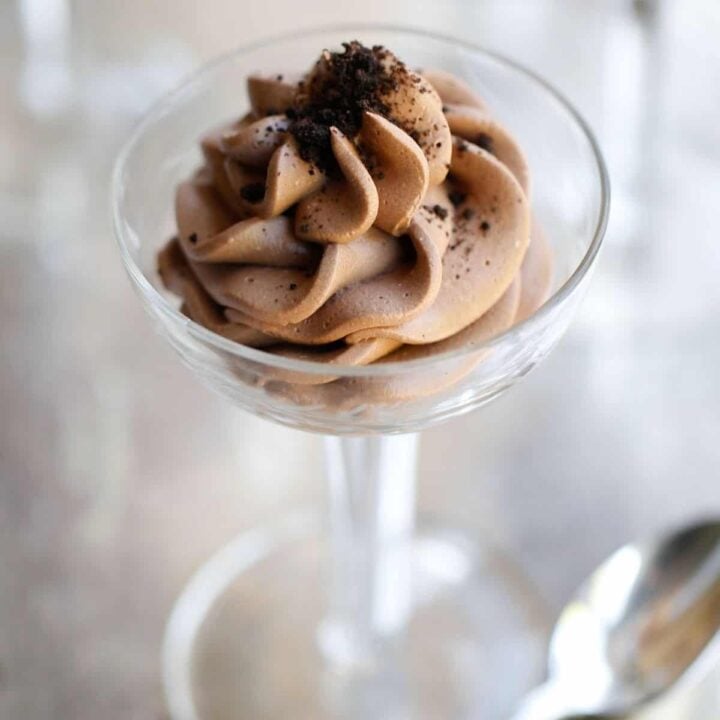
Step#4: Pipe into Glasses
- At this stage, I like to transfer the chocolate mousse into some champagne coupes to create a beautiful, decorative swirl.
- It’s the little detail that makes this easy chocolate mousse recipe feel extra fancy.
- Also, use a pastry bag tip like Wilton’s 2D tip which creates a really nice fancy swirl. Or for a larger swirl, as seen in these photos, I used the largest swirl tip found in this pastry tip kit.
No Champagne Coupes? Try This!
If you don’t have any champagne coupes to serve your chocolate mousse in, you can also use some cute teacups and saucers. That’s another fun way to serve it.
Step#4: Add Crushed Cookies
- Then to add a little texture and crunch on top, I like to sprinkle some crushed chocolate wafers to the top of each chocolate mousse.
- The Famous Chocolate Wafers work the best.
- I also use these as the base of a crust for my Chocolate Peanut Butter recipe, another great chocolate dessert to try!
- This is such a fun, fancy dessert to serve on Valentine’s Day or Mother’s Day or anytime you need a “fancy looking” dessert recipe that’s actually a cinch to make!

Another great recipe for Chocolate Mousse, which requires a few more steps, but is totally worth the effort in my opinion, is my Chocolate Mousse Cake Recipe. This is another delicious way to enjoy chocolate mousse!
More Great Chocolate Recipes!
- Baked Chocolate Donuts
- Flourless Chocolate Cake
- Super Moist Chocolate Cupcake Recipe
- The BEST Vegan Brownies
Eggless Chocolate Mousse
My Eggless Chocolate Mousse is as easy as it gets. It's a cream cheese chocolate mousse made with cocoa powder. There is no cooking involved and no raw eggs!
Ingredients
Mousse:
- 2 cups heavy cream or whipping cream
- ½ cup unsweetened cocoa powder
- 1 cup powdered sugar
- 8 oz whipped cream cheese or regular brick cream cheese will work too
- 1 tsp vanilla
Garnish:
- 5-6 plain chocolate wafer cookies
Instructions
- In an electric mixer whip together the heavy cream, unsweetened cocoa powder and 3/4 cup of the powdered sugar until stiff peaks form.
- Then transfer to a bowl and set aside.
- Then don’t even bother to clean out your mixing bowl. This is what makes this so easy!
- Then beat the cream cheese until soft, slowly add the remaining 1/4 cup of the powdered sugar, in stages, mixing in-between additions. Once combined, add the vanilla and beat to combine.
- Then remove the bowl from your mixer, and fold in the cream cheese mixture into to the chocolate whipped cream mixture, combining the two well.
- Transfer to a pastry bag, fitted with a Wilton 2D tip, and pipe mousse into your serving glasses. Refrigerate until chilled.
- Put cookies into a Ziploc bag and crush with a rolling pin until fine crumbs form. Top each mousse with a sprinkle of crushed cookie crumbs and serve!
Notes
The whipped cream cheese works a bit better for this recipe. It already has a lot of air in it and will prevent your chocolate mousse from having clumps.
It's best if these are made a few hours before serving so that they become well chilled.
If you don't have champagne coupes this mousse can also be served in fancy teacups and saucers.
Nutrition Information:
Yield: 6 Serving Size: 1Amount Per Serving: Calories: 355Total Fat: 26gSaturated Fat: 14gTrans Fat: 0gUnsaturated Fat: 9gCholesterol: 61mgSodium: 321mgCarbohydrates: 28gFiber: 1gSugar: 15gProtein: 5g

Good morning Beth. Could I make this mousse recipe and put in a springform pan with a chocolate crust like your recipe for Chocolate Mousse Cake?
This is such a great question, and to be honest, I have never tried it, but I bet it would work! If you do try it, please report back and let us know how it turned out!
So…you have powdered sugar listed twice? So a total of 1 cup?
Yes exactly 1 cup, used in different places. I just updated the recipe so it reads a bit clearer! I hope you enjoy! 🙂
Can I make this a day or two ahead of time and keep it refrigerated?
Oh sure I would do 1-day ahead for the best results 🙂 Hope you enjoy! 🙂
Oh…my….g…….. this is delicious, here in New Zealand at KFC and Pizza Hut you used to (maybe still do?) be able to get these tiny pottle of chocolate mousse and they so delicious, I accidentally forgot the vanilla in this recipe but it doesn’t matter this mousse takes just like those little pottles. De-lish-ous! I made a batch and put it into an 8” cake tin and hoping it will set overnight so I can put some little whipped cream stars on top and take it to Christmas dinner. Thank you so much!!
Oh wow! I hope it does set? But next time pop you could also pop it in a store-bought chocolate cookie pie crust (or make one from scratch) and that may make it easier to serve 🙂 Hope you enjoy!
This recipe is SO GOOD I made it for my dad’s birthday and he loved it I will definitely be making it again. It is also quick and easy. I definitely recommend this recipe. ❤️❤️❤️❤️
I’m so glad it was such a hit! 🙂
Can this be made without the cream cheese?
Well, you need the cream cheese to give it some body and weight. For another recipe that doesn’t use cream cheese you might like my Chocolate Pot de Creme desserts or salted caramel puddings.
Do I need to make it the same day or 24 hours ahead. I need to make it at least 2-3 days in advance
Hi! I wanted to know if the mouse tastes like cheesecake since there is cream cheese…does it have a cheesecake taste or no?
Yes it does! It has a bit of a tang, like a chocolate cheesecake 🙂 Hope you enjoy!
Ok, thanks so much! I’m going to make this for my moms birthday!
Hi! Do you know how this will do if made a couple of days in advance?
This was great!
So glad to hear it! 🙂
Yum! Great dessert to use with different applications. Love Beth’s recipes.
Made this and it’s amazing. What would you recommend if I want to do a berry flavored one?
Thnx
Do you have to add powdered sugar? Can I use everything but that?
Oh sure you could use regular sugar, but you may taste the graininess. The powdered sugar dissolves a lot better. You’ll need some sugar because the unsweetened cocoa powder is so bitter.
Made this once with a block of cream cheese and I found small clumps of cream cheese. It tasted great and I will def make this again. But I will use whipped cream cheese next time.
Whip the block of cheese 1st
This was everything promised…delicious, easy and impressive. Will make again and again! Thank you for sharing this wonderful recipe.
So glad it was a hit!! 🙂
Hi, can regular cream cheese like philadephia be used? Thanks and well done.
Yes as long as you whip or beat it first!
I’m really excited to find this recipe! I’m making it for Easter dinner, using the mousse to fill dark chocolate cordial cups! Two tiny tastes of chocolate decadence following forty days of denial.
Ha! Oh that sounds like one delicious dessert idea! I hope it was a hit!
Hi Beth, can this recipe be frozen for glazing?
Hmm I’ve actually never tried to freeze it. But I bet it would be OK?
Beth, this was delicious and so easy! I’ve marked it on my favorites tab to use it again (and again)j! Thank you!
YAY! So glad it was a hit!