Beth’s Foolproof Apple Pie Recipe
SHARE THIS RECIPE!

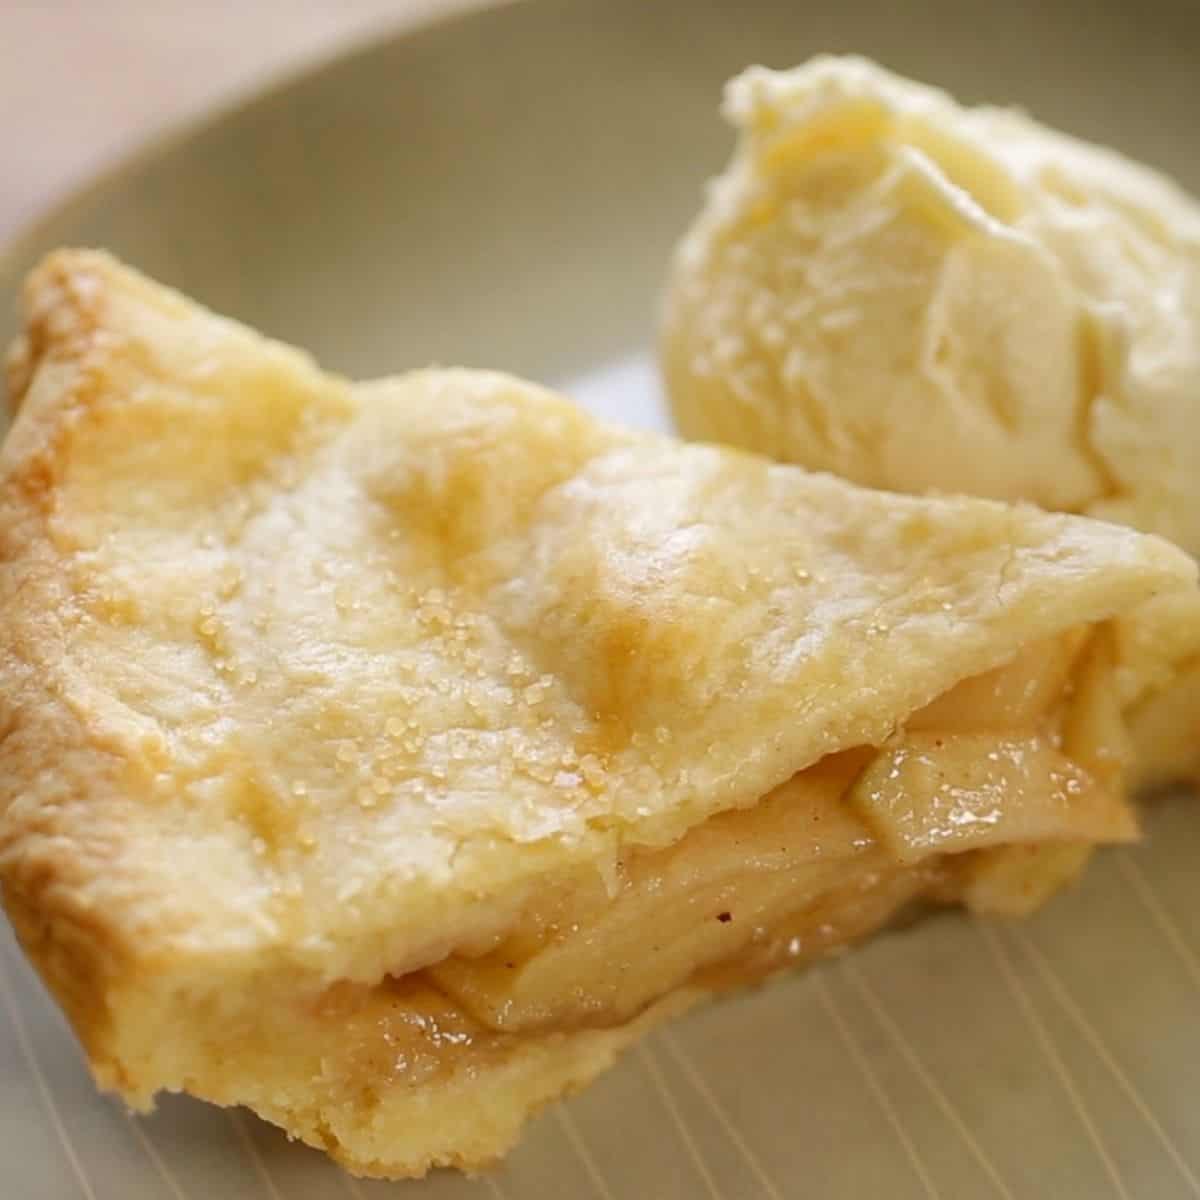
There’s nothing quite like homemade apple pie. At its core apple pie should be simple, but there are so many things that can go wrong with it! From tough crusts to mushy apples, runny centers, and soggy bottoms. Learn how to become a true “pie boss” with my Foolproof Apple Pie Recipe.
If any of these issues have happened to you, then it’s time to hit “reset on your go-to apple pie recipe” and give it a makeover! Seriously, your Apple Pie will be the talk of the table thanks to my Top Ten Apple Pie making tips!
Do you Need to Pre-Bake the Bottom?
- Personally I say no. The pie bakes for so long in the oven the crust will crisp up if you follow a few tips.
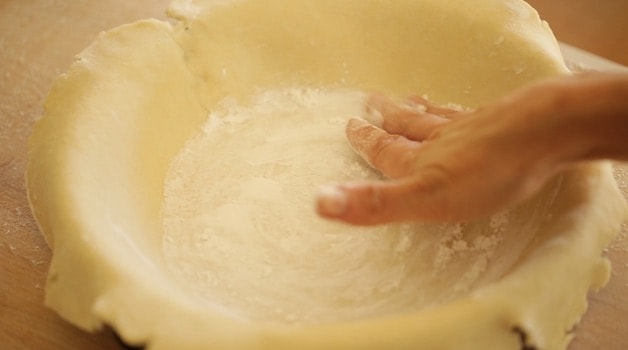
- First use the cornstarch to line the bottom of the crust (see tip below) this will prevent a soggy bottom crust.
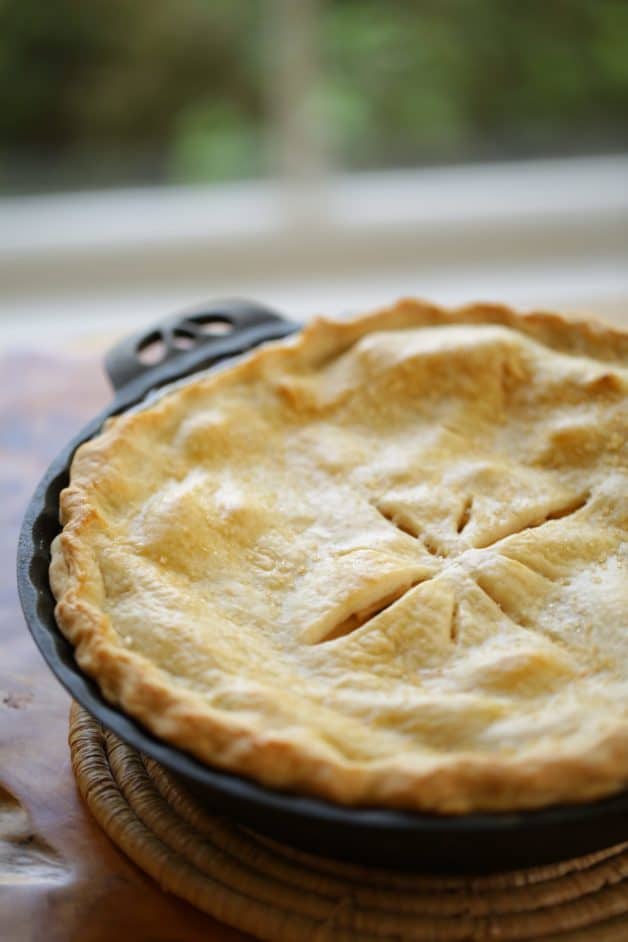
- And use a metal pie dish or cast-iron pie plate which will conduct the heat better and also crisp up the crust.
- I love using this 11″ cast-iron pie plate. There’s something so sweet and homey about it. It also provides even heat for a nice crisp crust!
The Pastry Crust:
- Apple pie can go really right, or really wrong!
- I find it all starts with a great homemade pie crust. But make sure it is well-chilled before it hits the oven.
- This is one of the first tips that are crucial for a well-shaped and flakey pie crust.
- I also prefer a double crust over a lattice crust, because I find the apples stay in the pie better! For a lattice crust pie, try my Cherry Pie Recipe.
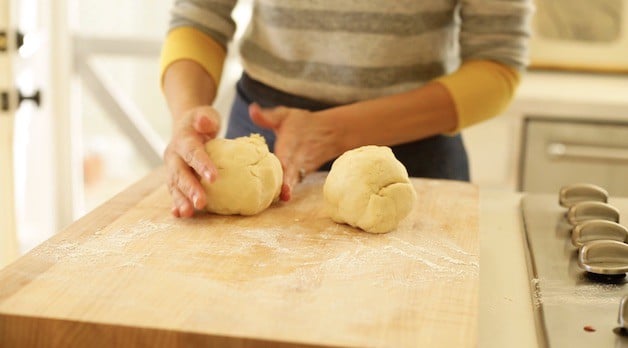
Tip#1: Refrigerate pie dough for at least 3 hours
- After the dough is made, separate it into 2 balls, and wrap it in plastic wrap and place it in the refrigerator.
- The magic number for pie dough refrigeration is really 3 hours, or overnight is even better!
- A well-chilled dough will prevent the dough from shrinking in the oven and becoming too misshapen.
Watch the Video Demo Below
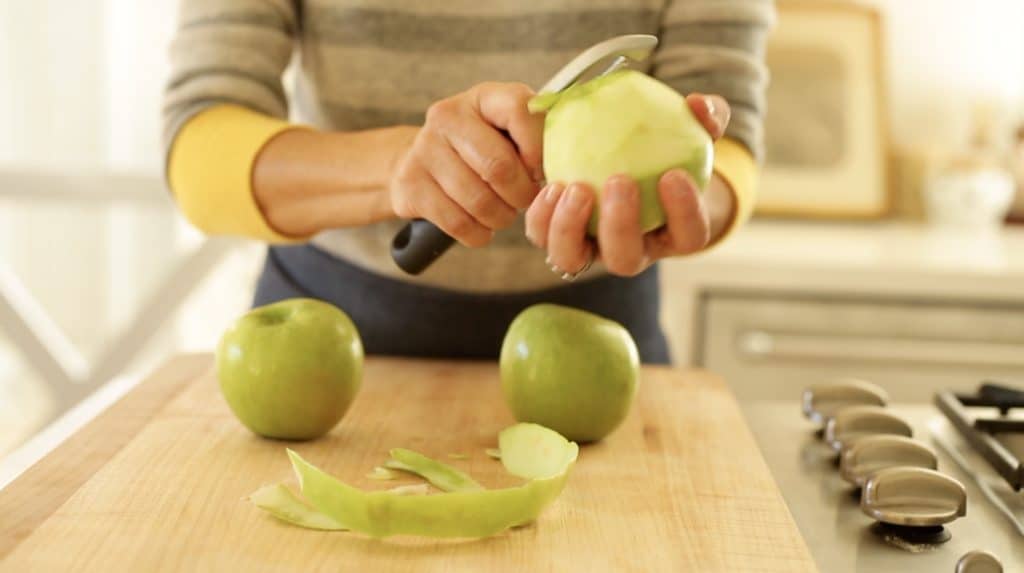
Tip#2: Use the Right Apples
- The most popular apple for apple pie is a Granny Smith Apple. This is one of my favorite apples to use too.
- Granny Smith apples are the best apples for apple pie because they are tart, which I think creates the best flavor and won’t omit too much juice when baked.
- This will help avoid “soggy bottom syndrome” when baked.
- But if you are in a pinch and need another alternative would be honeycrisp apples or Gala apples. Galas also work well for my Apple Galette, Apple Cinnamon Pastries or my French Apple Tart too!
- You do not need to cook the apple’s first for an apple pie because the pie bakes for so long in the oven. But I do cook them first for my Apple Crisp Recipe which doesn’t bake as long.
- Just be sure the apple slices are all uniform in size so they bake at the same rate.
Tip#3: How Do You Make Apple Pie Not Runny?
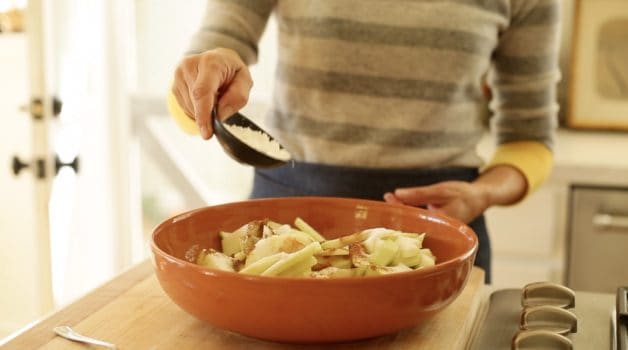
- If you have a lot of liquid at the bottom of your apple pie chances are you are not using thickeners.
- There are a lot of choices for thickeners that will prevent your apple pie from being runny. Flour. Tapioca. Cornstarch.
- But I find the most foolproof method is cornstarch. This will prevent your apple pie from being runny, while also allowing it to set properly.
- Toss it in with the apples while preparing the filling and it will create the most delicious apple filling that has just the right amount of syrupy texture.
Cornstarch Helps with the Slicing:
- Cornstarch also helps your pie set so you get a clean slice with structure and not a “flopsy, mopsy” pie slice with apples spilling out of it.
- The cornstarch will keep your apples intact and create a beautiful slice!
Tip#4: The Best Way to Avoid a Soggy Bottom Pie
- Adding a little cornstarch to the bottom of your crust, before filling the pie with apples, will create a barrier to moisture and will ensure a crisp bottom crust!
- It’s the simplest trick that I learned from my Aunt Nancy, the “original” pie boss of my family!
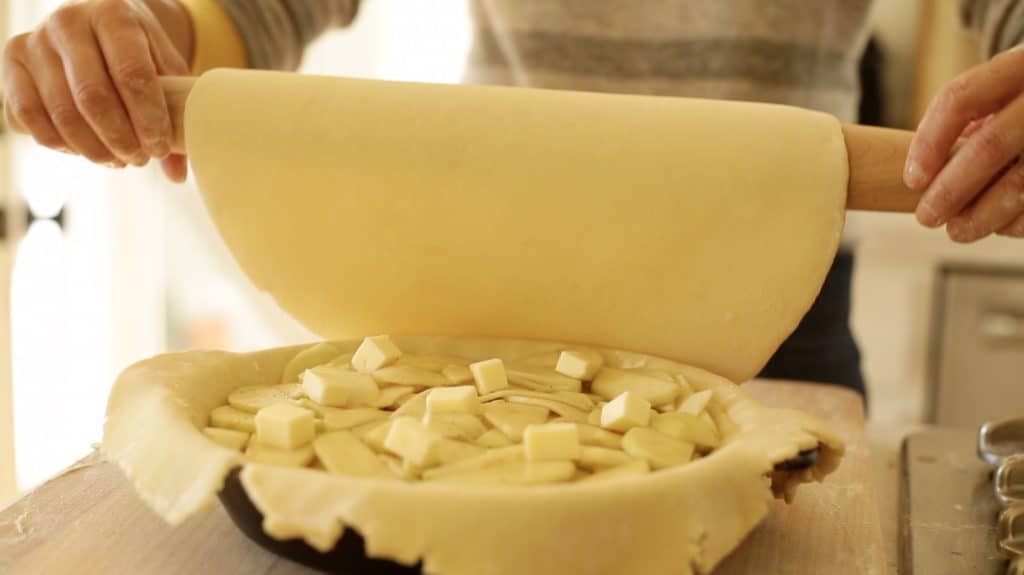
Don’t Forget the Butter:
- The other thing that helps the center become syrupy instead of runny is the butter!
- You’ll add at least 1 tablespoon of butter diced into cubes on top of your apples just before adding the second crust.
- This will help to create a syrupy consistency as the butter combines with the sugar and spices.
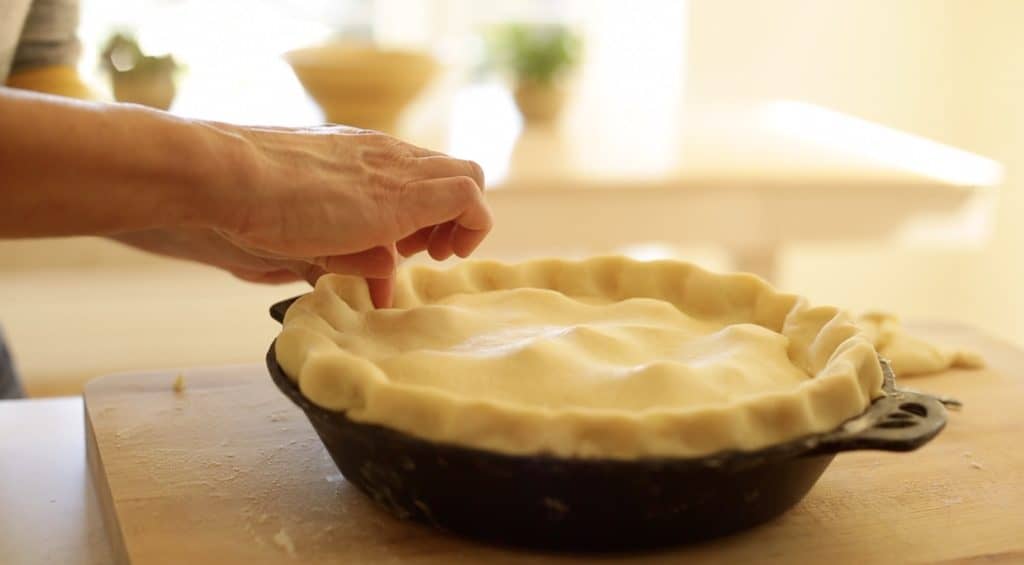
- Transfer the second pastry crust with a rolling pin and fit it so it’s tight and secure.
- Once your crust is secured on top, trim the edges so they are even all around, then tuck them under into the pie plate and then crimp.
- This will prevent any of those delicious juices from seeping out!
Tip#5: Place Pie in Freezer
- Once the pie is fully crimped it also helps to pop it in the freezer for 10 minutes to firm up the dough.
- You want your pie dough to be very cold before it hits the hot oven.
- This will help keep its shape!
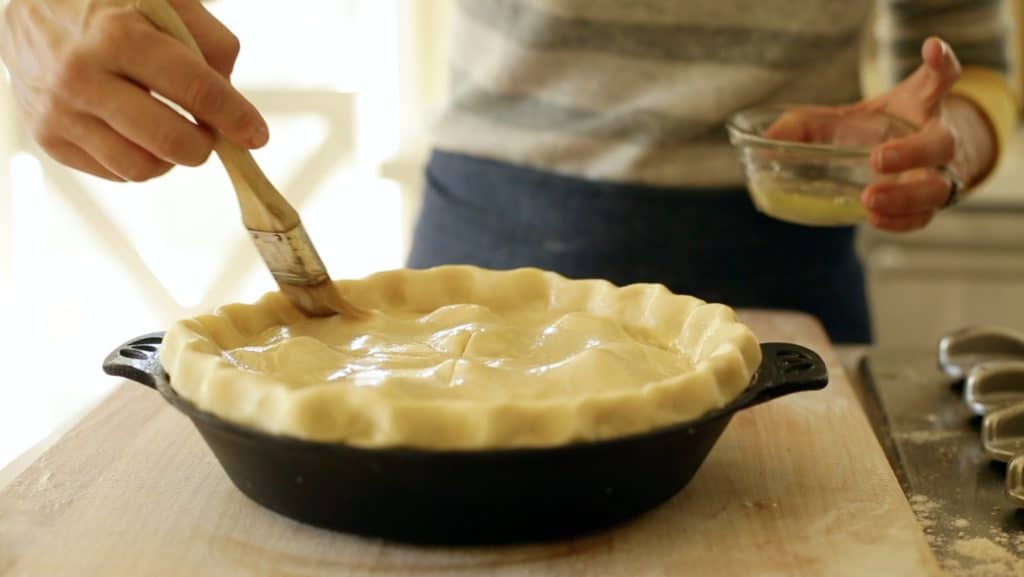
Tip#6: Use Egg White Not Egg Wash
- For a beautifully even golden-brown crust, brush egg white on the top of your pie with a pastry brush instead of egg wash (yolk mixed with water) or a full egg.
- The egg white doesn’t burn like the yolk can and creates a really nice even color to your pie crust.
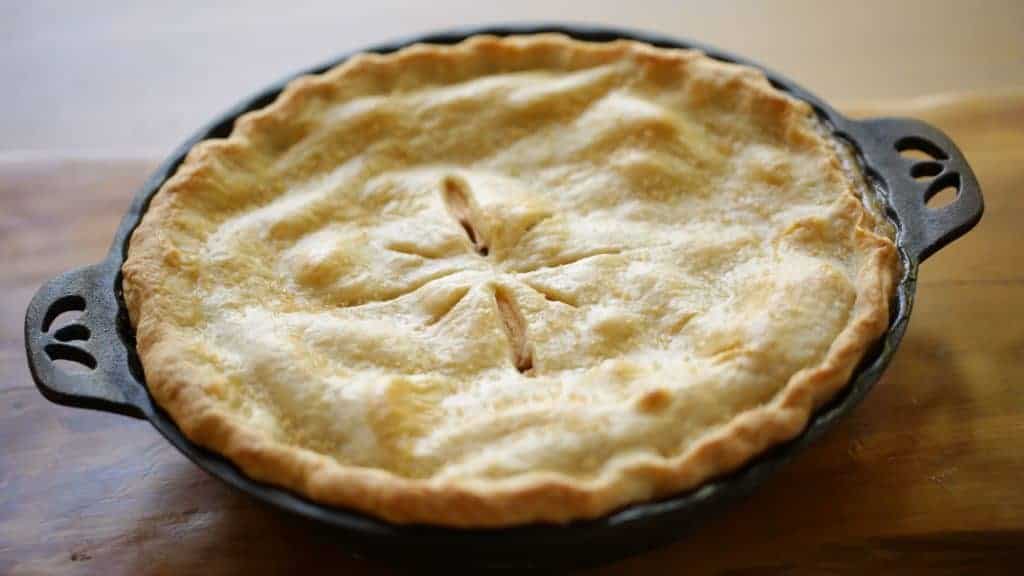
Tip#7: Bake at 375F
- This is the perfect temperature for slow, even browning, and provides the ideal heat to cook the apples to a tender consistency.
- At this temperature, there’s no need to cover the crust with a pie shield, since it’s high enough to set the crust but low enough to not burn the edges.
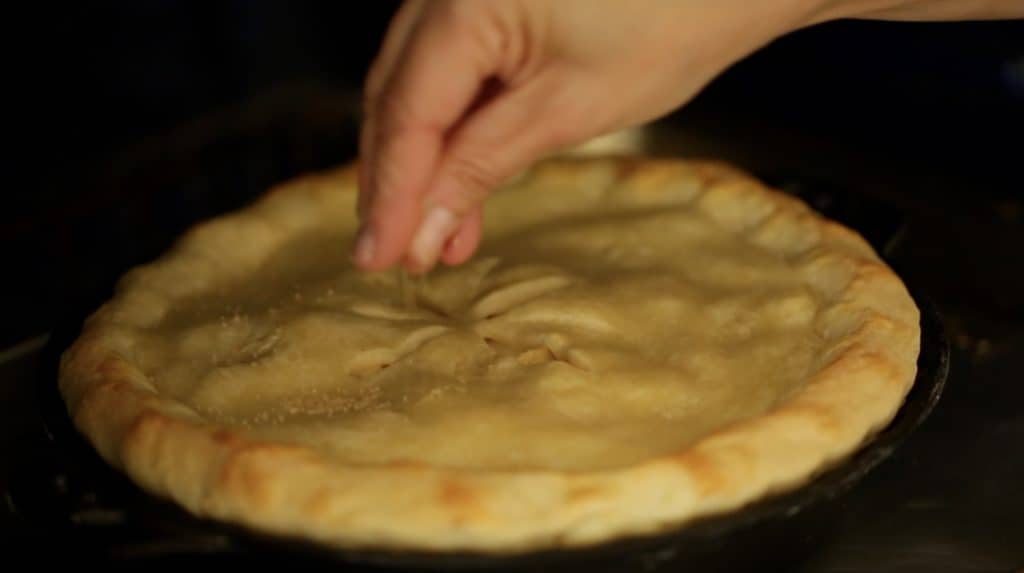
Tip#8: Add Sugar Later in the Baking
- Add a sprinkle of Turbinado sugar to the pastry top at the 35-minute mark for even browning.
- If you add the sugar too soon, it will start to burn before the rest of the pie is baked through.
- Adding the sugar mid-way assures you will get a lovely crunch on top of your crust along with a beautiful golden brown color.
Tip#9: Wait for the Juices to Appear
- Do not remove from the oven until you see the juices bubbling.
- This means the cornstarch is activating and creating a syrupy congealed filling, so be patient and let it do its thing!
- If you remove it too early, your pie will be dry inside.
- If your pie is getting too browned, cover it with aluminum foil until those juices appear! Resist the temptation to take your pie out of the oven too soon.
Tip#10: Bake 1 Day Ahead
It’s best to bake this pie the day before you plan to serve it. This allows time for the pie to set and for those juices to congeal.
How to Store the Pie:
- Let it rest at room temperature on your countertop, if it’s only one day ahead it’s best not to refrigerate it.
- Once it’s cooled completely, cover with just a sheet of foil on top.
- But be sure it’s completely cool. Otherwise, condensation will form under the foil and create a soggy top crust.
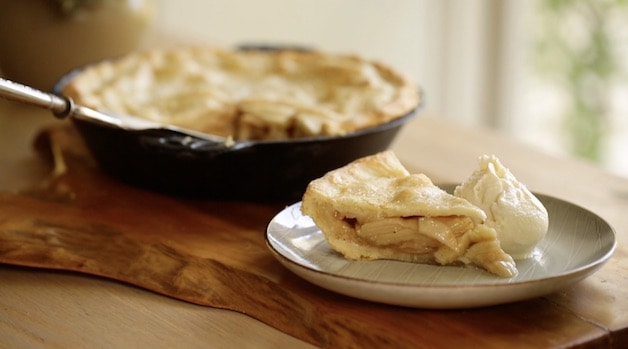
How To Reheat the Pie:
- Then to reheat before serving, place it in a 300F oven for just 15 minutes and serve with a bif scoop of vanilla ice cream!
- By following these 10 tips you’ll be rewarded with a fantastic Apple Pie recipe that will be the talk of the table!
If You Enjoyed this Recipe,
Please leave a rating and a review Below!
Beth's Foolproof Apple Pie Recipe
The Best Apple Pie Recipe that will create a light and flakey crust and warm syrupy center.
Ingredients
Crust:
- 2 ½ cups (300g) all-purpose flour
- 3 tbsp (38g) sugar
- ½ tsp (2.5ml) salt
- 1 cup (240g) butter, diced
- ½ cup (120ml) ice water
Filling:
- 7 cups (1050g) sliced Granny Smith apples
- ¾ cup (150g) white sugar
- ½ tsp (2.5ml) cinnamon
- ¼ tsp (1.25ml) nutmeg
- 1 tbsp (15ml) fresh lemon juice
- 2 tbsp (15g) cornstarch + 2 tsp (10ml) for sprinkling
- 1 tbsp (15g) butter, diced
Garnish:
- 1 Egg white
- A sprinkle of raw turbinado sugar
Instructions
- Place flour, sugar salt in a food processor and pulse until combined. Add butter and pulse until a coarse meal forms. Add water and pulse until a dough forms.
- Divide dough into 2 equal-sized balls, flatten it into disks and wrap in parchment paper. Refrigerate for 3 hours or overnight.
- For the filling, combine apples, sugar, cinnamon, nutmeg, lemon juice, and cornstarch. Toss to combine.
- Preheat oven to 375F (190C)
- Select an 11" inch Pie Plate.
- Roll out 1st dough ball into a large circle, using your pie plate as a guide. The circle should be at least 3 inches wider than the bottom of your pie plate to accommodate a deep-dish pie. Fit dough into the bottom of the plate. Sprinkle the bottom of the crust with 2 tsp of cornstarch to coat the bottom and serve as a “moisture barrier”. Add filling. Pack filling down to an even layer making sure there are no large air pockets.
- Cut the 1 tbsp of butter into quarters, tuck the butter on top of the apples, distributing it well.
- Roll out 2nd dough to an equal-sized circle. Place on top of the pie, adjust so circles roughly line up, then trim dough with kitchen shears all the way around pie so only a 1-inch overhang remains. Fold edges under ½ inch (13mm). Crimp the dough to seal.
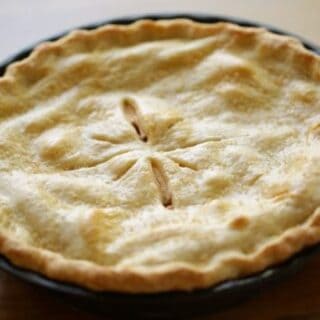
- Place pie in the freezer for 5-10 minutes to firm up. Before baking cut 4 large slits and 4 small slits (in between the large slits) in a start-burst pattern in the center of the pie to allow steam to escape. Lightly brush the top of pie and crust with egg whites. Place pie on a cookie sheet.
- Bake pie for 35 mins, then sprinkle turbinado sugar on top. And continue baking for 20-25mins more until the pie is golden brown and juices are bubbling.
Notes
THE 10 FOOLPROOF TIPS!
TIP#1: Refrigerate dough at least 3 hours to avoid shrinkage while baking
TIP#2: Use cornstarch as your thickener. Better than flour!
TIP#3: Use the right apples. Granny smith! Otherwise too much juice, too watery
TIP#4: Sprinkle the bottom of the crust before adding apples to avoid soggy bottom syndrome
TIP#5: Freeze pie 5-10 mins before baking to also avoid shrinkage
TIP#6: Brush very lightly with egg white (not yolk!) for best color, before baking
TIP#7: Bake at 375F. Perfect temp for slow, even browning and ability to cook the apples. And at this temp no need to cover the crust with a pie shield
TIP#8: Add a sprinkling of Tubinado sugar at 35 mins mark for even browning
TIP#9: Do not remove from oven until you see the juices bubbling (this means the cornstarch is activating and creating a syrupy congealed filling) so let it do its thing!
TIP#10: Make pie the day before serving to allow to rest 24 hours to set. This will allow pie to fully set and congeal. To serve, place in a 300F oven for 15 minutes to serve warm, top with vanilla ice cream.
Nutrition Information:
Yield: 8 Serving Size: 1Amount Per Serving: Calories: 204Total Fat: 1gSaturated Fat: 0gTrans Fat: 0gUnsaturated Fat: 0gCholesterol: 0mgSodium: 9mgCarbohydrates: 44gFiber: 4gSugar: 10gProtein: 5g

I am making the apple pie now. Does the pie rest at room temperature or in the fridge?
Hi Melanie, once the pie is baked you can leave it at room temperature 🙂 I hope you enjoy it!
I make an oil crust that almost tastes like puff pastry. It gets crisp and doesn’t get soggy, plus it adds a great layer of flavor. I use almond oil and it’s always a hit!
Hi Beth,
Thanks for the tips for the apple pie recipe. The cornstarch does the trick to prevent leakage and a crispy crust! Also brushing the crust with egg white and only sprinkling the sugar on top after 30 mins of baking. This recipe was perfect for all apples we picked last weekend!
Hi, Beth
I’ve been wanting to try making pies for a while and your recipe looks wonderful. But, I have a question. In some baking shows I’ve been watching, the pie crust is pre-baked with weights on the base before being cooled and then adding the filling. What is the reason for your not doing that? Having had many pies with pale partially cooked bottoms, the pre-baking made sense to me. Is the pre-cooking method used primarily for pie dough made with shortening?
Actually filled pies like this, with the double crust, are typically not pre-baked first with a blind bake on the crust, since they bake for so long to bake the apples inside that it really isn’t necessary. I find you can prevent the partially cooked bottom, by using a metal pie tin or my personal favorite a cast-iron pie plate featured in my blog post. It’s the best for creating a nice and crispy crust! 🙂
Beth….oh my goodness…..your fool proof apple pie was the biggest hit at my family Thanksgiving dinner yesterday. I wish I could give you the biggest hug ever. I followed your instructions (and hints) to a tee (except for the cast iron baking pan). All the chilling and freezing, etc made this the best apple pie I have ever attempted. I guess the best part was the tender, flaky crust. I searched for years trying different recipes for “so called” flaky crust. Finally have found it. The granny smith apples cooked up perfectly ( mine took a little longer before I got the bubbly juice). Mine was a little darker than yours in the video, but did not burn…..My family (and include me of course) loved it. I will be using the crust for all my pies from now on. Thank you thank you for a “full proof” recipe.
Now, if you just come up with a butternut squash/apple soup recipe, I will sing your praises loud and long.
Hi! I see 1tbsp butter on the filling but not in the directions. Does it get added with the filling in the bowl before you toss? Thank you!
Great question! It gets cut into quarters and topped on top of the apples once they are in the shell you can see the picture above TIP#5. I just added that to the instructions! So sorry for the confusion, I hope you enjoy the pie! It’s really yummy! 🙂
What size pie dish do you use? The 11” or will a 9” work as well? Thanks!! Can’t wait to try my first homemade apple pie!
Yes I use an 11″ pie plate and it works great. You could use a 9″ but you’d have a bit leftover filling and dough. I hope you enjoy your first apple pie! 🙂 Follow the tips and you can’t go wrong!
Love the recipe as its so easy to follow especially since I’m going to be making an apple pie for the first time for the holidays! So glad I found this recipe but I had a question as to whether you use salted or unsalted butter?
Sure if you live in the USA I say use salted Land O Lakes butter since it’s not really salty, just more flavorful. But if you live outside the USA I’d use unsalted butter since slated butter outside the US can be pretty salty! Hope you enjoy the pie! 🙂
Hi Beth, It’s been a while since I made an apple pie and it shows. I sliced the apples a little too thinly so all the apples slices turned into applesauce after baking. The cornstarch does provide a moisture barrier on the bottom crust. Last weekend, I made a meat pie crust using 2 sticks of butter and I still have heartburn. So I used tenderflake instead of butter to make the apple pie crust and the crust was flaky. I have also made crusts using vegetable oil and I find the dough comes together quickly and it is easier to roll out. Since it is apple season, I will definitely try your apple pie recipe again.
Love it! It’s my go-to recipe, love all the tricks and tips, just amazing!
YAY! So glad it was a hit! 🙂
this pie got raves from a group of friends we served it to. Not only for the taste and texture, but so many remarked on just how beautiful it was. Thank you so much, great video
Aww so glad to hear that Harold! We do eat first with our eyes, so I love anything tasty that also looks great! So glad it was a hit! Bravo!!
I measured all the ingredients out first then I slice the apples and sprinkle them with all the sugar cinnamon nutmeg cornstarch. Then I rolled out the crest by the time I did the crust the apples release a lot of juice so my question is do I do the crest first and then spice the apples later so does it release the Jews and there’s a lot of the spice.
Exactly! You should not let the apples sit for too long or they will release too much juice at room temp. Best for them to be added after the crust is made, right away, to that they release their juices in the oven where it’s hot, so that the cornstarch will activate and make the juice syrupy instead of runny. Hope that helps for next time! 🙂
I was a little nervous to try this recipe – never used cornstarch as a thickener in a apple pie recipe. The pie turned out delicious with no soggy bottom! I will add a tad more cinnamon the next time I make this recipe, but this will be my go to recipe for making apple pie in the future.
YAY! So glad it was a hit! Yes you could add more cinnamon next time or a little bit of pumpkin pie spice for a deeper spice flavor would do the trick too! 🙂
Beth your apple pie looks wonderful, and I was going to give it a try but you didn’t say how much flour in the recipe. I thought that I could find out by watching the video demo, but it was NOT there either. So disappointing.
I’m so sorry about that! It’s 2 1/2 cups. The recipe is updated and can be printed here!
Easy to follow and turned out amazing! Thank you Beth you are my holidays savor when it comes to recipes 🙂
Awe so glad it was such a hit! YAY! And so glad to hear the recipes have been a ht! Double YAY! 🙂
Hi Beth!
Thanks for sharing this surprisingly easy recipe.
I made this pie today and am struggling to wait 24 hours (until 6 pm tomorrow) to eat a piece of this delicious pie.
Of course I had to taste a small piece after it cooled down. The pie turned out great, especially since this was my second time making an apple pie from scratch. Again, Delicious!!!
I can’t wait to eat it tomorrow with a scoop of vanilla ice cream.
Beth, I made this pie and it turned out amazing! The crust was buttery and flaky, the filling set just right, and I loved how it was not overly sweet. Served warm with vanilla ice cream, wow! Perfect way to start off fall baking. Thank you for such an awesome recipe and all the great tips! And the video made it so easy to follow all the steps.
YAY! So glad it was a hit! Isn’t it yummy?! Can’t wait to make it for Thanksgiving! And so glad the tips helped! 🙂