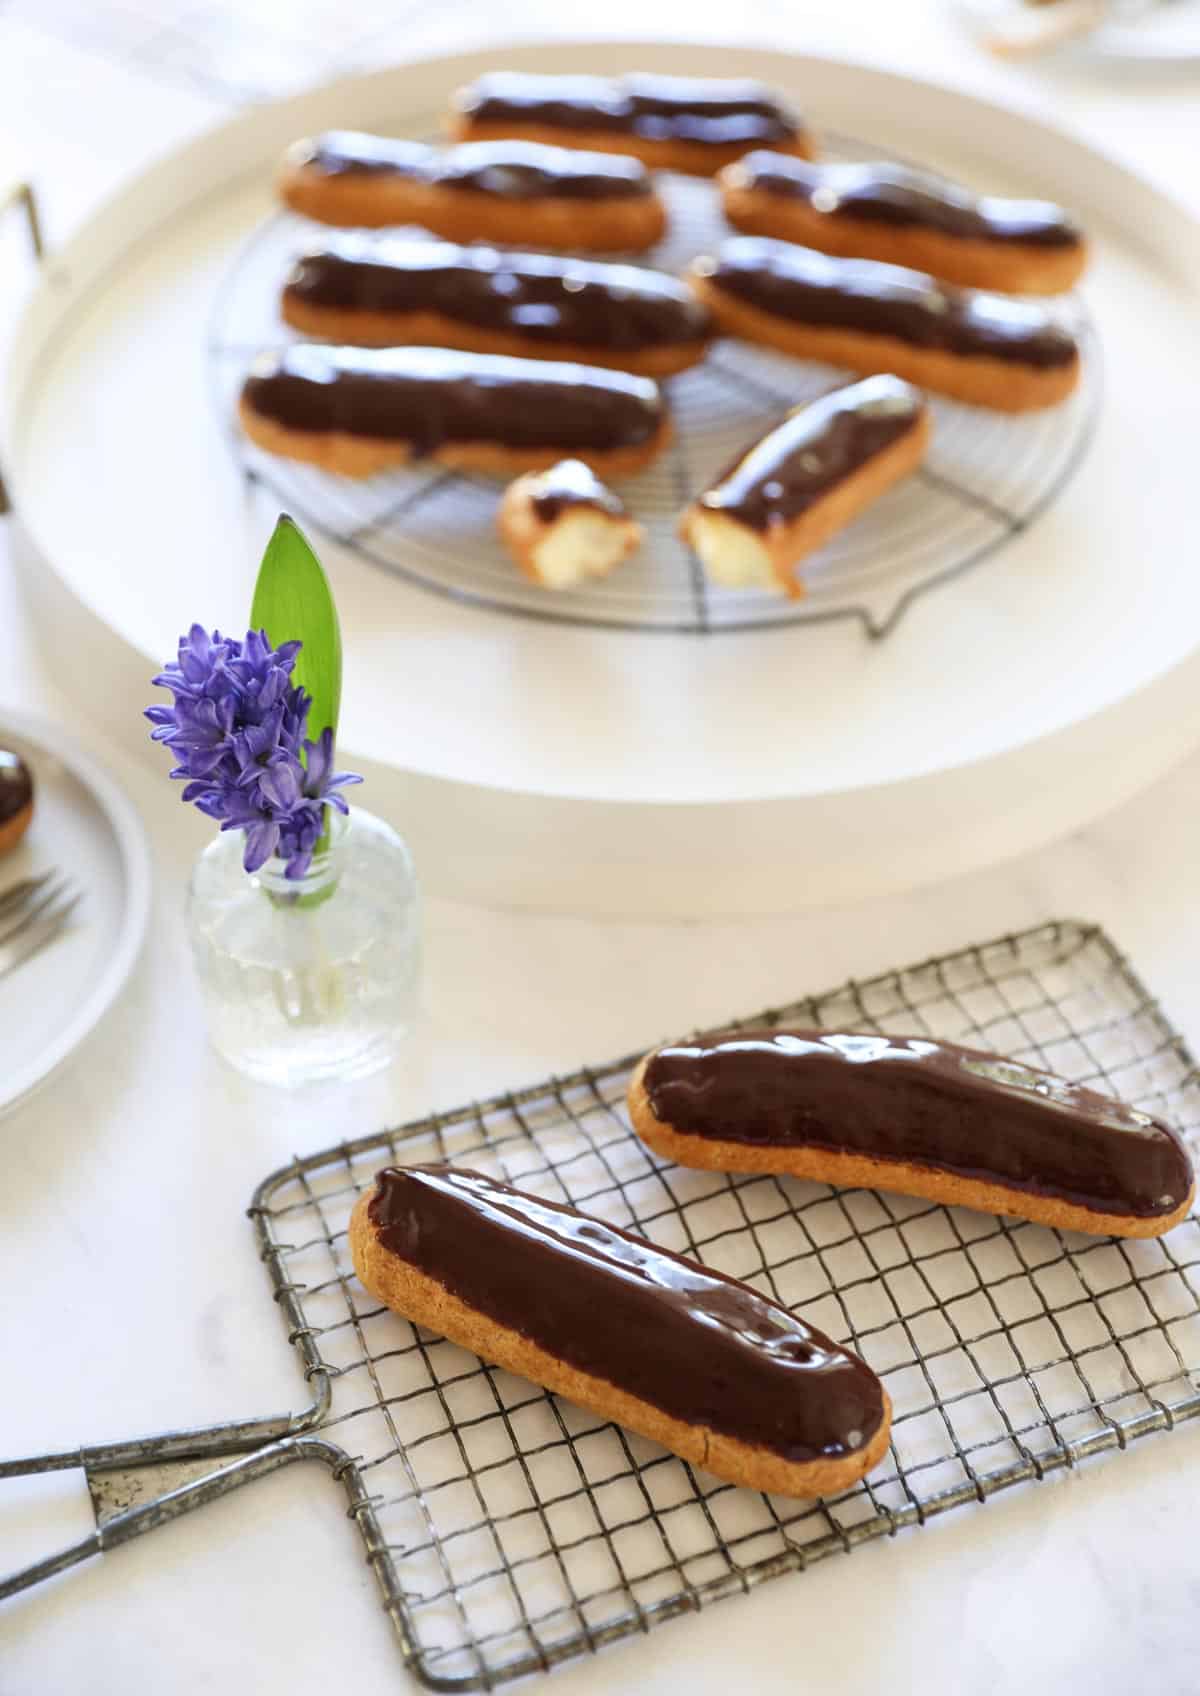
Easy Chocolate Eclair Recipe
SHARE THIS RECIPE!


Learn how to make this Easy Chocolate Eclair Recipe that will be sure to impress! It’s easier than you think and the best part is they can be made a day ahead!
These are one of my favorite French recipes because guests are always so impressed when they hear you’ve made them yourself!
For more French dessert recipes that easily impress try my Foolproof French Macarons, Easy Madeleines or my Foolproof Chocolate Souffle.
Homemade Eclairs is a 3 Step Process
- The Pastry Shells. Made with a pate a choux dough, the shells are easy and fun to make!
- The Pastry Cream. Is a simple recipe that can be made up to 2 days ahead of time.
- The Filling and Glazing. This part can be done up to one day ahead.
- And really that’s all there is to it! Intimidated by the process? Don’t be! Learn how to make this easy chocolate eclair recipe below.

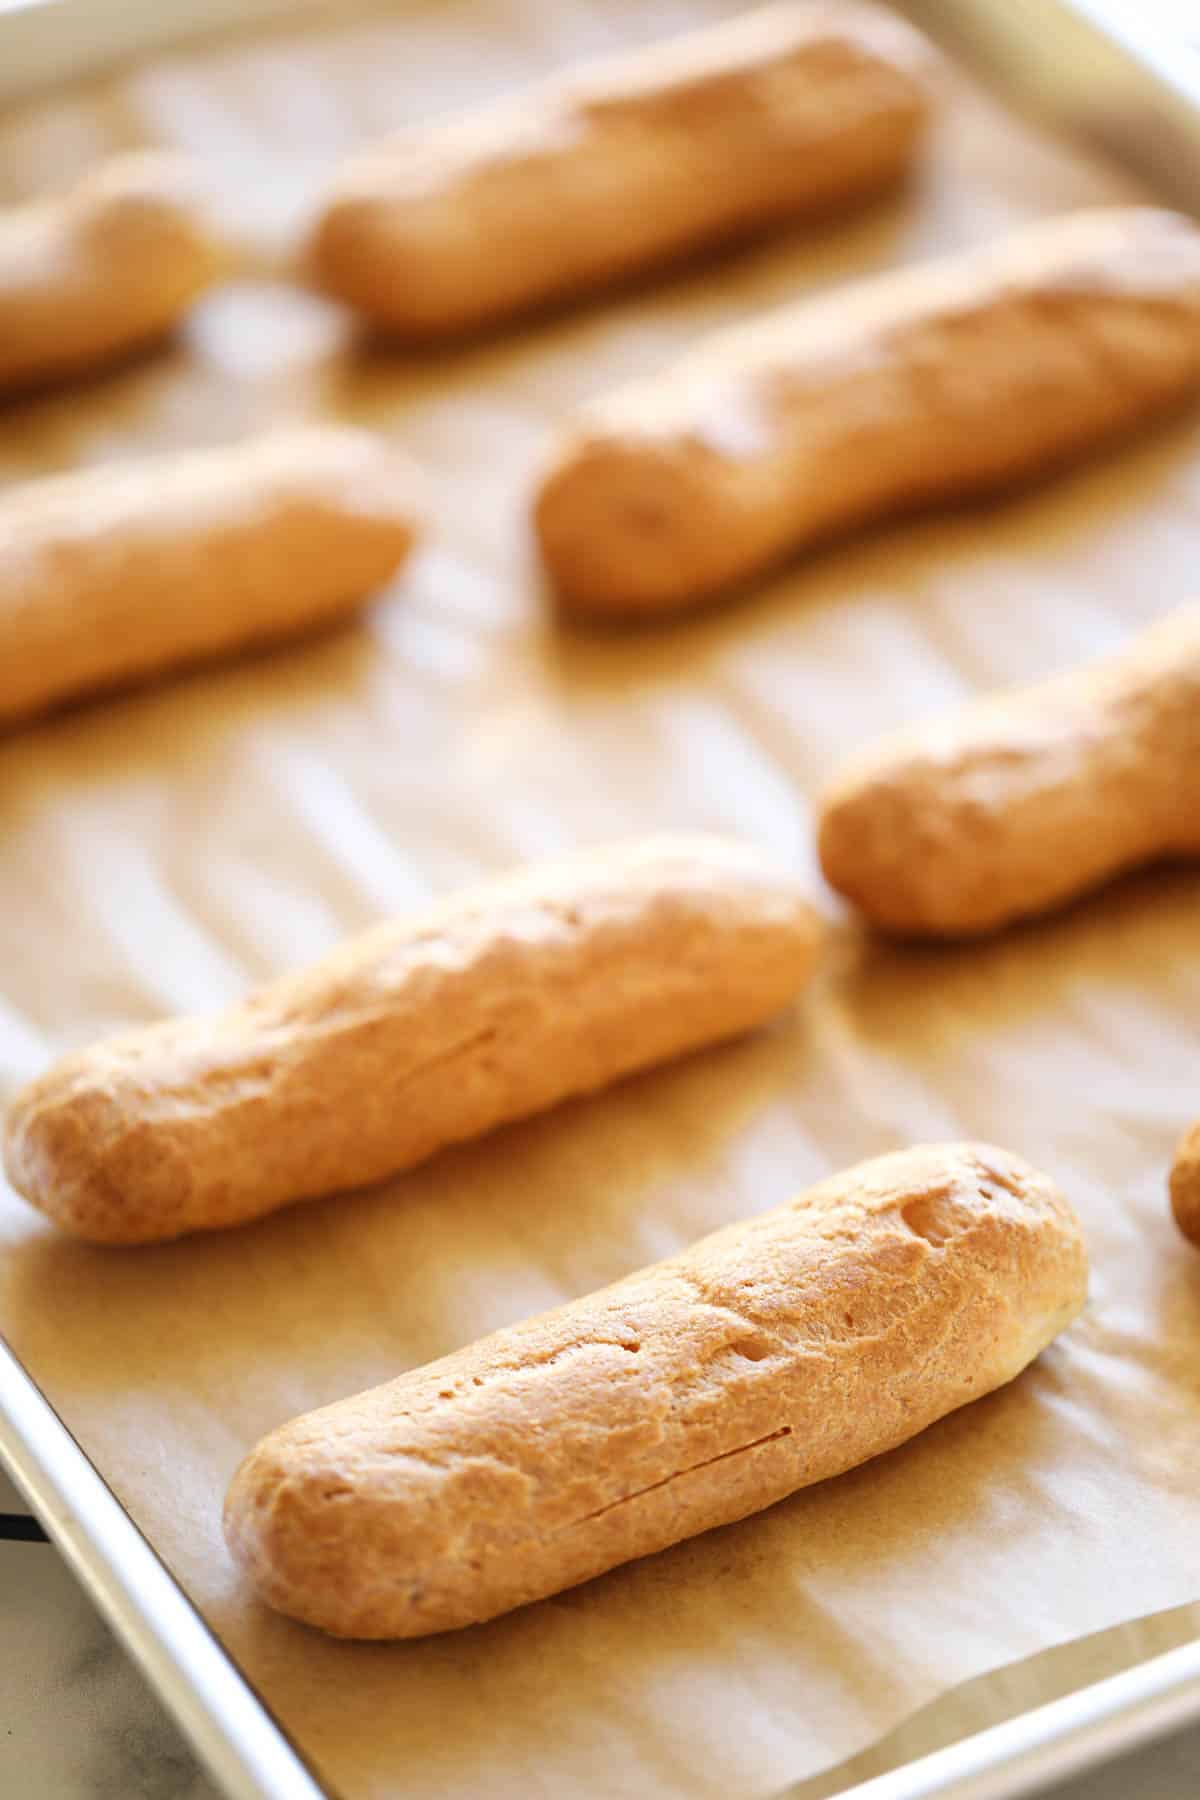
Step#1 Make The Shells
Eclair shells are made from choux pastry which is the basis for so many delicious French desserts like Profiteroles another great recipe for entertaining!
How do you make choux pastry?
- Choux Pastry is pretty easy to master if you stick to the recipe and follow my tips below (especially regarding the baking process).
- Essentially you’ll melt some butter and water in a pan, bring it to a boil, add the flour, sugar, and salt, create a paste, then turn off the heat.
- As you stir this mixture, it will cook and pull away from the sides.
- Once you get a dough ball to form, cook that for at least a minute. This will make your choux pastry more stable and prevent it from separating once in the oven.
- Then spread out the dough mixture to create a space for the beaten eggs to rest. This will prevent them from scrambling on the hot pan.
- Then you can pipe it into circles for cream puffs or profiteroles or pipe them into straight lines for eclairs!
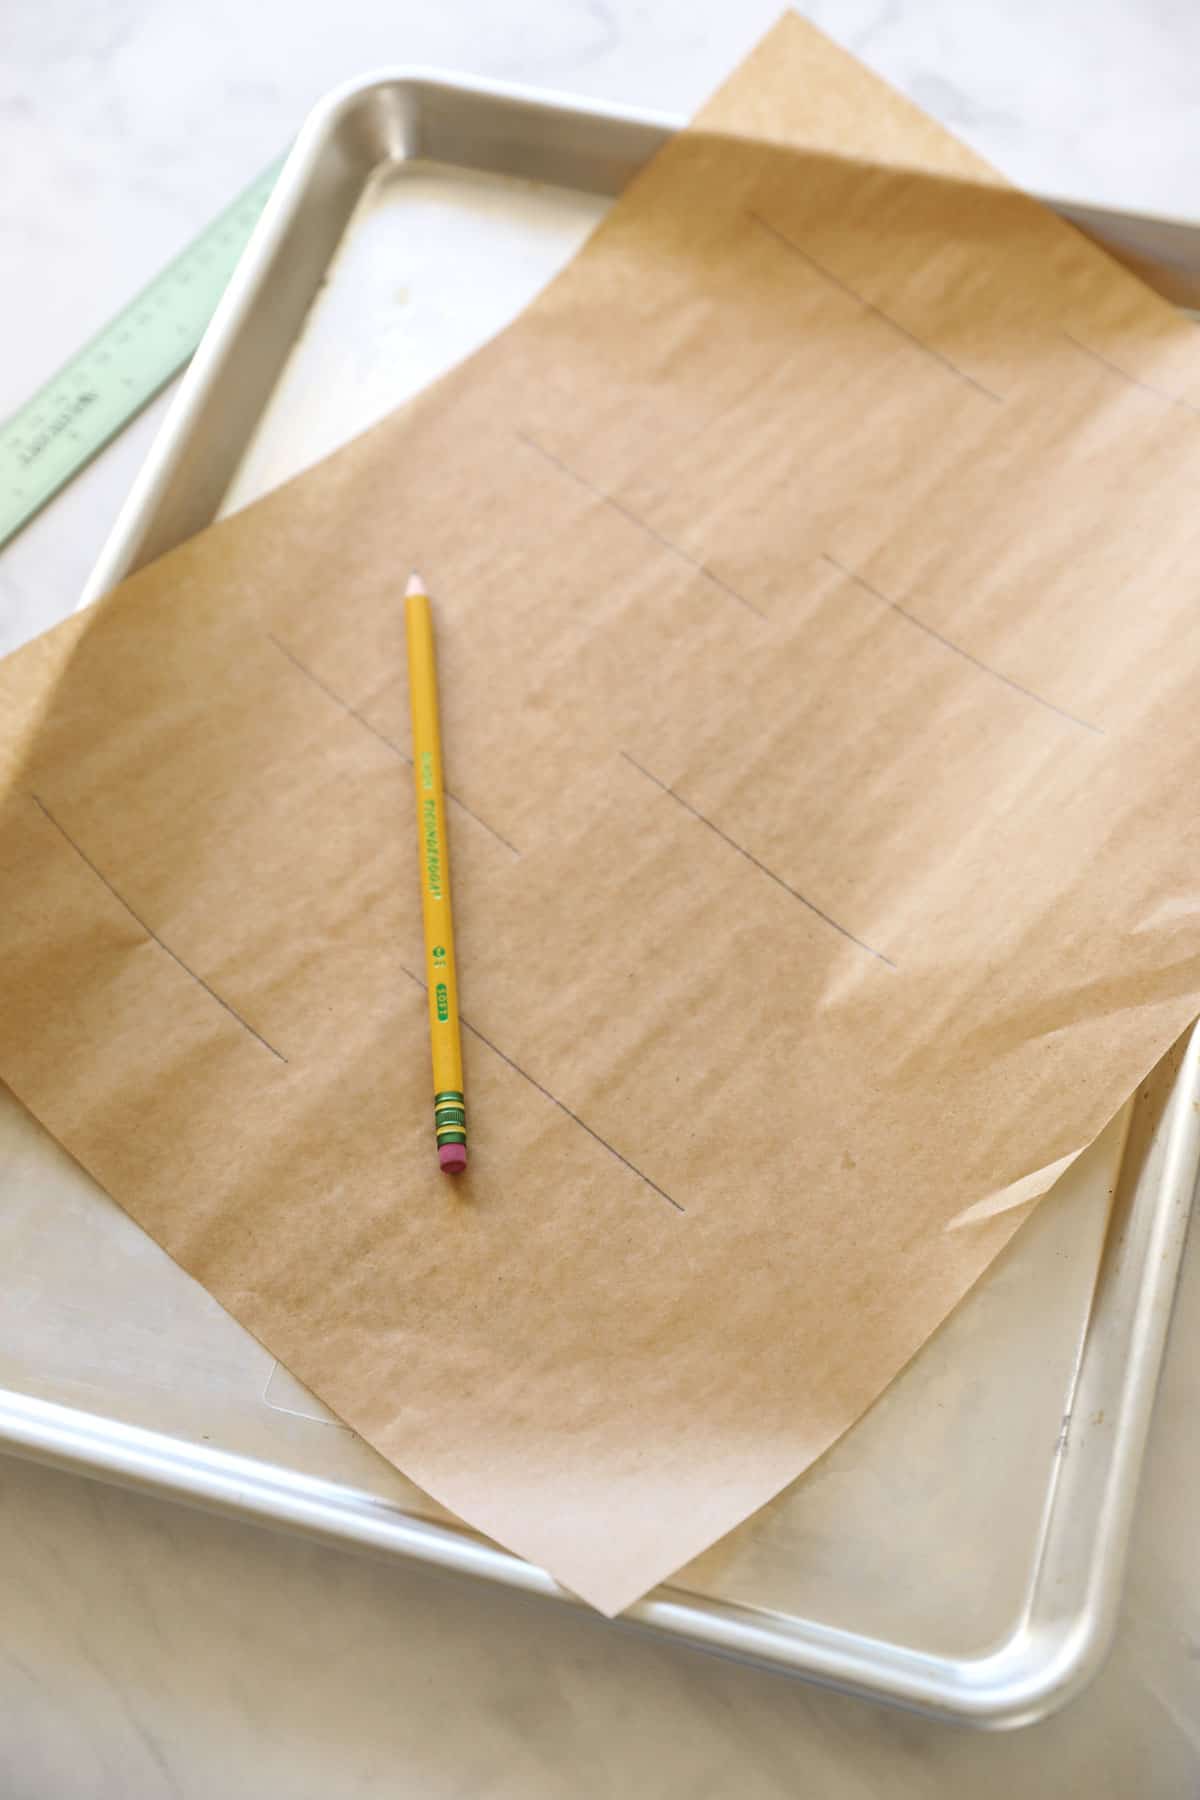
How To Create an Eclair That is Uniform in Size
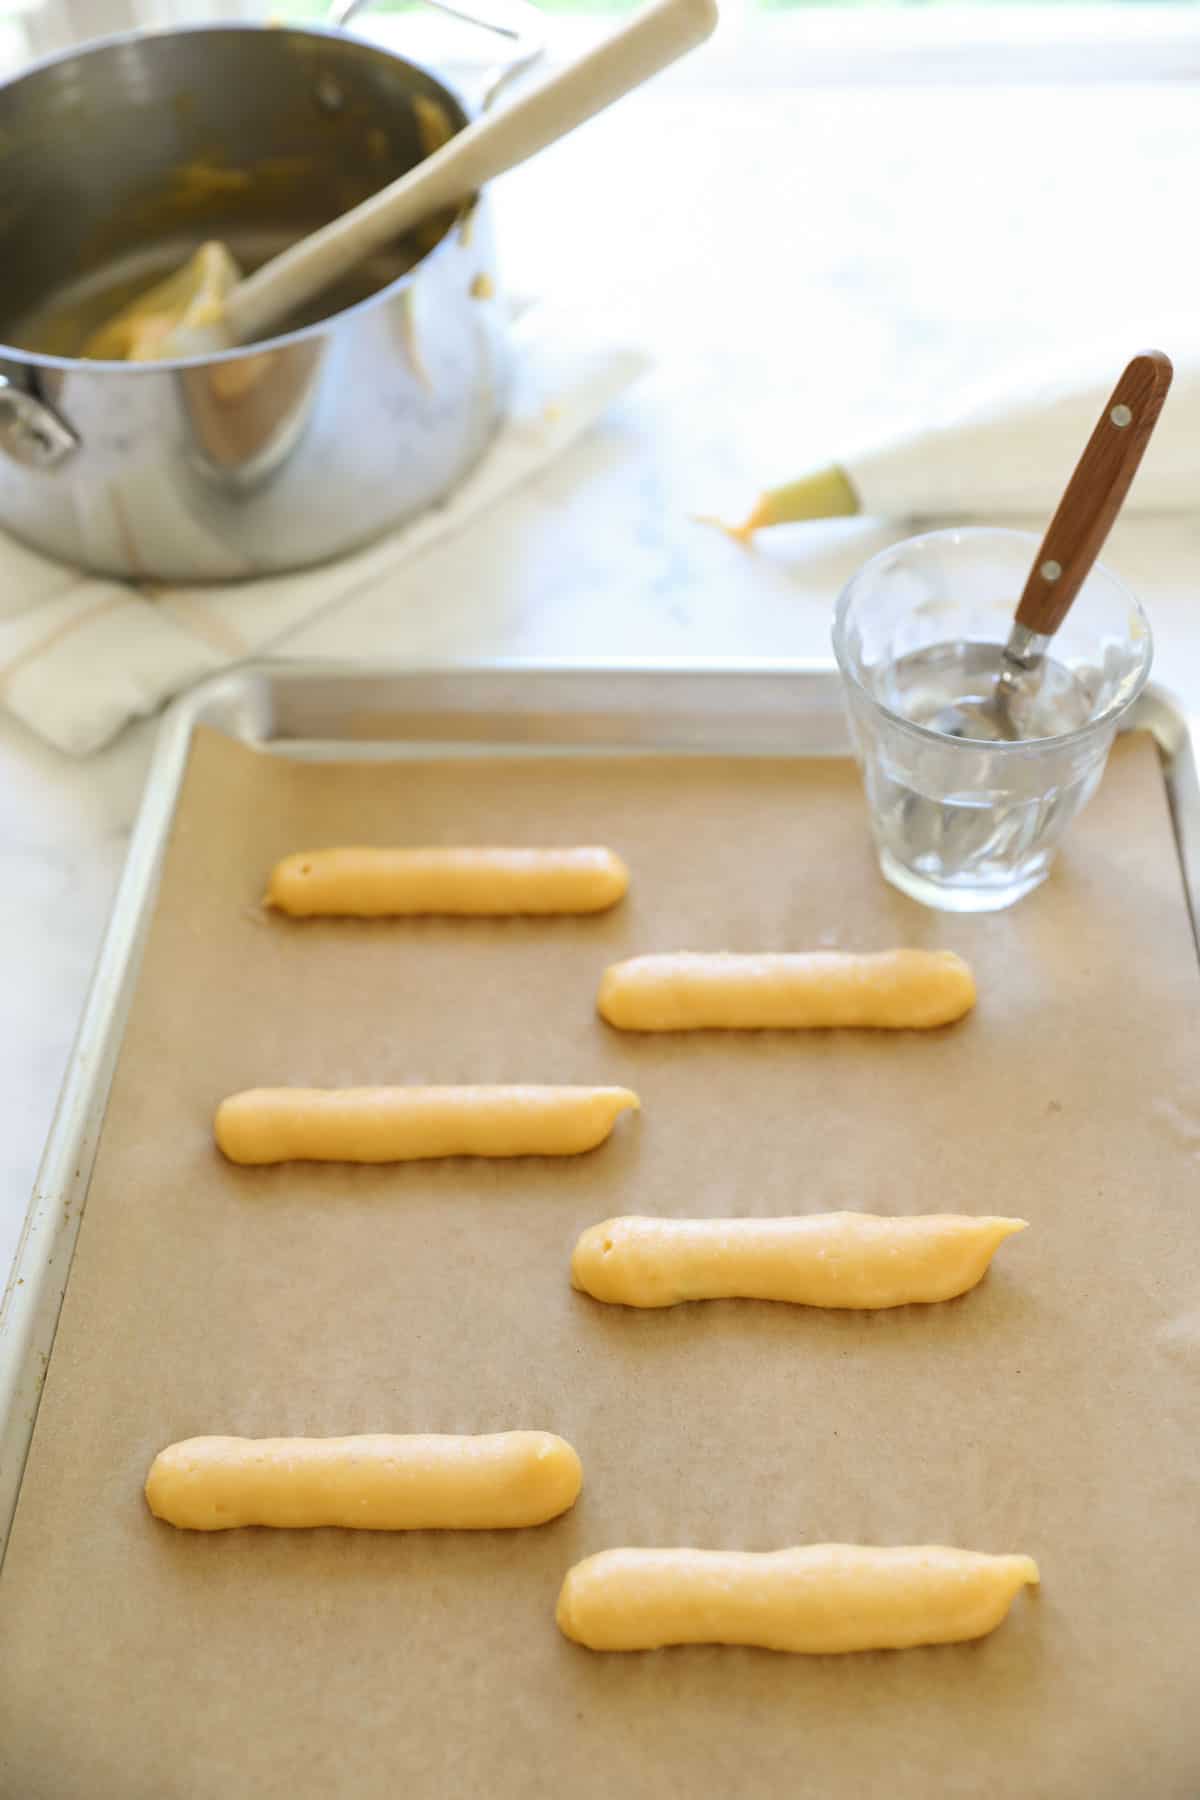
- Create 4″ lines with a pencil on parchment paper. Then flip the parchment paper over so it’s visible from the other side.
- This will give you a guide for piping the choux pastry.
- Pipe the pastry from a pastry bag following the line.
- This will assure all your eclair shells will be the same size and bake at the same rate.
- And they’ll look more professionally made if they are all the same size too!
How to create a Smooth Surface on The Shells
- Choux pastry is sticky! You’ll notice this when piping it onto the parchment paper.
- It’s normal for it to peak up at the end of the line.
- But you can tamp that down with a cold, wet spoon.
- Just be sure the spoon drips off the excess water into the glass before tamping the peak down.
- You don’t want the parchment paper of piped choux to become laden with water droplets.
- The water is just to prevent the choux sticking the spoon as it touches the pipped shells.
How To Prevent Your Eclair Shells from Deflating?
- The trickiest part of this recipe is baking the shells. This is where most bakers get into trouble because the shells can easily deflate.
- Bake 400F/(200 C) 15 mins first DO NOT OPEN DOOR.
- Then reduce oven to 350F (176 C) and bake for another 20-25 mins.
- Once golden brown and puffed, turn the oven off, open the door.
- Make small incisions (1/2 inch) in the side of each eclair to release the steam (this step is critical! DO NOT SKIP)
- Then keep the door propped open for 10 minutes while they sit inside.
- Following these tips will assure your shells will keep their shape!
Can You Freeze Eclair Shells?
Yes! Place in a zip lock bag once completely cooled and they will last for at least a month. Then place in a 300F oven for 10 minutes until thawed and crisp. Then fill as directed below.
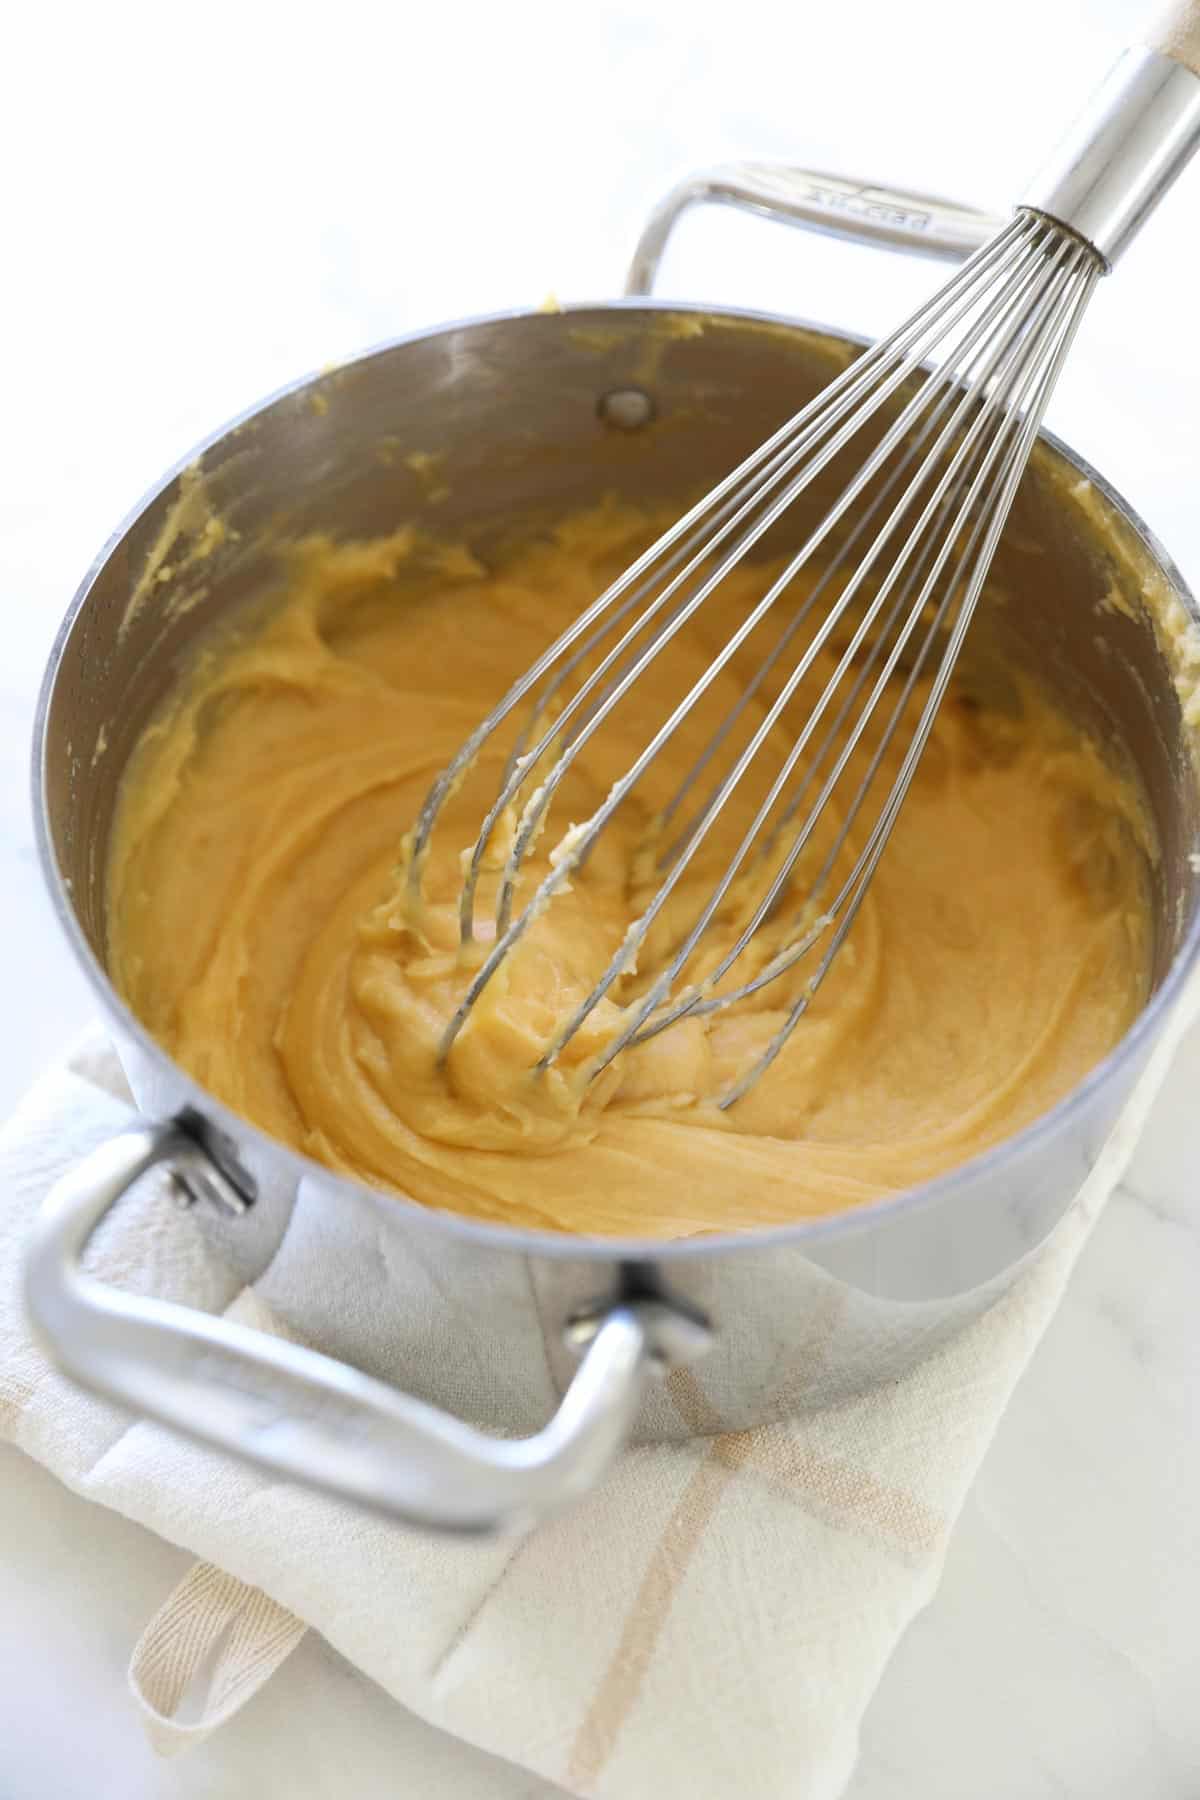
Step#2: Make the Pastry Cream
Pastry cream is a great recipe to master because you can use it for many wonderful French desserts like fruit tarts or use it as a base for other flavorings like Pistachio Pastry Cream or Coconut Cream for Coconut Cream Pie. Or for another custardy dessert try my Lemon Curd Tart Recipe.
How do you make pastry cream?
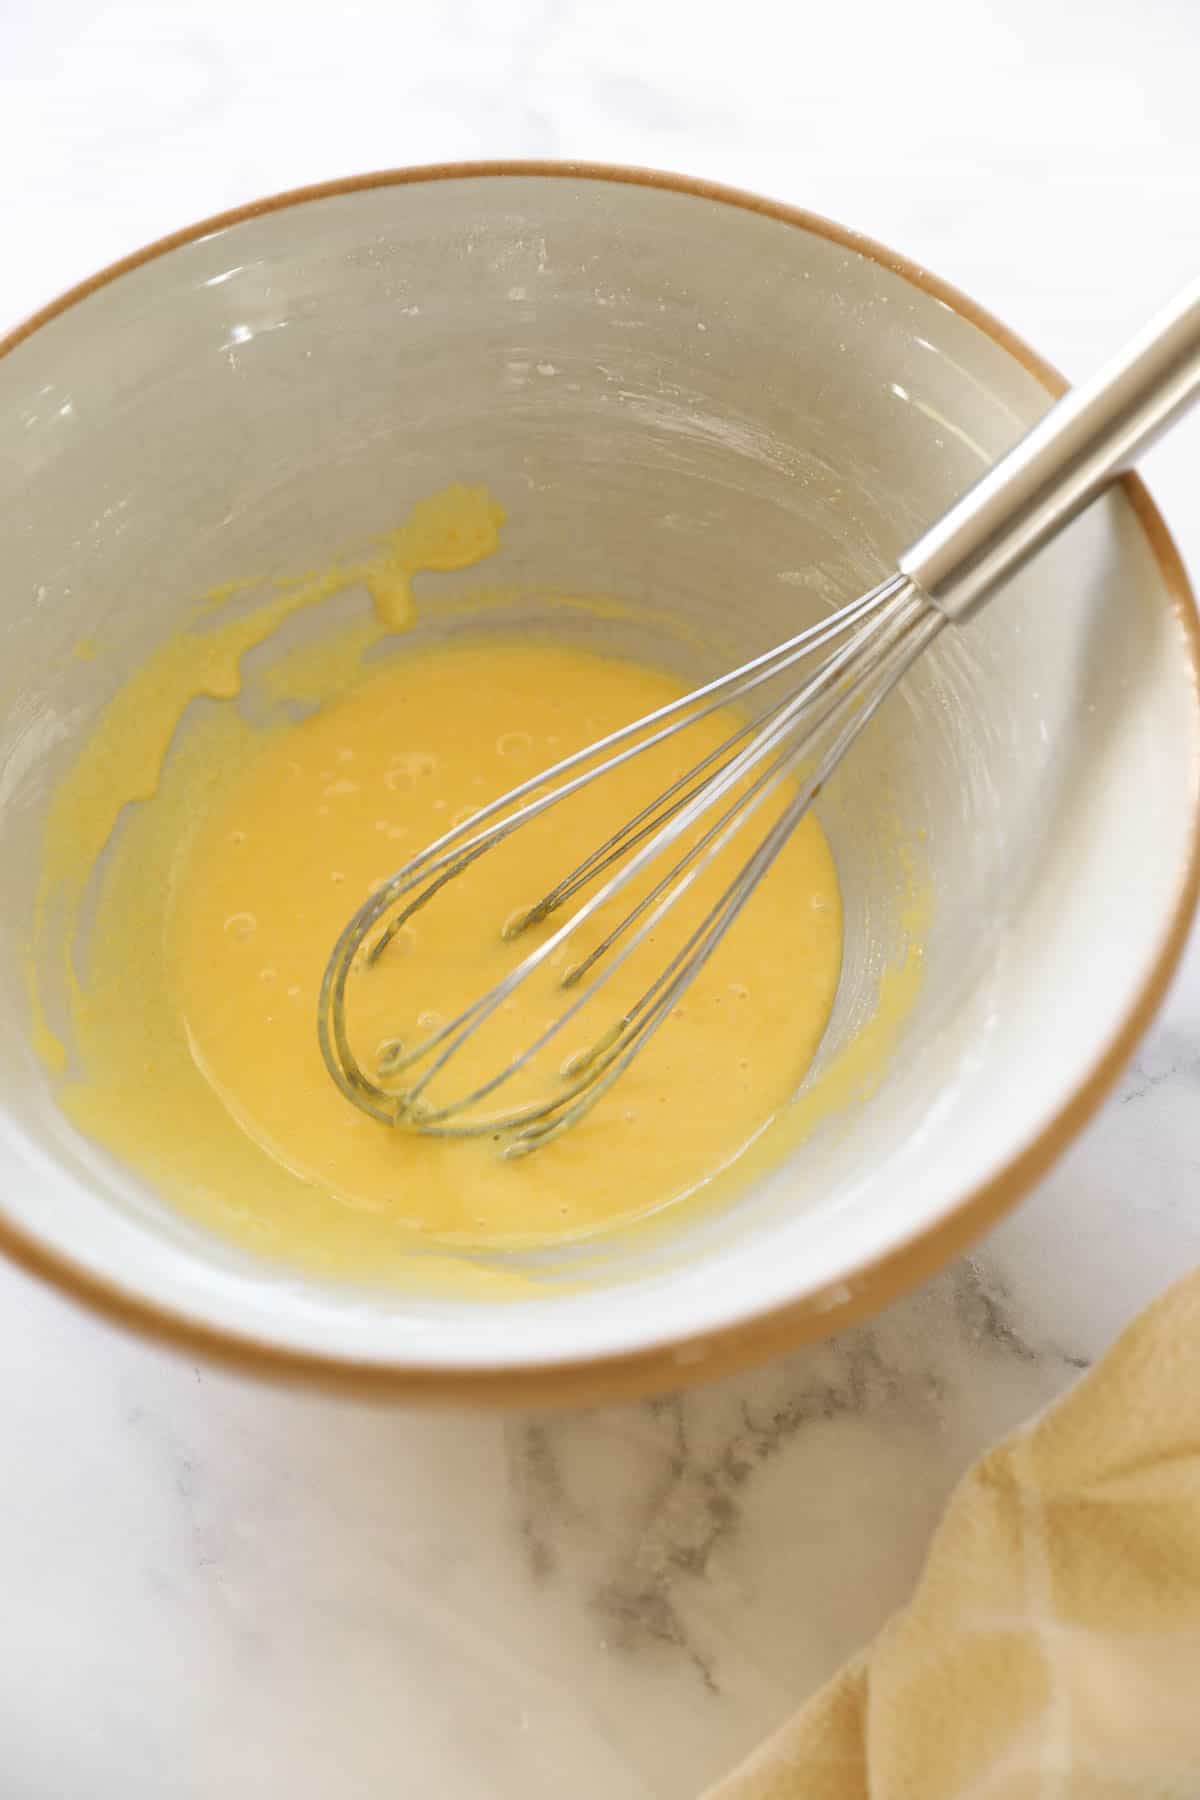
- You’ll begin by adding egg yolks, sugar, and cornstarch in a bowl, whisk until a smooth paste forms. Set aside.
- Then in a large saucepan heat milk, vanilla paste, and pod until simmering. Strain out the bean. Allow to cool slightly.
- Add the warm milk slowly to the egg mixture whisking all the while until combined. Wash out the saucepan.
- Then strain this mixture through a fine-mesh sieve back into a clean saucepan.
- Heat custard on medium-high, whisking all the while until thickened.
- The whisking part is a critical step. Pastry cream can easily scorch if you don’t “keep it moving”. Remove it from heat. Allow it to cool slightly. Add a pat of butter, whisk until smooth.
- If your pastry cream looks too thick, because it cooked too long, add another pat of butter, this will thin and smooth it out
- Transfer pastry cream to a shallow container, cover with plastic wrap so that the wrap is touching the cream. This will prevent a skin from forming. Refrigerate until ready to use.
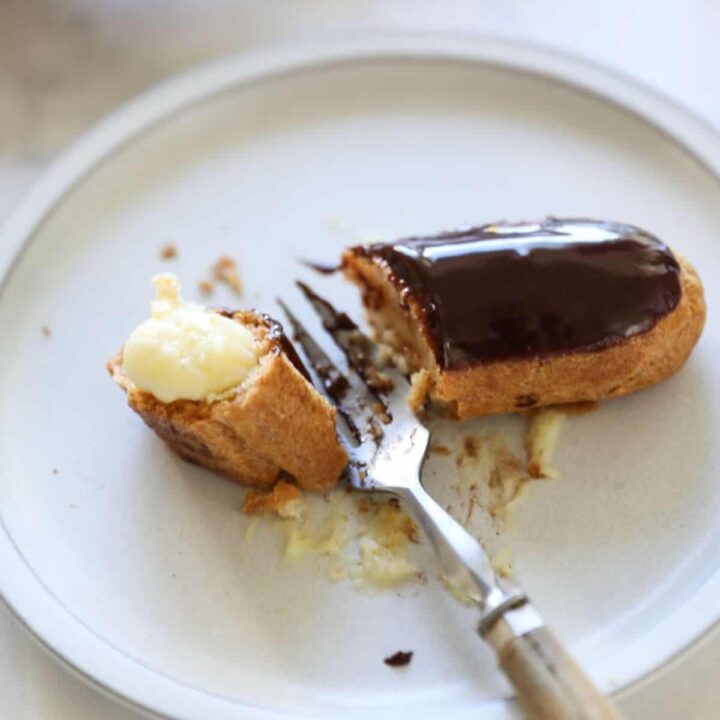
Step#3: Filling the Shells
- Then comes the fun part of filling them and dipping them in chocolate!
- Pierce bottom of éclairs with ¼” pastry tip, piercing and twisting the tip into the bottom of the éclair shell bottom to form a hole. Make 2-3 holes, equidistant.
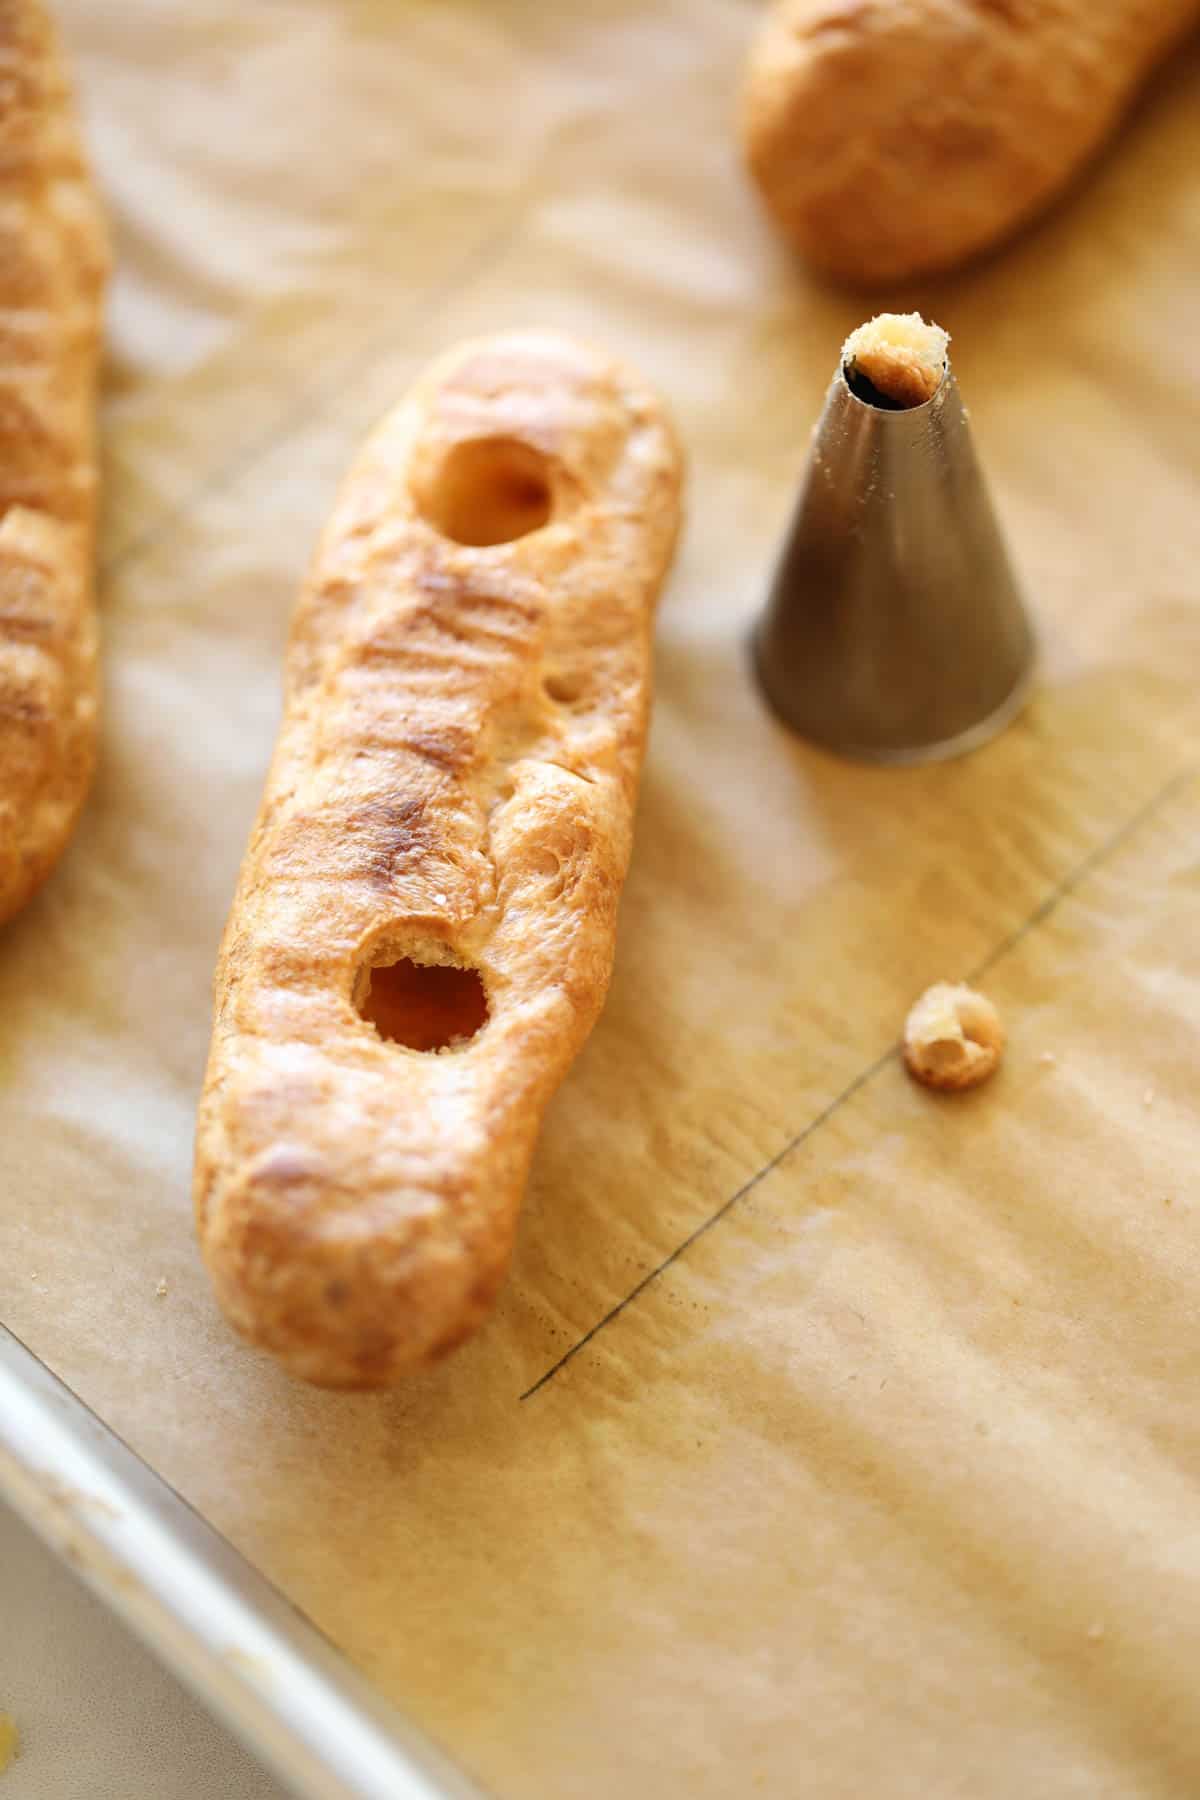
Filling the Eclairs
- Transfer pastry cream to a pastry bag fitted with the same tip and fill each hole with the cream.
- You may need to insert the pastry tip a bit deeper into the hole than you think in order to fill the shell.
- Continue to fill the éclair until the éclair feels full and heavy.
- You can scrape any excess cream off the holes with a knife or a spatula.
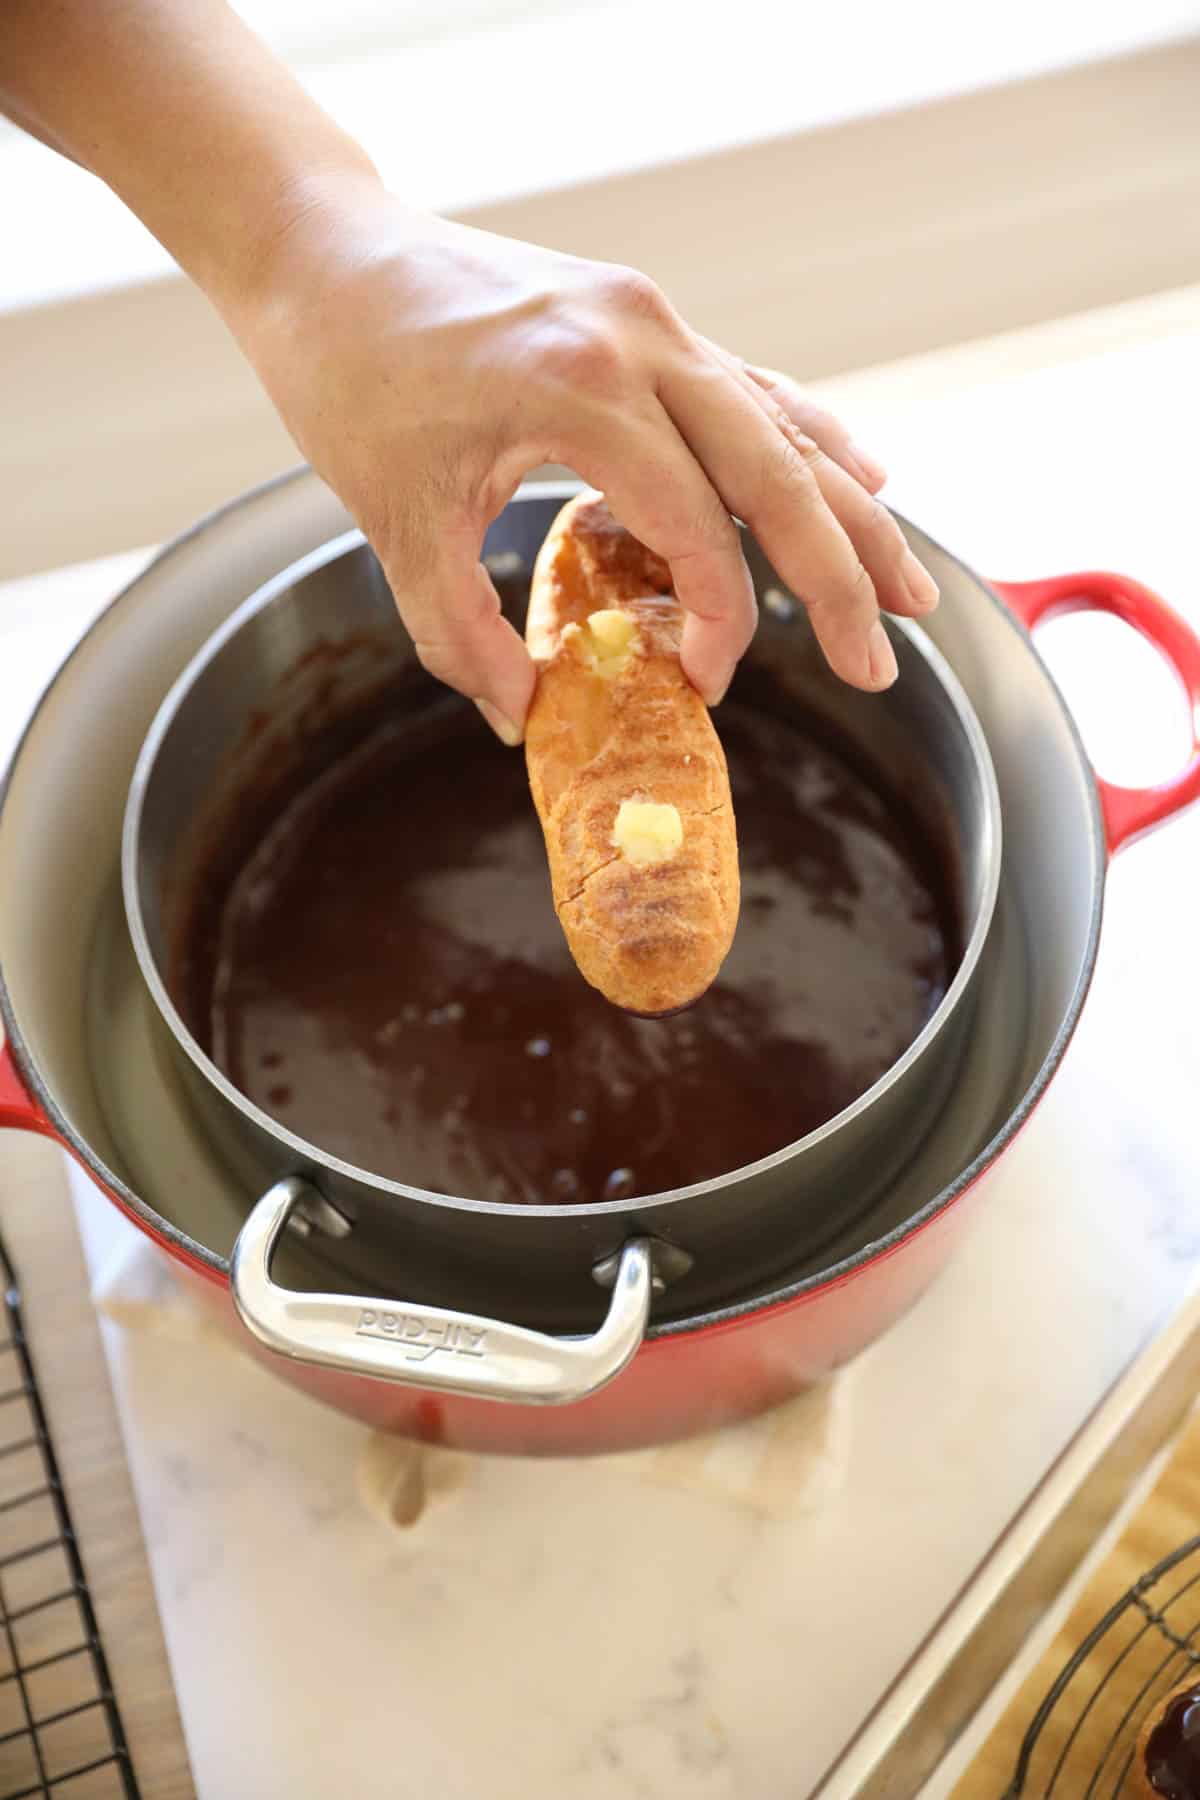
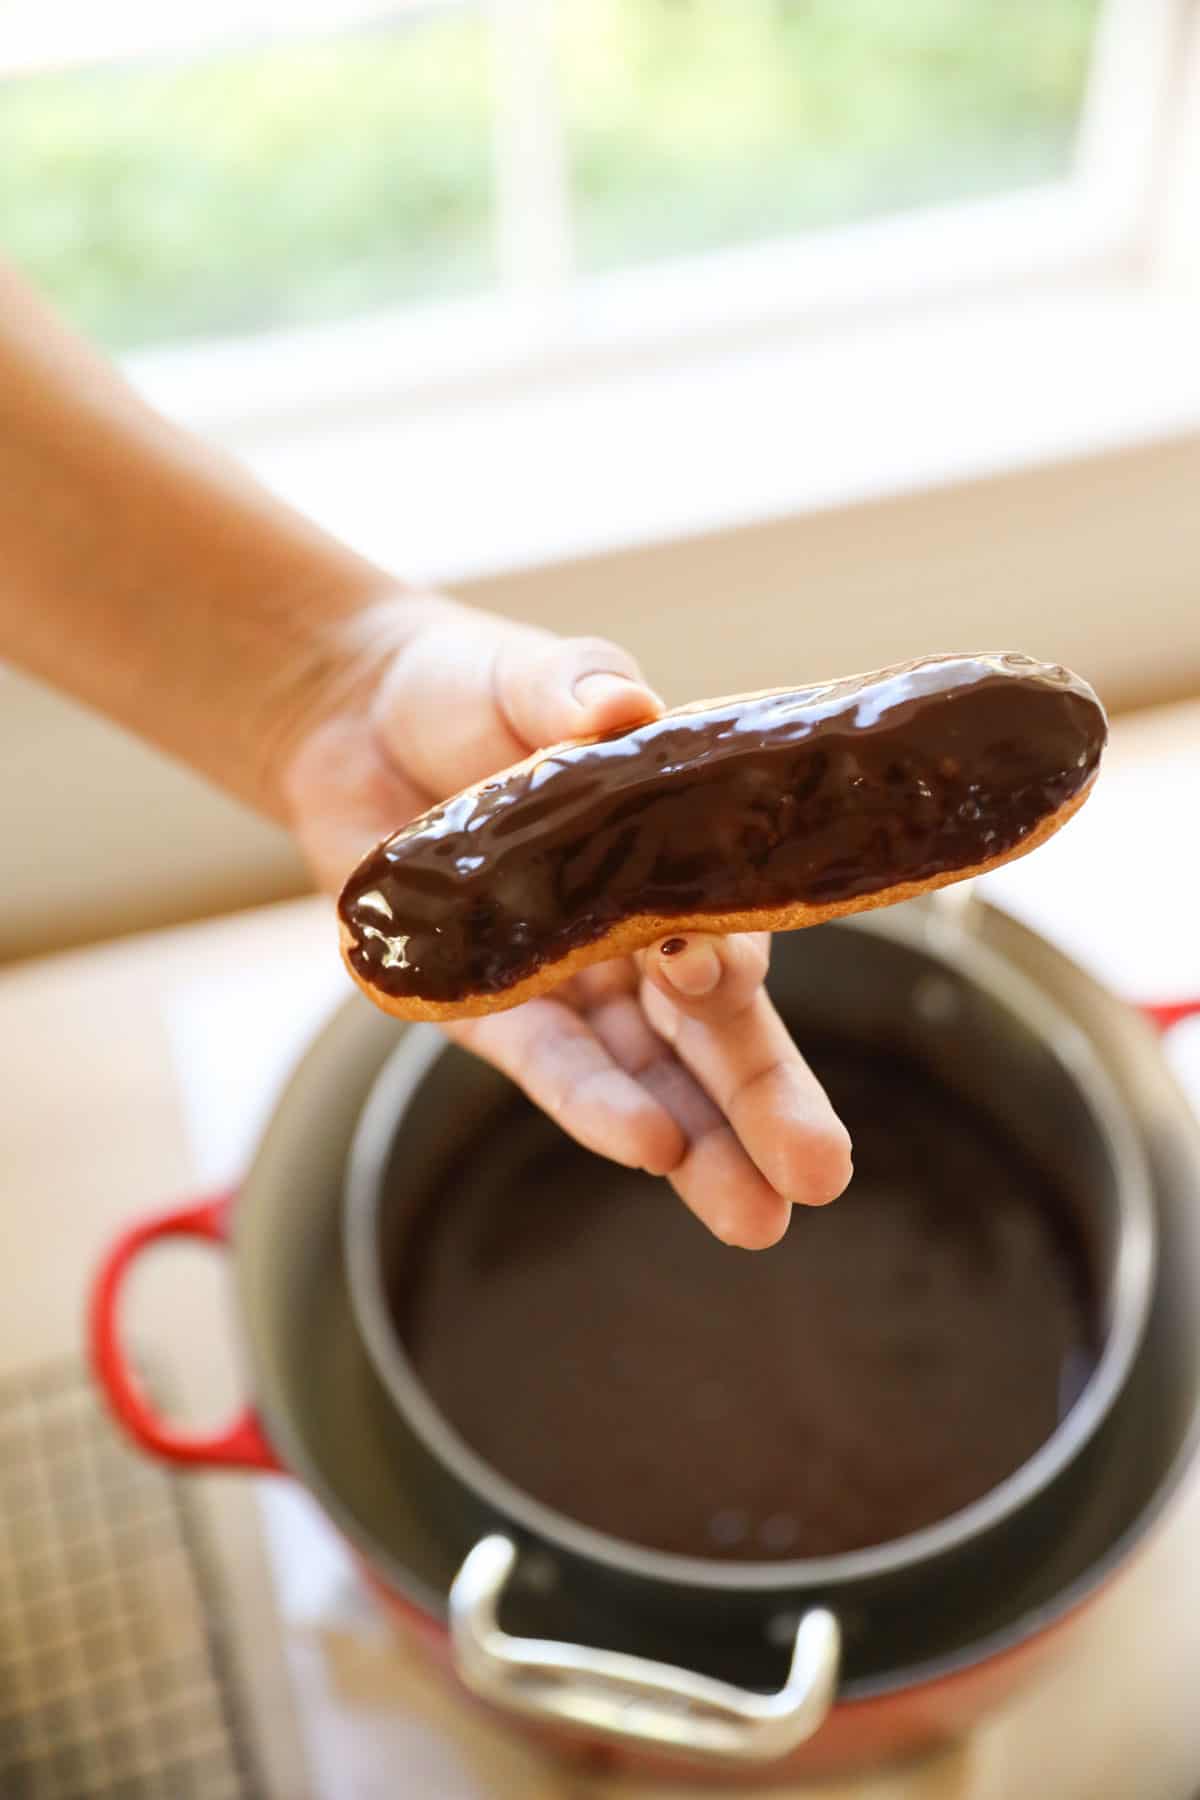
Step#4: Dipping the Eclairs
- Fill a large Dutch oven with 2-3 inches of water.
- Then place a medium pot inside the large pot to create a “double boiler”.
- Then heat the heavy cream and add the chocolate chips. Whisk chips and cream together until a smooth ganache forms.
- Then transfer the double boiler to your work surface, I like to keep the chocolate pot in the Dutch oven filled with hot water in order to keep the chocolate in liquid form.
- Place each éclair topside down in the chocolate about 1/3 of the way just to coat the tops with chocolate, remove éclair and place it on a cooling rack to allow chocolate to set.
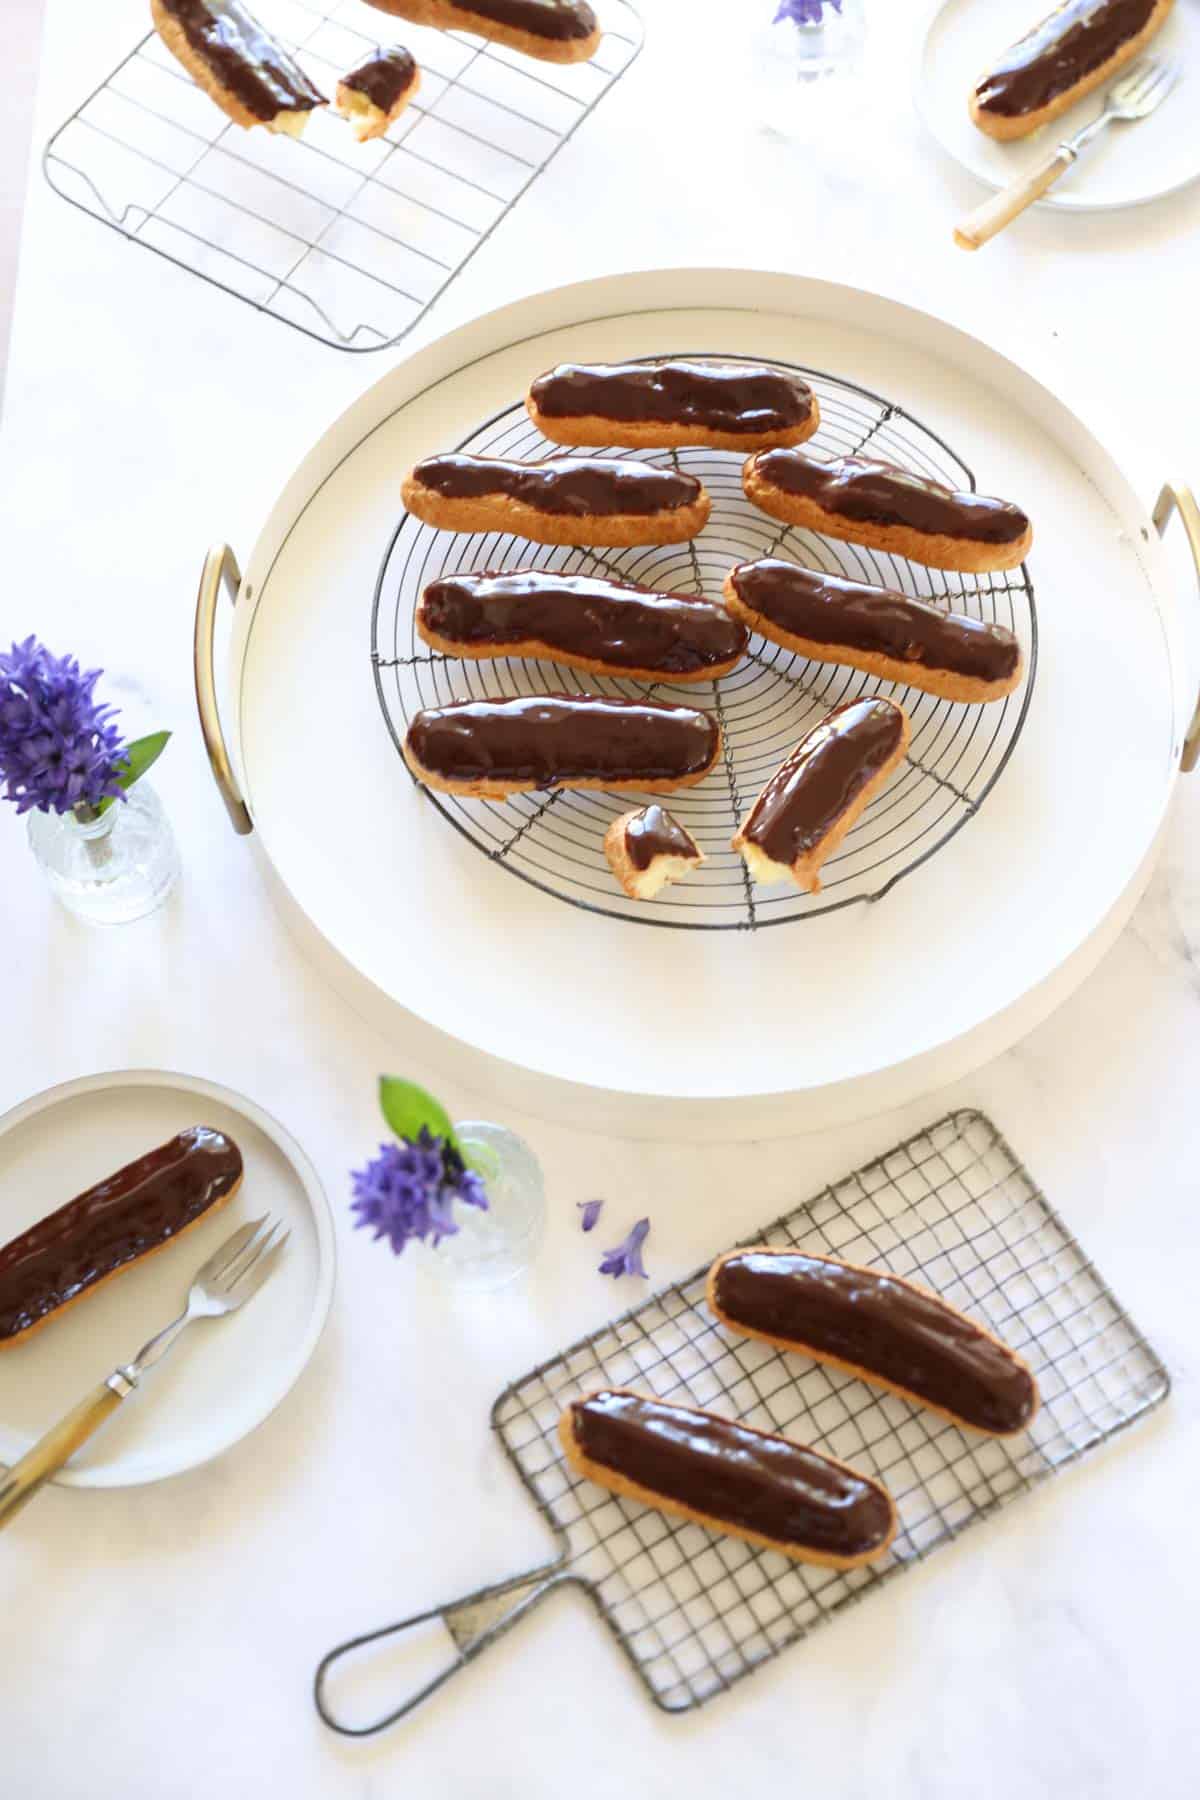
Step#5: Refrigerate The Eclairs
- Eclairs are best enjoyed when they are nicely chilled! It’s also the great part about deserving this dessert since all the prep is done in advance.
- The best way to refrigerate them is to leave them uncovered, and placed them on a cooling rack.
- This will prevent ruining your nice chocolate glaze and avoid any condensation from forming on the bottom and making your eclairs soggy.
- Place on a cake stand and serve!

Storage and Serving Tips
- Keep eclairs on a cooling rack while refrigerating. This will help to keep the pastry shells crisp.
- Do not cover the eclairs with foil or plastic wrap. It can cause condensation which can make the eclairs soggy.
Please let me know if you make this recipe
by leaving a rating and review below!
Easy Chocolate Eclair Recipe
Learn how to make this Easy Chocolate Eclair Recipe that will be sure to impress! Easier than you think and guests are always so impressed!
Ingredients
FOR SHELLS:
- 9 tbsp (135 g) butter
- 1 cup (240 ml) of water
- ½ tsp (2.5 ml) of salt
- 2 tsp (10 ml) sugar
- 1 cup (120 g) of flour
- 4 large eggs, lightly beaten
FOR PASTRY CREAM:
- 2 cups (480 ml) milk
- vanilla bean, seeds and bean
- 4 egg yolks
- 1/3 cup sugar
- 1/3 cup (40 g) cornstarch
- 1 tbsp (15 g) butter
GLAZE:
- 1 ½ (360 ml) cup semi Sweet Chocolate Chips
- 1 cup (240 ml) warm heavy cream
Instructions
- Preheat oven to 400F (200C) degrees. Line a sheet pan with parchment paper and set aside.
- Mix together the salt, sugar and flour and Set aside.
- Place water and butter in a pan and bring to a boil. Remove from the heat and with a wooden spoon stir in your flour mixture, until it turns into a ball and pulls away from the sides. Allow to cool slightly and then make a flat indentation in the dough ball and gradually stir in the 4 beaten eggs, it will be hard to combine and slimy at first but not to worry keep stirring, changing to a whisk if needed, and it will come together into a sticky paste. Allow to cool slightly.
- Transfer the dough into a pastry bag, fitted with a ½ inch round tip. Pipe out 1 4- inch line Form into place with a wet spoon or wet fingers. As dough cools it's less sticky and easier to handle! You should get 10-12 eclairs
- Bake 400F/(200 C) 15 mins. DO NOT OPEN DOOR. Then reduce oven to 350F (176 C) and bake for another 20-25 mins.
- Once golden brown and puffed, turn oven off, open door. Make small incisions (1/2 inch) in the side of each eclair to release the steam. Keep door propped open for 10 minutes.
- TO MAKE PASTRY CREAM:
- In a heat safe bowl add the egg yolks, sugar and cornstarch, whisk until a smooth paste forms. Set aside.
- Then in a large saucepan heat milk, vanilla paste and pod until simmering. Strain out the bean. Allow to cool slightly. Add the warm milk slowly to the egg mixture whisking all the while until combined. Wash out the saucepan.
- Pour egg mixture through a fine mesh sieve back into the clean saucepan. Heat custard on medium high until boiling, whisking all the while until thickened. Remove from heat. Allow to cool slightly. Add the butter, whisk until smooth. Transfer to a shallow container, cover with plastic wrap and refrigerate until ready to use.
- TO FILL SHELLS:
- Pierce bottom of éclairs with ¼” pastry tip, screwing the tip into the éclair to form a hole. Make 2-3 holes, equidistant.
- Transfer pastry cream to a pastry bag fitted with the same tip and fill each hole with the cream until éclair feels full and heavy.
- TO MAKE GLAZE:
- In a double boiler add the heavy cream and the chocolate chips and set heat on medium-high. Whisk chips and cream together until a smooth ganache forms.
- Transfer double-boiler to a work surface to keep the chocolate in liquid form.
- Place each éclair topside down in the chocolate about 1/3 of the way to coat the tops with chocolate, remove éclair and place on cooling rack to allow chocolate to set.
- Keep refrigerated until ready to serve.
Notes
To create uniform shells, create 4" lines with pencil on parchment paper. Then flip it over so it's visible from the other side. This will give you a guide for piping the choux pastry and assure all your eclair shells will be the same size and bake at the same rate.
To freeze the éclair shells place them in a zip lock bag, once completely cooled, and they will last for at least a month. Then place in a 300F oven for 10 minutes until thawed and crisp. Then fill as directed.
The best way to refrigerate the finished eclairs is to leave them uncovered, and place on a cooling rack, fitting into a baking tray. Storing them this way will help keep them elevated and avoid soggy bottoms from forming due to any condensation build up
Nutrition Information:
Yield: 12 Serving Size: 1Amount Per Serving: Calories: 163Total Fat: 6gSaturated Fat: 3gTrans Fat: 0gUnsaturated Fat: 3gCholesterol: 126mgSodium: 53mgCarbohydrates: 22gFiber: 2gSugar: 10gProtein: 6g

Hi Beth, and I’m finding a good recipe to make for a French dessert stall coming up I have made choux-pastry based recipes before but I was wondering how long these éclairs would be able to last outside of the fridge (on the day of the stall when they’re outside)
Your reply would be greatly appreciated, and if there’s perhaps a better idea of what to prepare for this stall, recommendations would be great.
Thank you, Zoe
Ah OK because of the heavy cream in the ganache, and the cream in the filling, I wouldn’t leave these unrefrigerated for any length of time. A better choice for a French pastry you could leave out would be these French Apple Pastries or Caneles would be ghreat too!
Hi Beth, I’ve only recently caught on with your website and videos. I love how you explain the process and make it so simple for us beginners.
There is one request however. I sometimes cannot make out some words, especially those at the end of your sentences inspite of increasing the volume on my tv.
Thank you so much!
Hi! Thanks for the lovely detailed recipe. I had a go at making them today. Mixed results, sadly.
A few parts puffed up – top shelf and closer to the edges were best. The ones on the bottom shelf were mostly very flat. So I think the lessons for me are 1. DON’T use the “fan-forced” setting. and 2. My oven cooks too hot, so to prevent burning, maybe start at 180 C? 3. Don’t use electric beaters when adding the eggs – the mixture is very sticky and friendly, it tried to swallow the beater, I ended up with batter across my midriff and kitchen! 4. Stick to small quantities so it all fits on one shelf, then make another batch later if needed.
Experiments to create proper-shaped eclairs continue…
Good tips! Hope they turn out better next time!
Oh I’m sure they will! Hope you enjoy them!
Made this tonight for the family and it is amazing!! Watching your video really helped when following the recipe. Thank you so much!!
YAY! So glad it was a hit! Yummy right? 🙂 So glad the video was a help! 🙂
Hi Beth,
I suddenly found your website while I was searching the éclair recipe. Your recipe is very clear and look very delicious.
As you said to make the shells is very trickie, it’s true ?, but I still currious since the ingridiences are so easy (all is in our kitchen almost everyday ). So my questions are :
1. How many eggs in gram instead number ( I’ve tried as your recipe but no luck, became to liquid )
2. What is the oven’s function do you use? Up n bottom flames or only bottom flames ( without fan )
Your reply is highly appreciated. I desperate curious with this recipe and this the the fourth time I’m trying.
Kind regards,
Lina Schmidt – Denmark