Pumpkin Pie Recipe with Marshmallow Topping
SHARE THIS RECIPE!


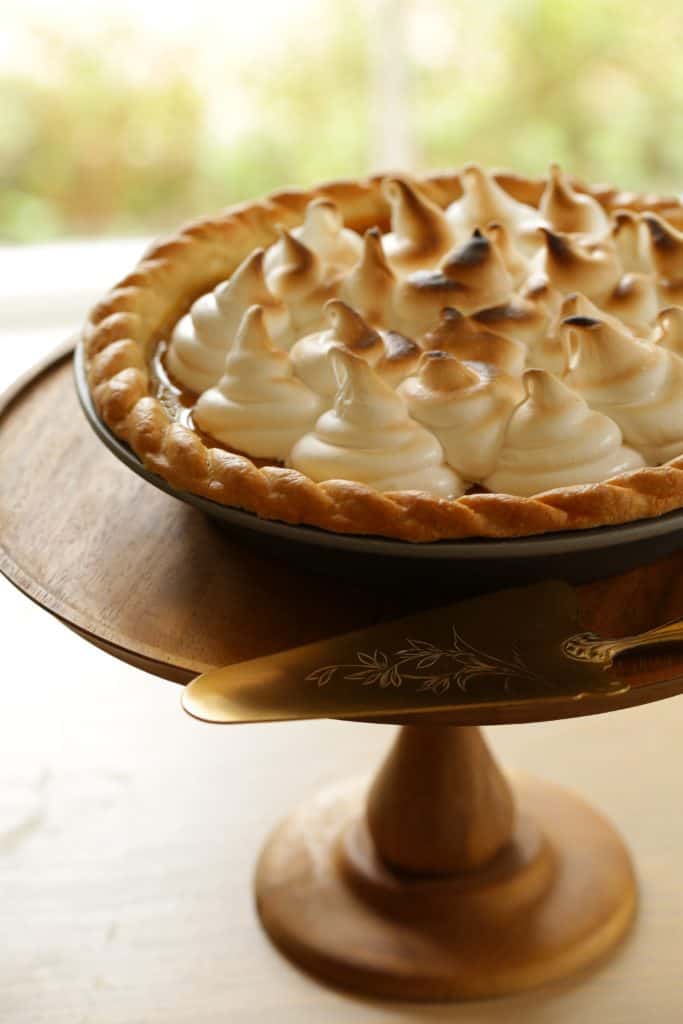
This Pumpkin Pie with Marshmallow Topping is a pumpkin pie recipe with a serious “Wow” factor.
When it comes to Thanksgiving, nothing will suffice but homemade pumpkin pie. Add a special topping like homemade marshmallow, and the results are over-the-top! No time for pumpkin pie? Try my No-Bake Pumpkin Cheesecake Mousse, an even easier pumpkin dessert!
Step 1: Make the Pie Crust
- If you want to kick this pie up a notch, you can spend a little time on creating an “Instagram Worthy” pie crust.
- This is thanks to my most favorite pie-making gadget, The Pastry Wheel Decorator by Talisman Designs.
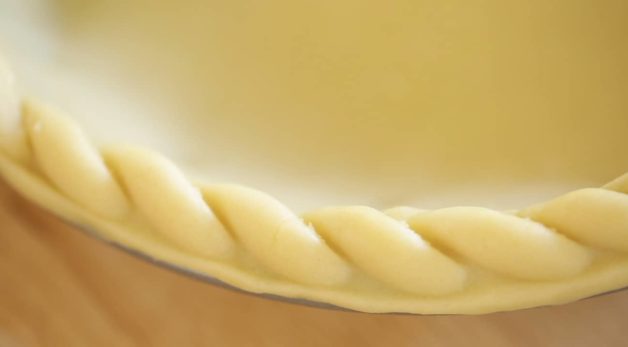
This product is SO easy to use and will make you look like such a “Pie Boss” on Thanksgiving!

How to Create a Decorative Crust
- Place the wheel on the edge of your pie crust and zip around the edge—it’s that easy!
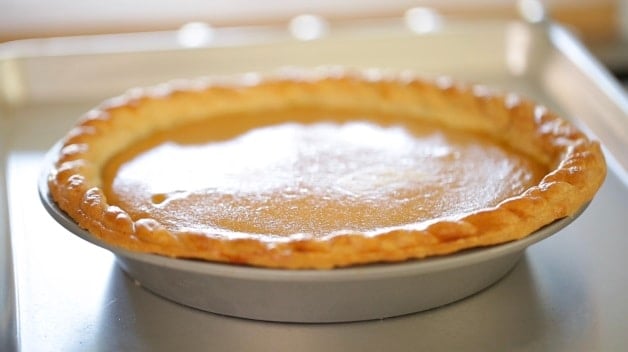
- I find this tool works best with a metal pie, like the one shown below, because the rim is flat, allowing the pie crust decorator to zip around the rim unencumbered.
- For this recipe, I’m using a 9″ pie tin.
- To preserve the beautiful design of your crust it helps to place the tin in the freezer to firm up while you create the filling.

Do I cook pie crust before filling?
- The great thing about this pumpkin pie recipe is that you do not need to pre-bake the crust before filling.
- You can bake both at the same time. Just make sure your pie dough is well-chilled or frozen before hitting the hot oven.
- I typically place my tin in the freezer for 15 minutes before baking and filling.
Step 2: Make the Pumpkin Pie Filling
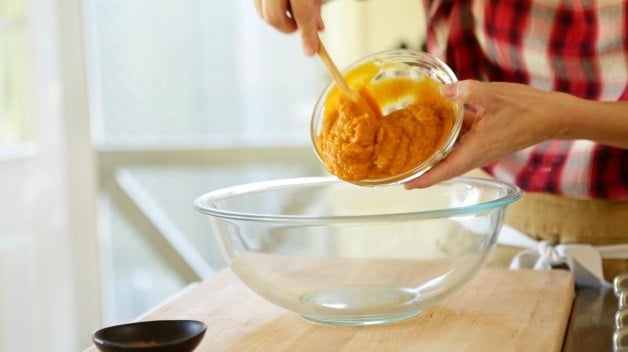
- In a large bowl, you’ll add pure pumpkin puree.
- This recipe calls for a full 15-ounce can of puree, which is nice since you’ll use the whole quantity for this recipe.
- However, if you can only find the 28-ounce can and have leftover puree, you can use it to make my Pumpkin Scones or my Pumpkin Cinnamon Roll Loaf.
What is the difference between pumpkin puree and pumpkin pie filling?
- Pumpkin puree is just that – cooked, pureed pumpkin, and nothing more.
- Pumpkin pie filling is the puree with different spices added to it. Since we are adding our own for this recipe, pumpkin puree is best.
- The thing about pumpkin pie spice is it’s really easy to make at home! You can try my Homemade Pumpkin Pie Spice Recipe and see for yourself.
- I bet you probably already have the spices for homemade pumpkin pie spice sitting in your pantry too!
- Once you have a little jar of it prepared it can sit in your pantry until you are ready to use it in a Pumpkin Chocolate Cheesecake or my extra moist and delicious Pumpkin Bread Recipe.
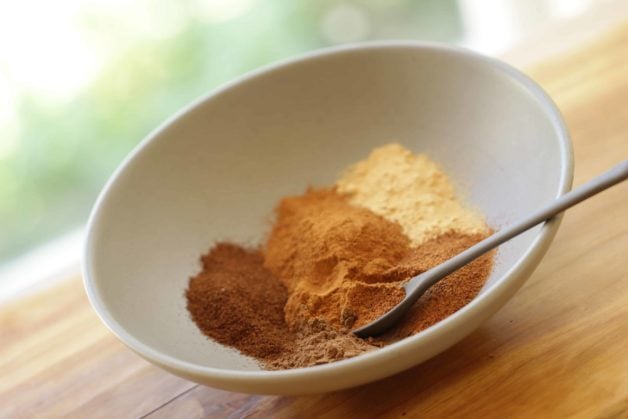
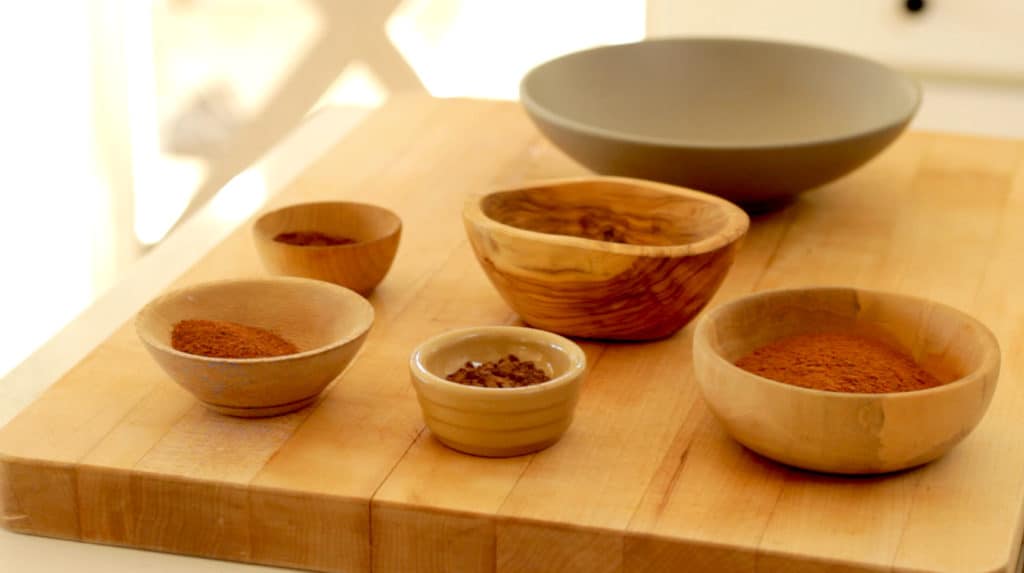
What’s in pumpkin pie spice?
Pumpkin Pie Spice is made by combining (3 tbsp) cinnamon, (2 tsp) ground ginger, (2 tsp) nutmeg, (1 1/2 tsp) allspice and (1 1/2 tsp) cloves.
Do You Need Sweetened Condensed Milk for Pumpkin Pie?
- In a word, yes! My Mom has always favored the use of sweetened condensed milk in pumpkin pies, mostly because of its texture and firmness.
- I’ve tried in years past to use a heavy amount of egg yolks to get the same effect, but it just doesn’t compare!
- It doesn’t create those nice clean slices of pie, the filling just doesn’t set the same.
- So it’s best to stick with tradition and use sweetened condensed milk. Mom knows best!
- Have extra sweetened condensed milk? Use it to try my Nutella Ice Cream, No Machine Needed!
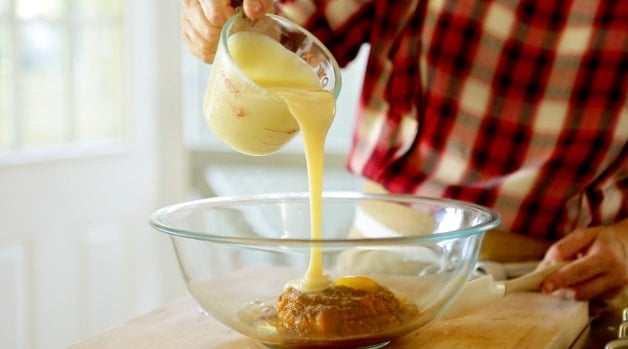
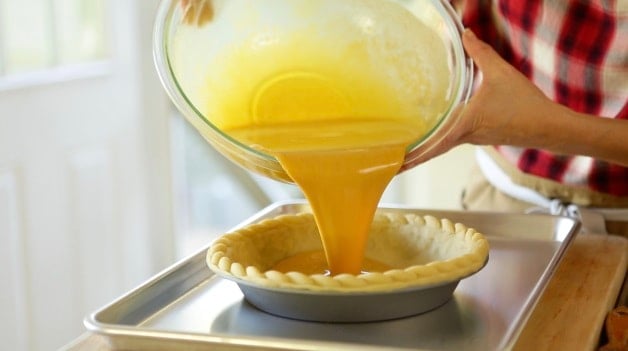
Whisk the filling until well-combined, then pour into a pie shell which should be well-chilled or frozen.
Egg White vs Egg Yolk or Egg Wash?
- Right before placing in the oven, brush the edges of the crust with egg white for a pretty shine.
- I find the egg white works better over egg yolk or egg wash, mainly because it doesn’t burn like egg yolk or turn your crust soggy like an egg wash can.
- Instead, it just adds a pretty shine to a golden-brown crust.
Baking the Pie
- Place the pie on a baking sheet in a 450°F (232 °C) oven for 15 minutes, then reduce the temperature to 350°F (132 °C) for 40 more minutes.
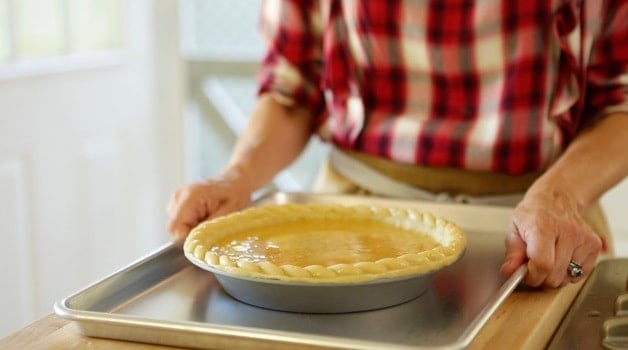
- The very hot oven helps the pie crust set quickly, and then it continues baking at a lower temperature to cook the pie filling through.
- It’s done when a knife inserted comes out clean. Remove from the oven and allow to cool.
Make-Ahead Tip:
You can make this pie the day before and then refrigerate it overnight. Then, before serving, make the marshmallow topping!
Step 3: Make the Marshmallow Topping
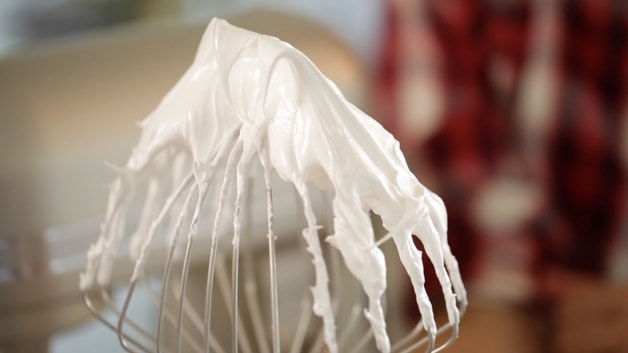
- Add the egg whites, corn syrup, vanilla extract, and cream of tartar to an electric mixer.
- Cream of tartar stabilizes the marshmallow and prevents the egg whites from falling.
- If you don’t have cream of tartar, you can substitute it for 1/2 teaspoon of fresh lemon juice.
- Whip the mixture until it shows soft peaks, then add the sugar slowly, whipping until stiff peaks form.
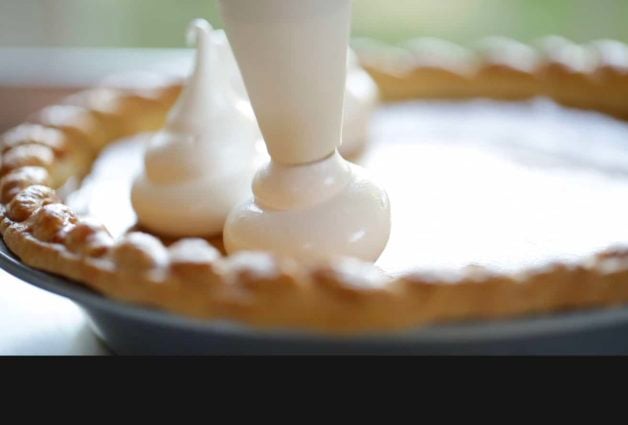
Piping the Marshmallow Topping
- Transfer your marshmallow topping to a pastry bag, fitted with a round tip and begin piping about a half-inch from the crust to expose a little of the pumpkin filling.
- I think it’s prettiest to see a little pumpkin peeking through and so your guests know what’s inside the pie.
Broiling the Topping
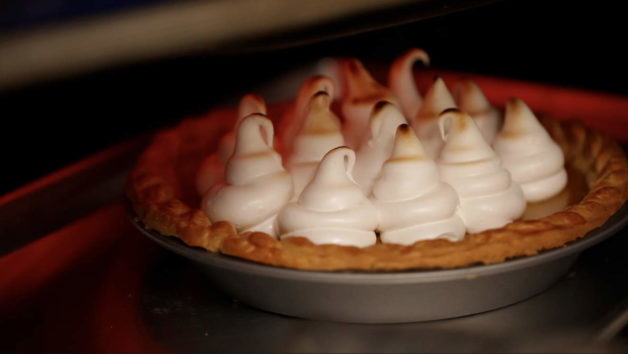
- When it comes time to serve, place the pie under the broiler until the peaks begin to brown.
- Do not walk away, or you will burn your marshmallow topping. Marshmallow burns very quickly if not watched carefully!
- You can rotate the pie to ensure the topping is browned on all sides.
- Place on a cake stand and present it to the table! This pie always gets lots of ohs and ahs and your guests see that you’ve made your own marshmallow topping from scratch!
- However, if you are really pressed for time, you can also use store-bought marshmallows and pop them on top.
If You Enjoyed This Recipe,
Please Leave a Rating And a Review Below!

Pumpkin Pie with Marshmallow Topping
This Pumpkin Pie Recipe with Marshmallow topping is a fun twist on a Thanksgiving dessert with a real WOW factor!
Ingredients
For Crust:
- 1 ¼ cups (150g) flour
- 3 tbsp (31 g) powdered sugar
- ½ tsp (2.5 ml) salt
- ½ cup (120 g) butter, chilled and diced into cubes
- 1 egg yolk and egg white separated
- 2 tbsp (30 ml) ice water
Filling:
- 15 ounce can (422 g) pure pumpkin puree
- 1 ¼ tsp (6.25ml) pumpkin pie spice
- ½ tsp (2.5 ml) salt
- 2 eggs
- 14 ounce can (396 g) sweetened condensed milk
Marshmallow Topping:
- 2 egg whites
- 1 cup (240 ml) of light corn syrup
- pinch of salt
- ½ tsp (2.5 ml) vanilla
- ¼ tsp (1.25 ml) cream of tartar
- 2 tbsp (25 g) sugar
Instructions
- In the bowl of a food process combine flour, powdered sugar and salt, pulse to combine. Then slowly add butter pulsing until a coarse meal forms.
- In a small bowl whisk together the egg yolk and ice water and then slowly add this mixture to the food processor pulsing until dough ball forms. (reserve egg white)
- Turn dough out onto a floured surface, flatten into a disk and wrap in plastic wrap. Chill in the refrigerator for at least 1 hour.
- Preheat heat oven to 450F (232C)
- Once the dough is chilled, roll out to 1/8” thickness and fit into a 9 " pie tin. Trim edges of dough around rim and then fold up to create a double crust.
- Press crust together to form an even level around the rim. Then use the Pastry Wheel Decorator to run over the pie crust to form a decorative edge. Then place the pie shell in the freezer to set up while you prep the filling.
- In a large bowl combine the pumpkin puree, pumpkin pie spice, and salt. Whisk until smooth. Then add the eggs and sweetened condensed milk.
- Remove pie from freezer and place on a baking sheet. Pour filling into shell. Lightly brush pie crust with the egg white to seal crust and ultimately form a golden, shiny crust.
- Bake at 450F (232C) for 15 mins. Then reduce temperature to 350F and bake for another 35-40 mins until pie is set. Place a pie shield, or strip of aluminum foil, around the crust to prevent over-browning.
- Allow pie to cool completely and then make the marshmallow topping.
- Place 2 egg whites, corn syrup, salt, vanilla, and cream of tartar in a bowl and whip on high until stiff peaks form and mixture is glossy. Slowly add sugar.
- Transfer marshmallow to a pastry bag fitted with a round tip. Pipe out decorative mounds or swirls in the center of the pie.
- If you are not serving right away, the pie can be refrigerated, uncovered, until ready to serve. Then proceed with the last step of broiling.
- Place pie under the broiler for 1-2 mins until marshmallow topping turns golden brown.
- BE CAREFUL! Marshmallow burns quickly so please keep an eye on it while broiling, do not walk away! Enjoy! xx
Notes
You can make this pie the day before and then refrigerate overnight. Then, before serving make the marshmallow topping!
Nutrition Information:
Yield: 8 Serving Size: 1Amount Per Serving: Calories: 324Total Fat: 10gSaturated Fat: 5gTrans Fat: 0gUnsaturated Fat: 4gCholesterol: 92mgSodium: 187mgCarbohydrates: 51gFiber: 2gSugar: 45gProtein: 10g

I made this recipe and it was a total hit. Thank you
I’m so glad it was a hit! 🙂 YAY!!
Hi Beth,
Would using fresh cooked pumpkin work the same in this recipe? I have pumpkin pie pumpkins grown in my garden that I would like to use.
Thanks!
Mary Ann
Oh sure you could try that. You may want to roast the pumpkin first and then puree it for sweetness and concentrated flavor 🙂
Thanks Beth!
Hi Beth!
Would this recipe work for mini pumpkin pies? I want to try to filling in muffin tins with pie crust. Thank you!
Oh sure you could do that too 🙂 Hope you enjoy!
Hello Beth,
What a great recipe – I think this was the best pumpkin pie I’ve ever made! I was thrilled with how well it held up and the texture was perfect. Thanks so much for making our lives better. Best from Maryland, Karen
Aww Karen it’s my pleasure! I’m so glad the pie was a hit! This recipe is such a family favorite at our house too! 🙂
So whole cloves in the pumpkin pie spice?
No ground cloves are what you need. I’ll update the recipe ASAP to be sure others know as well 🙂 Thanks for the catch!
I am in baking in high altitude (6500 ft). Will the measurements and time be the same/
Hi Beth I fallow for years, I enjoy all your recopies and the manner you present it easy to make and beautiful presentation .
What size pie tin please?
Oh sure this recipe is for a 9″ pie pan. Hope you enjoy it!
I made this pie last year around thanksgiving. And guess what? I’m going back to it again this month! The pie definitely tastes better the next morning (all the juices combined and soaked together). And, it was easy and fun. Thank you Beth. Been following you for years.
Awe so glad to hear the pie was a success!! YAY! And thanks also for all your support over the years! It always means a lot 🙂 xo