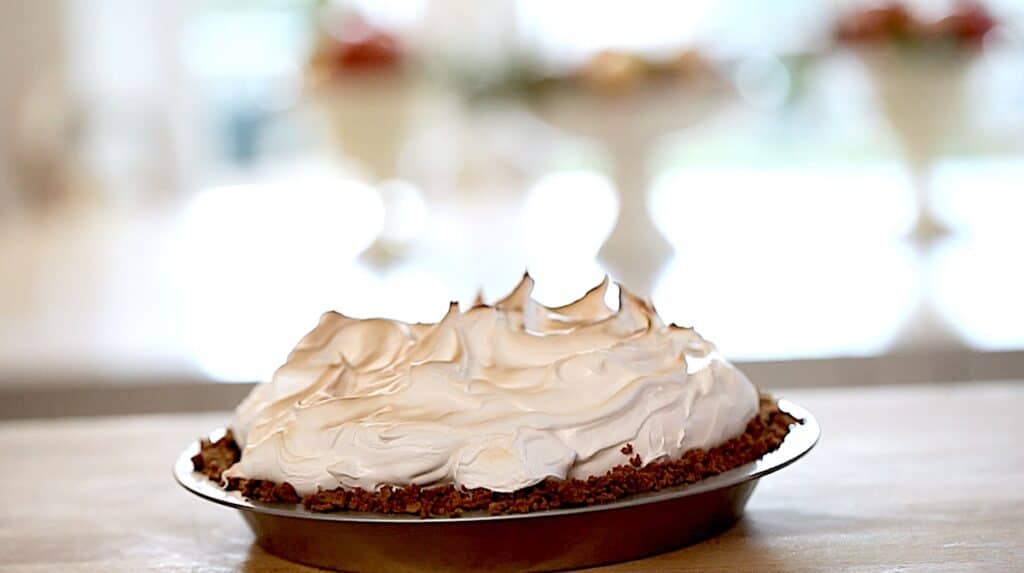
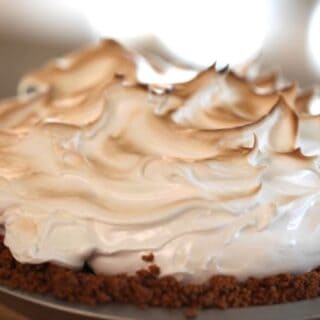
Beth’s S’more Pie Recipe
SHARE THIS RECIPE!

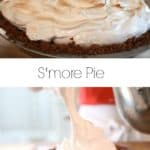
If you are looking for a memorable Thanksgiving Pie Recipe, look no further than this S’more Pie. It’s elegant and delicious and so easy to make too!
It will bring back a lot of childhood memories sitting around the campfire. While this version may be a bit more grown-up, rest assured it loses none of the great s’more flavors!
Looking for an easier S’more dessert to make? Try my S’more Pudding Pots instead! They are served as cute individual portions and use store-bought marshmallows, saving you the time of making your own!
Watch My Video Demo of This Pie Recipe Below!
Subscribe to My YouTube Channel and Never Miss a Recipe!
Step#1: Make the Graham Cracker Crust
All great s’mores start with the graham crackers, in this pie, our graham cracker base will serve as the crust. To avoid dragging out the food processor, you can place them in a Ziploc bag and give them a good whacking with a rolling pin.
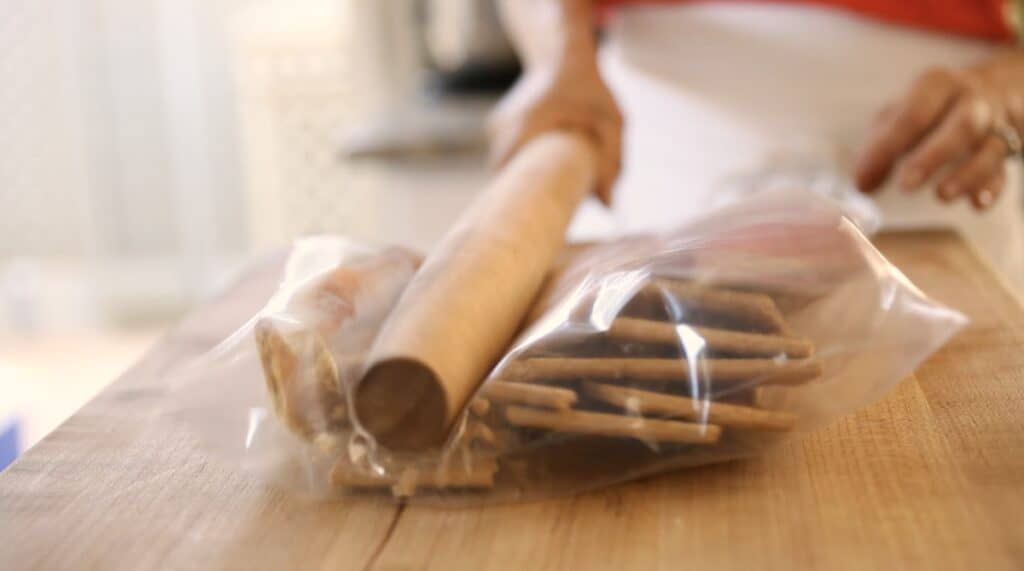
Keep whacking until you get a coarse crumb, then roll the rolling pin over the bag to get a finer crumb. This method takes minutes to create and no food processor to clean!
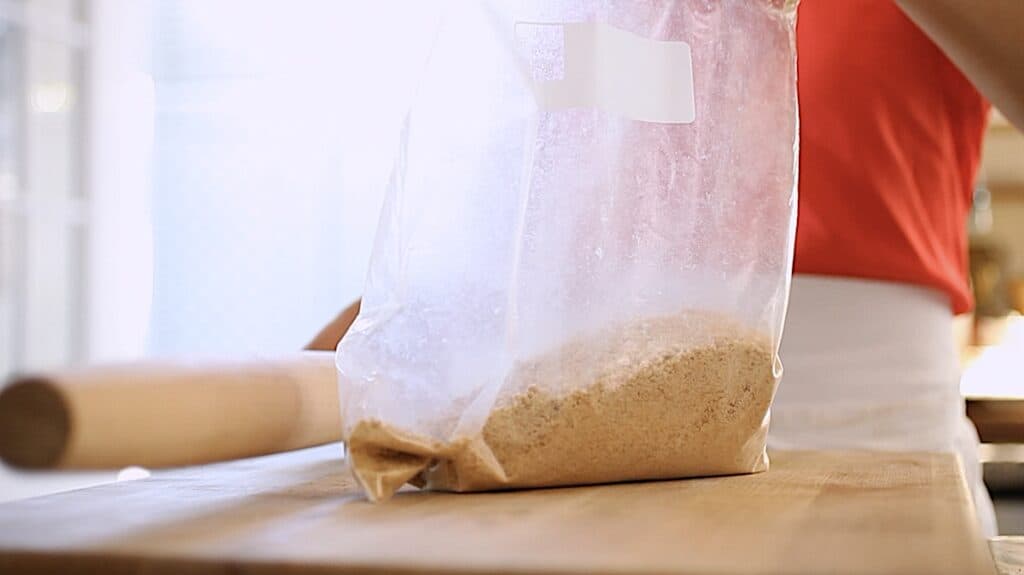
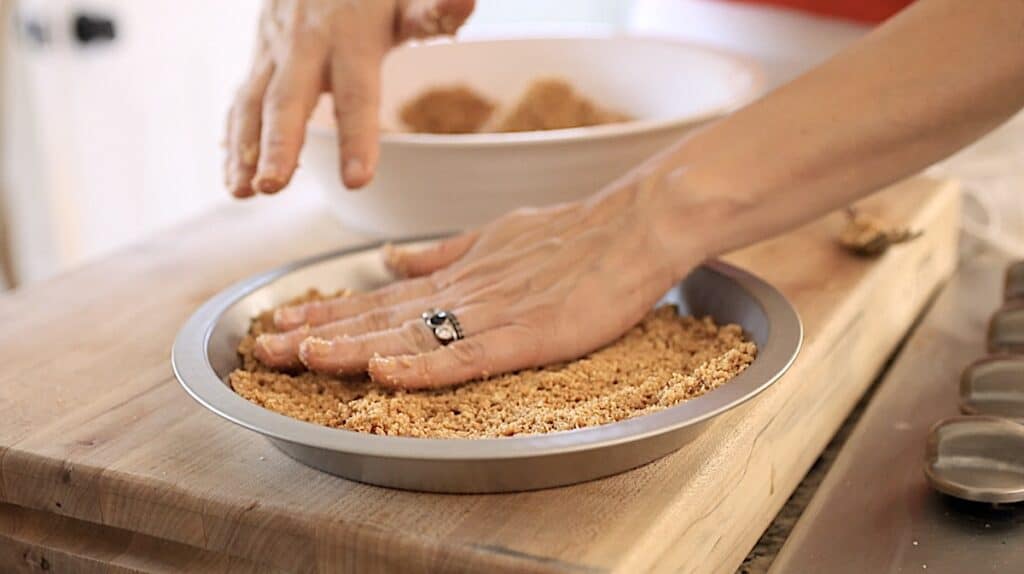
Once the graham crackers crumbs have been mixed with the butter, sugar, and salt, transfer them to a metal pie plate and pat down the crumb mixture first. This will help the crumb base adhere to the bottom and make your pie easier to slice once the pie is baked.
How To Create a Nice Crust?
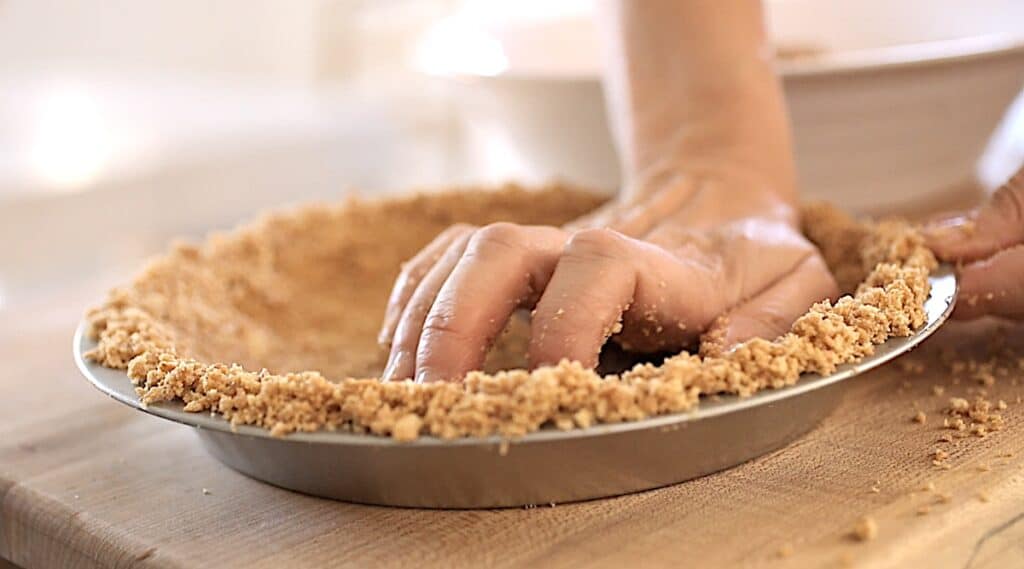
Once the bottom is packed down, press the crumb mixture up the sides with the palm of your hand. This will force the crumbs to move upwards, creating a nice crumbly crust. It will be fragile at this stage, but once baked the butter in the crumbs will help the crust set a bit further.
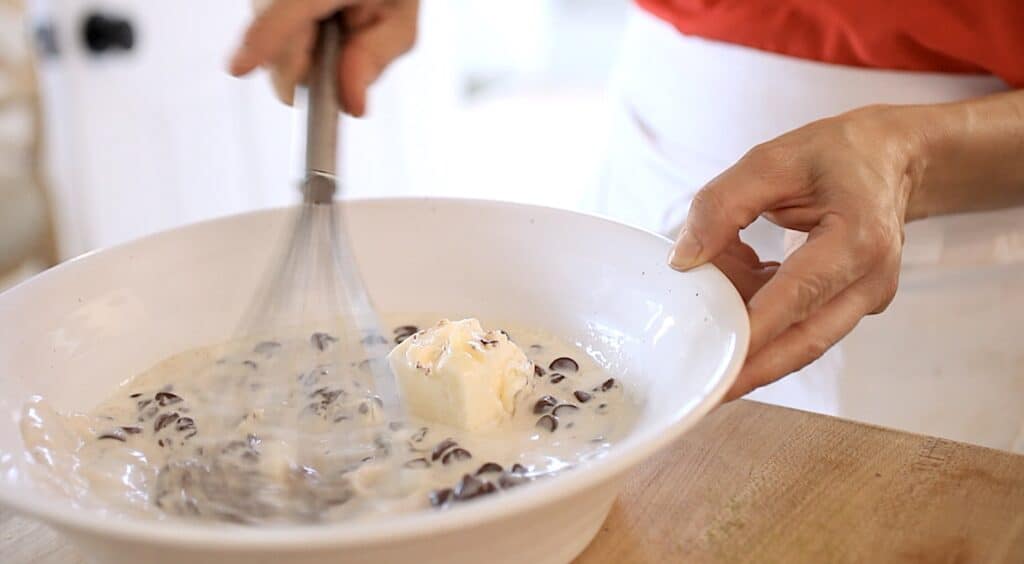
Step#2: Make the Chocolate Pie Filling
The chocolate pie filling will represent the chocolate bar in our s’more pie. To keep the texture as close to a chocolate bar as possible, the filling is essentially a chocolate ganache with a bit of butter and eggs for a bit lighter texture.
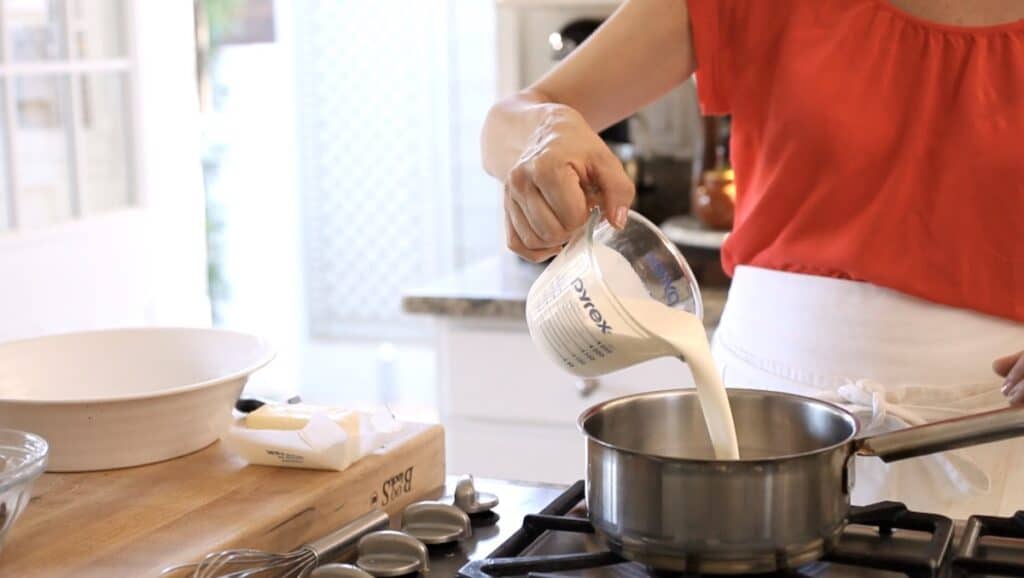
You’ll begin by heating the heavy cream until hot. This will help melt the chocolate and butter.
Milk Chocolate and Semi-Sweet Chocolate vs. Bittersweet Chocolate
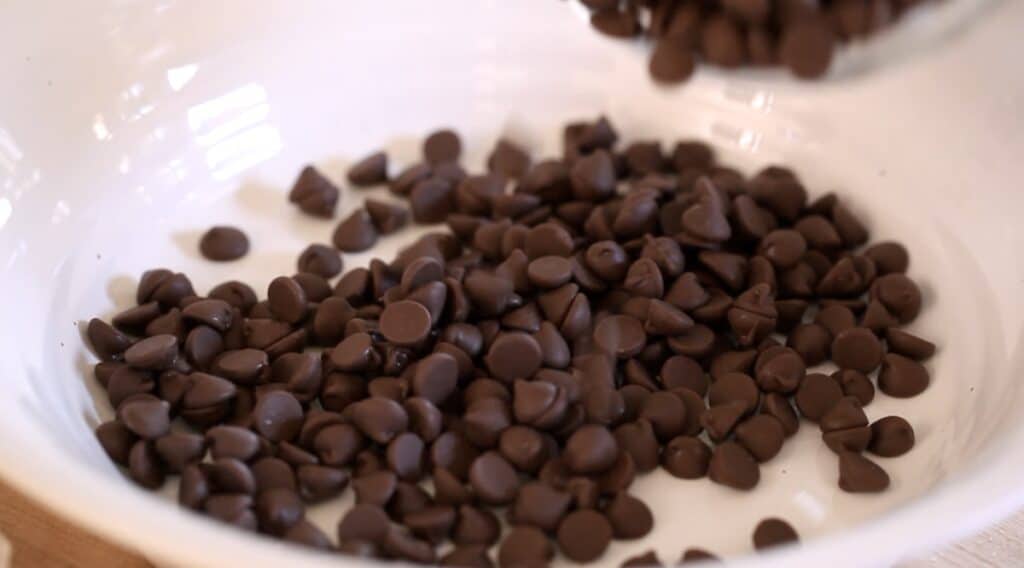
The flavor of the chocolate is really a matter of preference. I like to mix the chocolates and use a combination of milk chocolate and semi-sweet chocolate.
But if you prefer bittersweet chocolate you can do that too. The marshmallow topping is pretty sweet so the bittersweet should be fine without adding any additional sugar.
You Must Use Chocolate Chips
- Chocolate chips have stabilizers in them which allows the chocolate to re-set, and keep its shape after it cools. Think about a chocolate chip cookie, the chips are warm and gooey when fresh out of the oven but as soon as they cool, they harden while still retaining their shape of a chip in the baked cookie.
- If you’ve ever used chocolate bars for cookies you’ll notice how much the chocolate spreads and typically doesn’t retain its chunk-like shape but instead turns into small pools of chocolate.
- That’s because it doesn’t contain the stabilizers. So, if you use the chocolate bars in this recipe or lower quality chocolate chips, your pie will have a hard time setting once baked.
Getting the Chocolate Chips to Melt Quickly
It’s best to place the chocolate chips and the butter in a shallow bowl and then pour the hot cream over it. The shallow bowl will help the chocolate and butter melt quicker than a deeper bowl.
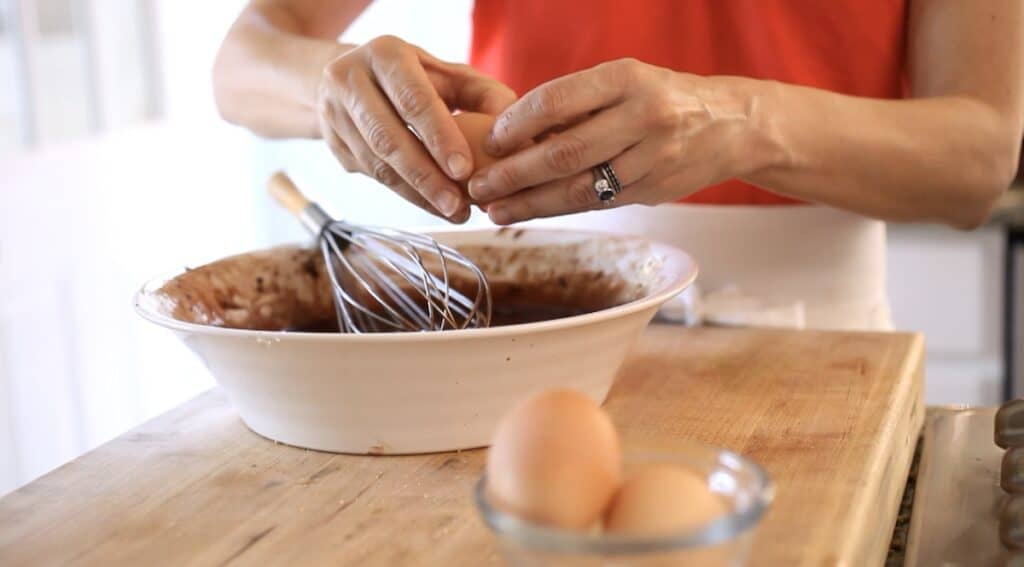
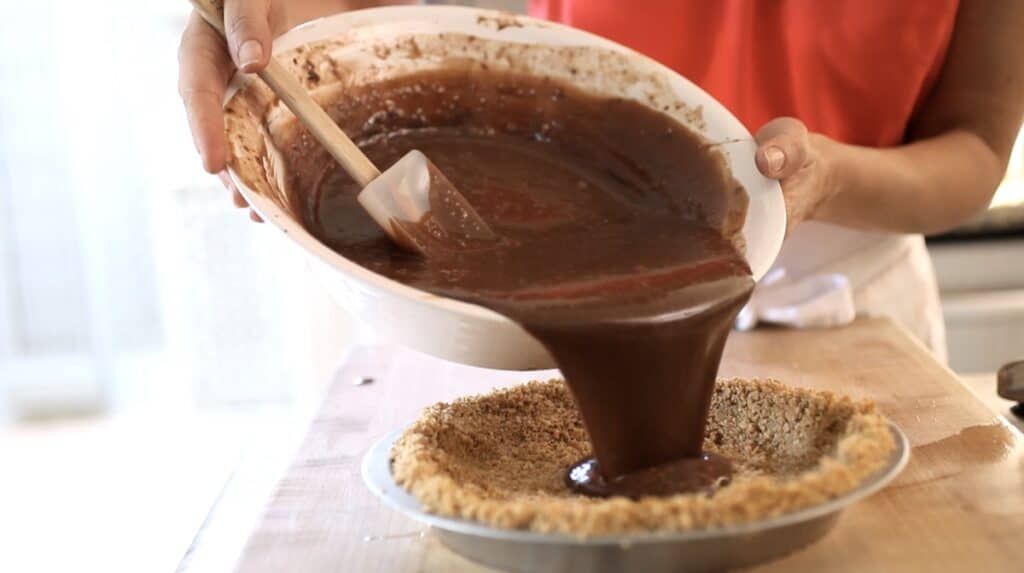
Fill the Pie and Bake
Then you’ll add the eggs and vanilla extract and whisk it well. The mixture should be smooth and silky.
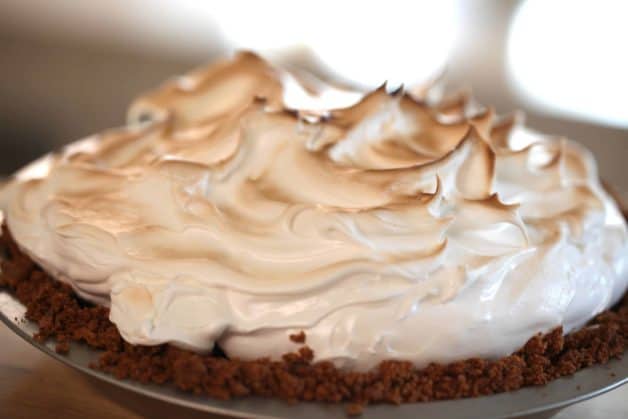
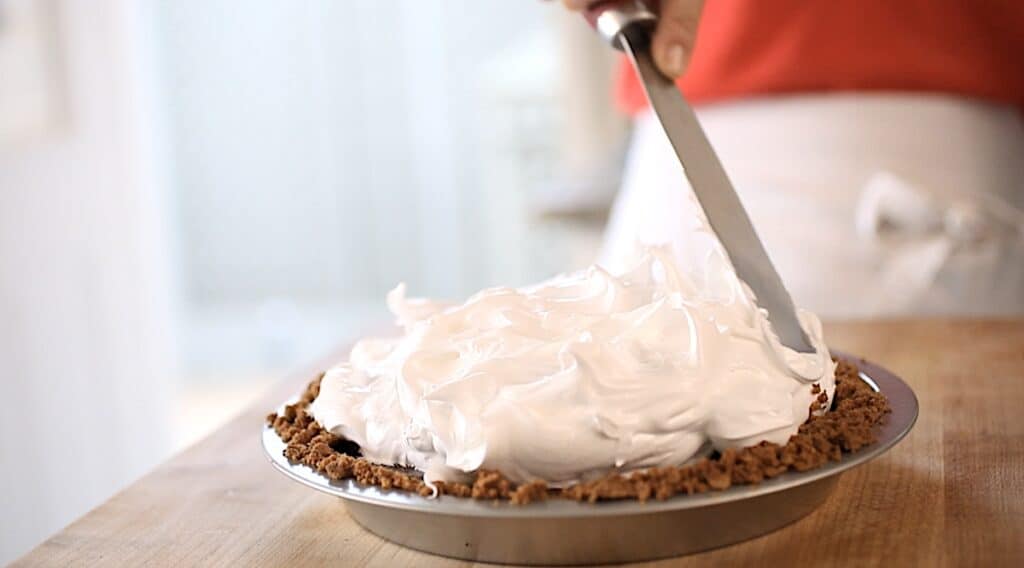
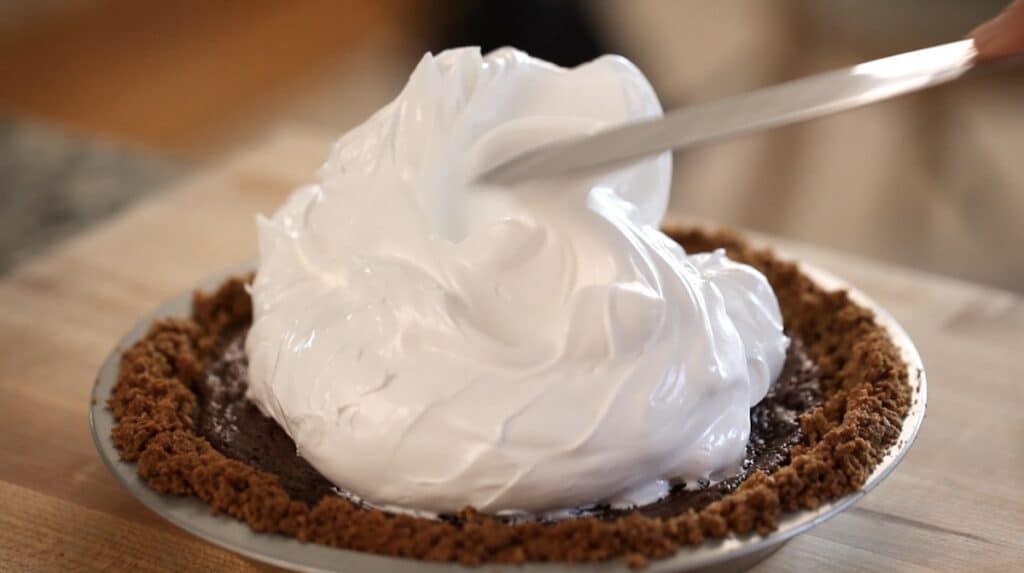
Then pour the filling into the crust and bake. Allow the pie to cool completely before adding the marshmallow topping.
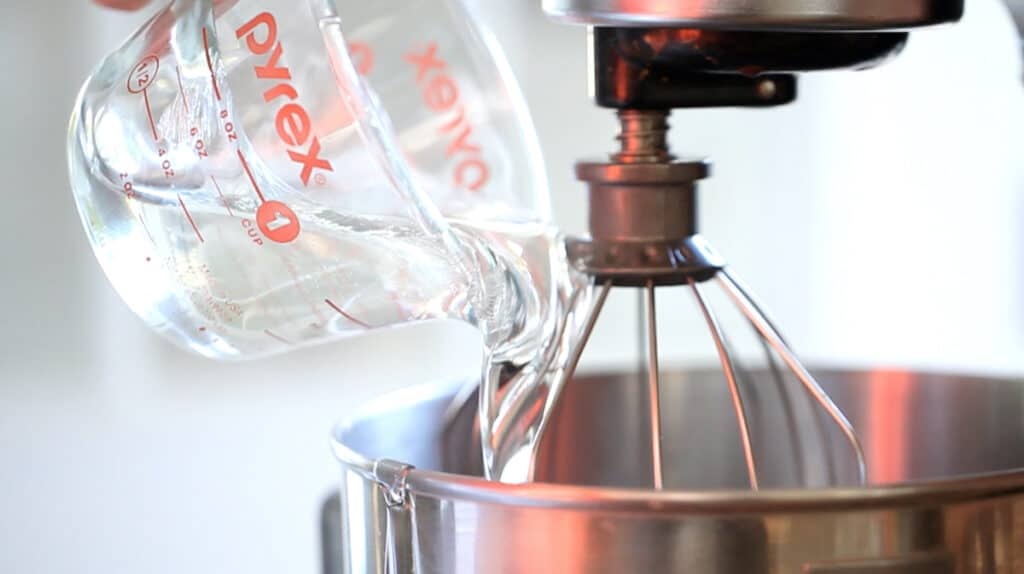
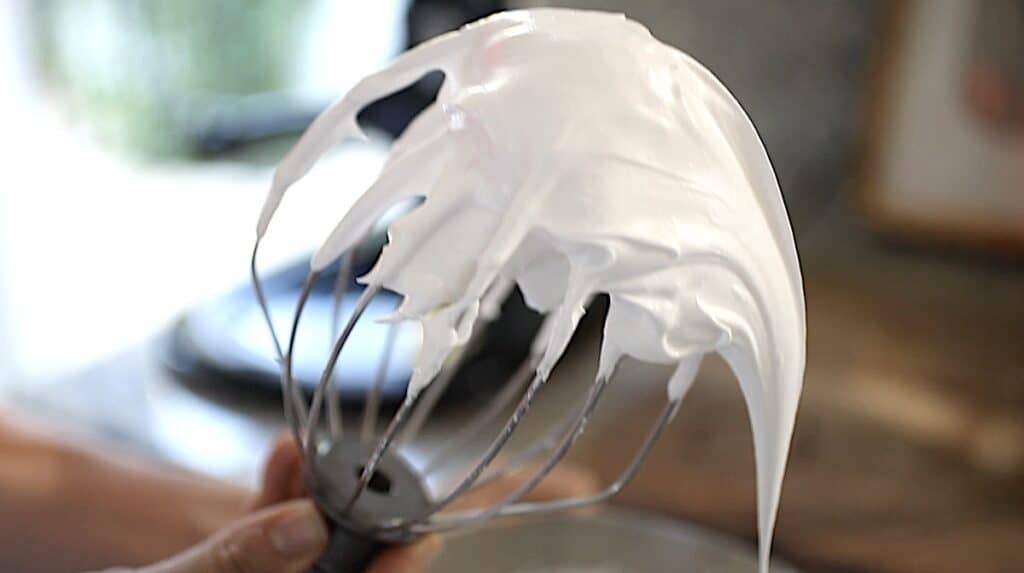
Step#3: Make The Homemade Marshmallow Topping
There’s nothing quite like homemade marshmallow topping! You’ll have the benefit of creating beautiful swirls on top of your pie. The secret to homemade marshmallows is the corn syrup for the texture and the cream of tartar for the egg white stabilization.
These products can be hard to find outside the United States, although you can purchase them online, see links below in the recipe card.
Alternatively, you can also use store-bought marshmallows for the topping.
The topping is ready when it can hold up on the whisk attachment and looks shiny and glossy. Then it’s ready to use. This homemade marshmallow topping is also great on top of pumpkin pie too!
Make-Ahead Tips:
- You can make this pie the day before, even placing the marshmallow topping on top.
- Do not cover it, leave it uncovered and refrigerate overnight.
- Then remove it 30 minutes before serving to rest on the countertop and come to room temperature.
- Then all you’ll have to do before serving is place it under the broiler to toast.
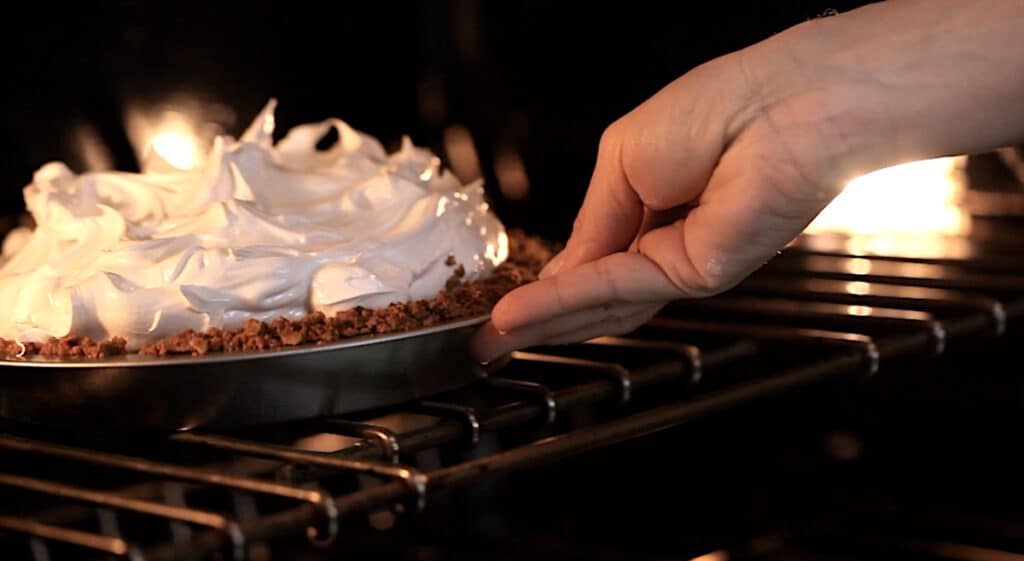
Watch That Topping!
The biggest tip with this recipe is to make sure once you put that marshmallow topping on and pop in the oven, you stay close by! I realize this the season for multi-tasking, but this pie will burn in a flash if you are not careful! So do not walk away!
What to Do if You Burn The Topping?
If disaster does strike and you burn the topping you can always just scrape off the burnt topping and start again! The pie underneath will be ok, it’s typically just the topping the burns.
If you don’t want to take the time to make another homemade batch of marshmallows, use store-bought marshmallows for the topping.
In fact, as an “insurance policy”, I always throw in a bag of marshmallows in the cart while shopping for the ingredients of this pie, “just in case” since there may not be time to remake the homemade topping, and you’ll be happy to have a “back-up” plan!
Avoid the Marshmallow Fluff
As tempting as it might be, I would not use the store-bought marshmallow fluff. It’s too sweet and will not give you the same texture as the homemade marshmallow or store-bought marshmallows.
Allow the pie to cool slightly and then serve immediately. It will be a bit easier to slice if cooled slightly.
More Thanksgiving Desserts!
- Pecan Bars with Shortbread Crust
- French Apple Tart
- 10 Tips for the BEST Apple Pie
- Pumpkin Pie with Marshmallow Topping
- Pear Almond Tart
If You Enjoyed This Recipe
Please Leave a Rating and a Review Below!
S'more Pie Recipe
If you are looking for a memorable Thanksgiving Pie Recipe, look no further than this recipe. It's elegant and delicious and so easy to make too!
Ingredients
For the Crust:
- 2 cups of finely ground graham crackers (about 15-16 graham crackers)
- 6 tbsp melted butter
- 1/8 tsp salt
For the Filling:
- ¾ cup of semi-sweet chocolate chips
- ¾ cup of milk chocolate chips
- ¼ cup of butter
- 2 whole eggs
- 1 egg yolk
- 1 cup heavy cream
- 1 tsp vanilla
For the topping:
- 2 egg whites
- 1 cup of corn syrup
- pinch of salt
- ½ tsp vanilla
- ¼ tsp cream of tartar
- 2 tbsp sugar
Instructions
- Preheat oven to 350F.
- Grind graham crackers in a food processor. Or place them in a zip lock bag, and whack them with a rolling pin, until they are crushed into a fine crumb.
- Place graham cracker crumbs into a bowl, add the salt and the melted butter. Combine with a fork until the crumbs stick together.
- Place the crumbs in a 9 ½ pie plate working the crumbs up the side of the pan, with the palm of your hand. Set aside.
- Place both chocolate chips and butter in a heat safe bowl. Heat the heavy cream in a sauce pan until it simmers, pour it over the chocolate chips and whisk until melted and combined. Add whole eggs, and yolks and mix until combined. Add vanilla.
- Pour chocolate mixture into piecrust and bake 15-20 mins until pie is set and a toothpick comes out clean.
- Meanwhile, place 2 egg whites, corn syrup, salt, vanilla and cream of tartar in a bowl and whip on high until stiff peaks form and mixture is glossy. Slowly add sugar.
- Allow pie to cool, and then add marshmallow topping on top, creating decorative swirls as you go with a spatula.
- At this point, if you are not serving right away, the pie can be refrigerated until ready to serve. Then proceed with last step of broiling.
- Place pie under the broiler for 1-2 mins until marshmallow topping turns golden brown.
- BE CAREFUL! Marshmallow burns quickly so please keep an eye on it while broiling, do not walk away!
Notes
What to Do if You Burn The Topping?
If disaster does strike and you burn the topping you can always just scrape off the burnt topping and start again! The pie underneath will be ok, it's typically just the topping the burns.
If you don't want to take the time to make another homemade batch of marshmallows, use store-bought marshmallows for the topping. In fact, as an "insurance policy", I always throw in a bag of marshmallows while shopping for the ingredients of this pie, "just in case" since there may not be time to remake the homemade topping, and you'll be happy to have a "back-up" plan!
Do not use Marshmallow fluff. It will not have the same texture as the homemade marshmallow topping or the store-bought topping.
Recommended Products
As an Amazon Associate and member of other affiliate programs, I earn from qualifying purchases.


Nutrition Information:
Yield: 8 Serving Size: 1Amount Per Serving: Calories: 646Total Fat: 39gSaturated Fat: 23gTrans Fat: 1gUnsaturated Fat: 13gCholesterol: 145mgSodium: 343mgCarbohydrates: 73gFiber: 2gSugar: 59gProtein: 7g

going to make this tomorrow, can I make it with DARK chocolate chips? We like it much better than milk.
Yes of course no problem you can make it with dark chocolate chips too!
I also had a hard time getting it to set even after 25 minutes of baking. I didn’t want to burn the crust so I took it out. I have an oven thermometer to make sure my oven is at the correct temp. I ended up making a second pie thinking I did something else wrong in the recipe, but I had the same problem the second time around. However, the pie did set up fine in the fridge. I took it out 1/2 hour before making the marshmallow topping and both pies were a huge hit!
I take back my previous comment about the marshmallow fluff not turning out because this pie was INCREDIBLE. It was the hit of our Thanksgiving dinner. So delicious. I am currently eating what little leftovers is left for breakfast hehe. This will be my new staple dessert!
Ha! Oh I’m SO glad it turned out to be a hit! YAY!!
If I’m in a hurry and don’t have time to make the marshmallow topping, do you think I could just use the marshmallow fluff from the store?
Actually I would just use regular jumbo marshmallows. Since I would be afraid tat the fluff wouldn’t toast! But regular marshmallows do and that’s even easier 🙂 And probably less messy too! 🙂 Hope you enjoy!
I’m wondering if it should de the center oven rack or lower?
Center rack is fine 🙂
Making this now! Can’t wait! FYI chocolate base Still in the oven after 30 minutes and finally starting to set.
I can’t wait to make this!! Is the corn syrup light or dark?
Light Corn Syrup 🙂 Hope you enjoy!
I have cooked this pie for over 20 minutes and it’s not setting…What did I do wrong?!? 🙁
Hmm the only thing I could think of is that your oven my not be running “at temperature”. This is a common problem that can cause baked good to take longer than exopected. Here’s a video that explains how to fix that. Hope it helps!https://www.youtube.com/watch?v=FUs_sk-o_7M
Did anyone else have to bake it for a lot longer tha 15-20 min?? Mine has been in for 30 min and he toothpick is still bringing back a lot of liquid 🙁
Hmm the only thing I could think of is that your oven my not be running “at temperature”. This is a common problem that can cause baked good to take longer than exopected. Here’s a video that explains how to fix that. Hope it helps!https://www.youtube.com/watch?v=FUs_sk-o_7M
Hi! I very much dislike (read: hate!) any chocolate chips that aren’t milk. Do you think doubling the milk chocolate chips and omitting the semi-sweet would make the dessert too sweet? Thanks in advance!
Actually, yes it could make it very sweet. I would reco half milk chocolate and half semi-sweet 🙂 That would probably be just right. Hope you enjoy!
What is the * for in the corn syrup? Is there something else I can substitute instead?
Oh so sorry that’s for a “Homemade Version” of Corn Syrup in case you can’t find it or don’t want to run to the store to get it. Here’s the link!http://homegrownandhealthy.com/homemade-corn-syrup/ and just updated the post. Thanks! And apologies for the confusion! Beth
Could I make this the day before and then brown the marshmallow? And if so would I need to allow it to come to room temp before toasting it?
Sure you could make the crust and chocolate center the day before and then just do the marshmallow the “day of” and brown. I’d be afraid the fluff would fall if you did it the day before 🙁 so best to to that the day you plan to serve it. Enjoy!
Smore’s are my absolute favorite!! I like to try out all different recipes using store’s…this is next on my list!