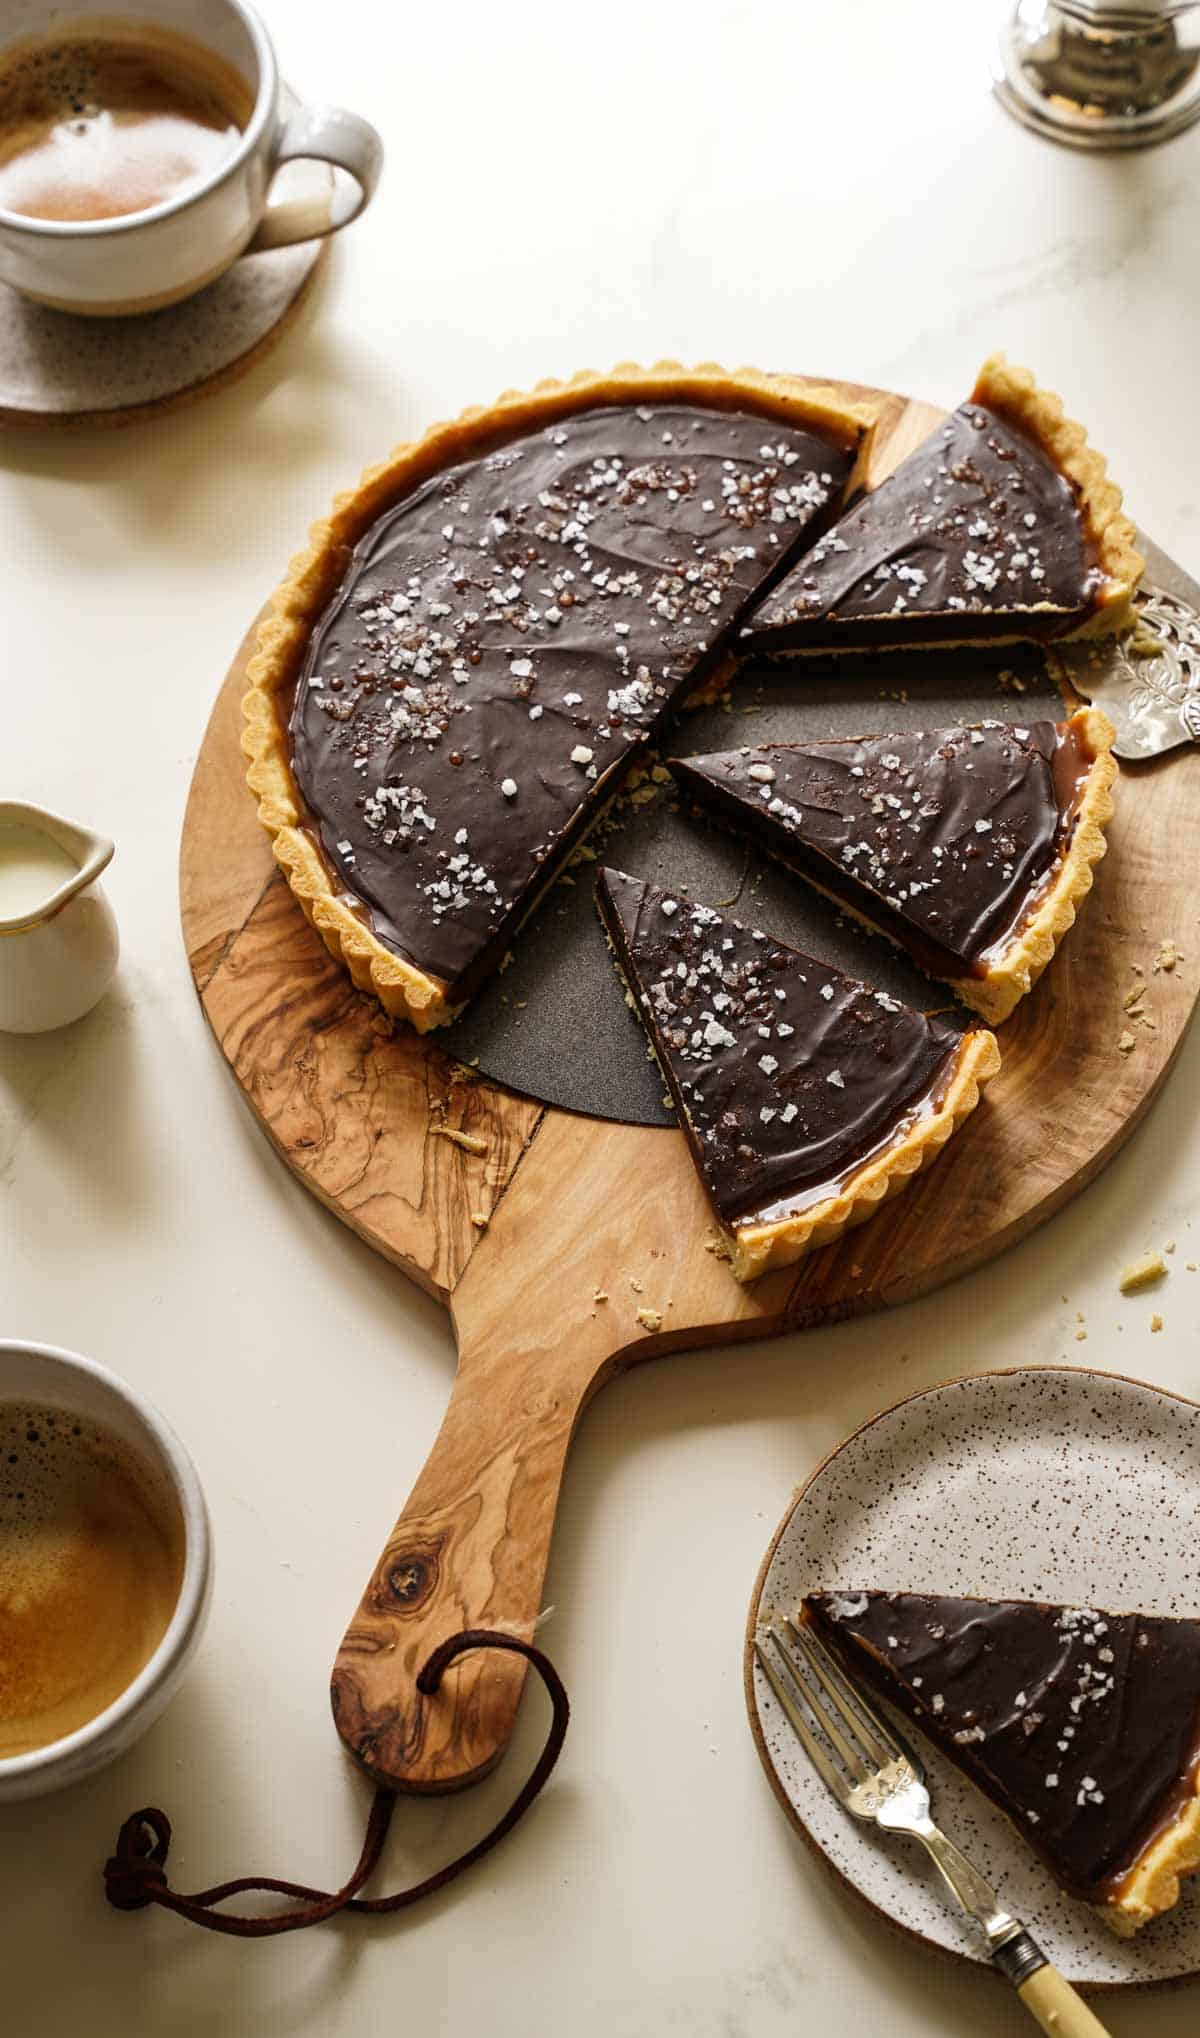
Salted Chocolate Caramel Tart
SHARE THIS RECIPE!

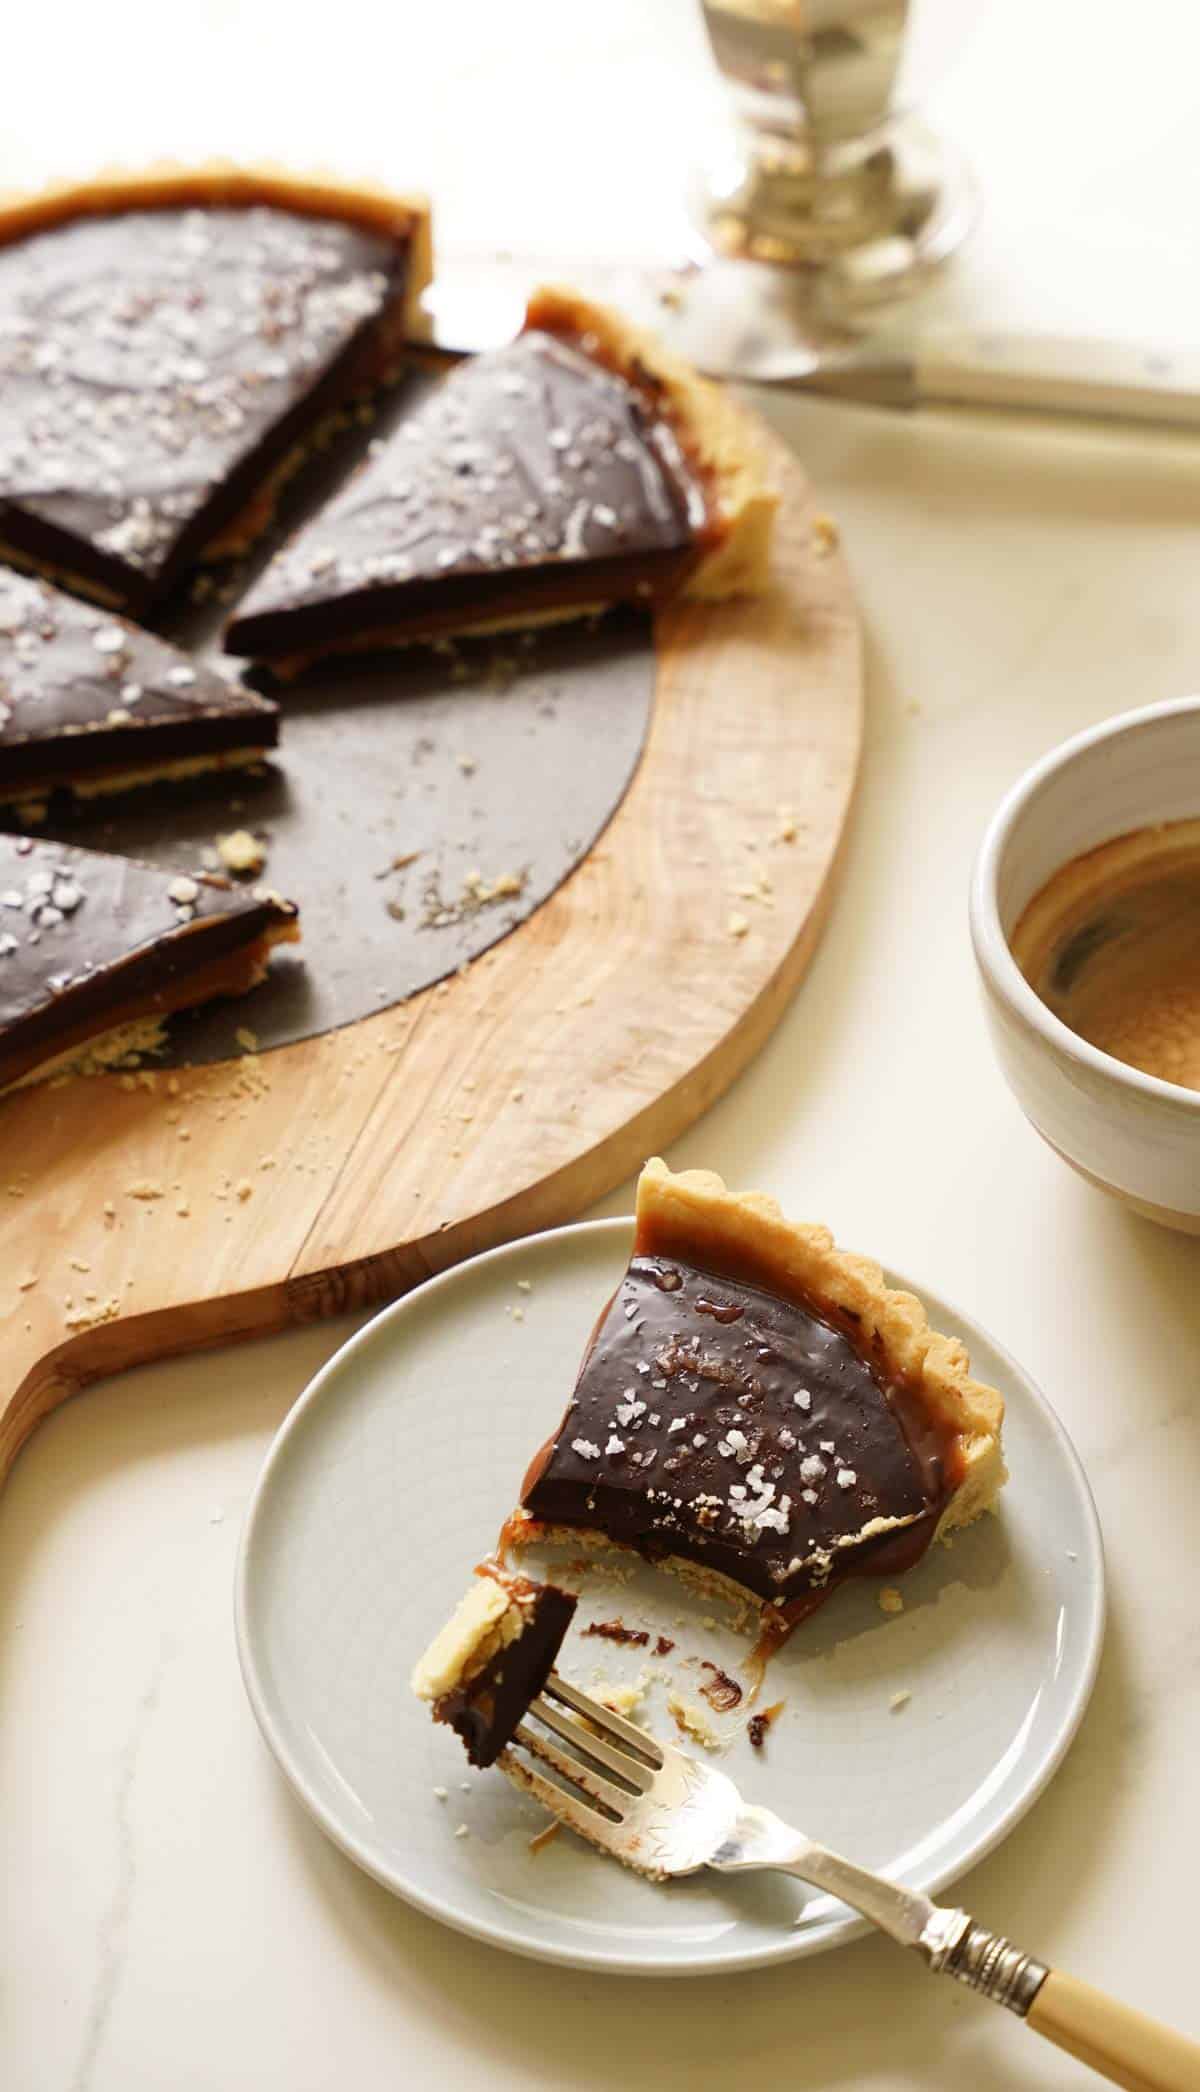
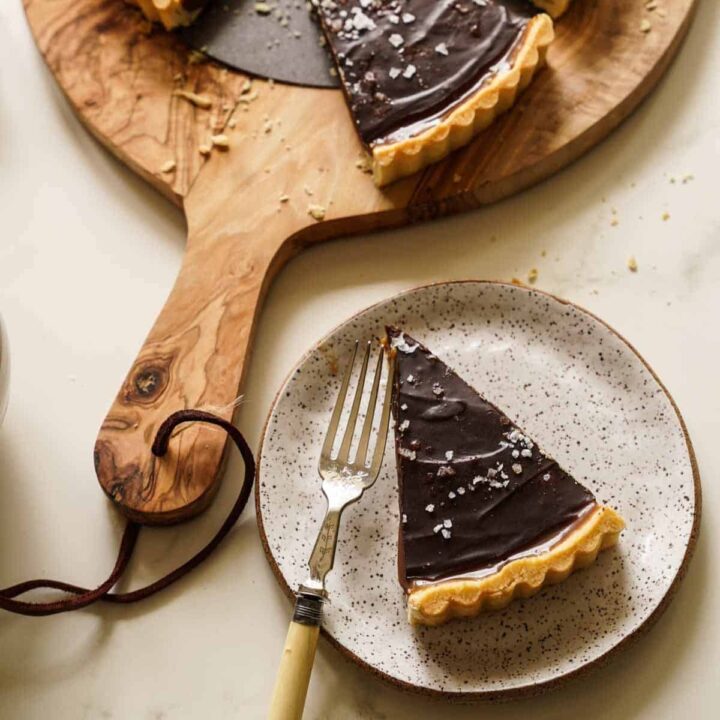
This delicious salted chocolate caramel tart is an easy dessert recipe to make for your next dinner party! You’ll love the flakey buttery crust, the luscious caramel, and of course the salted chocolate on top!
And the best part is you can make the whole thing ahead of time, place it in the refrigerator and all you have to do is slice and serve!
For more fantastic chocolate dessert recipes try my Chocolate Raspberry Cupcake Recipe or my Chocolate Mousse Cake Recipe.
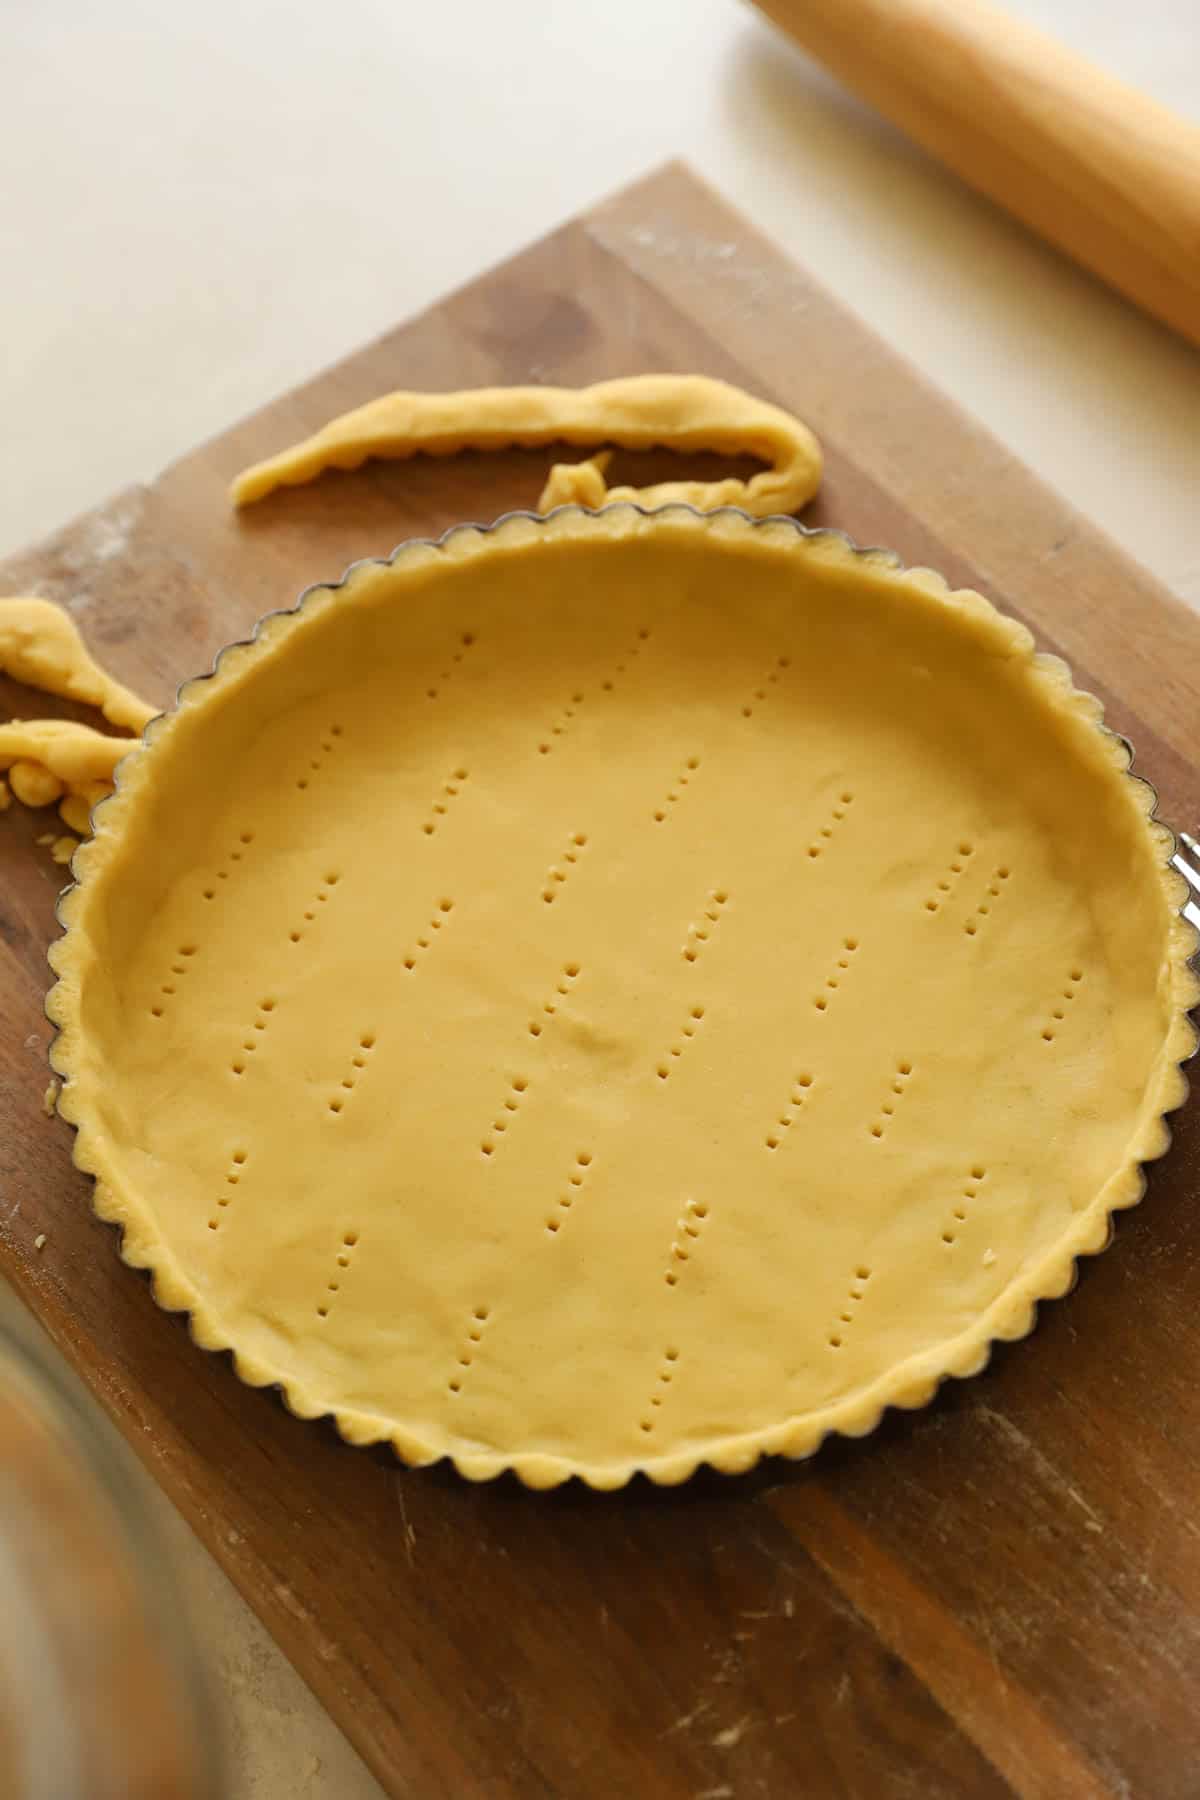
Step#1: Make the Crust
- The crust is my easy tart shell recipe that I use for most tarts. It’s also great for my Lemon Curd Tart recipe too!
- Be sure your butter is very cold before you begin.
- If you live in the U.S.A use salted Land O’ Lakes Butter. It will give you the best flavor
- Use a 9″ removabale bottom tart tin for easy release of the tart once it’s baked.
- Refrigerate the dough for at least 1-2 hours, or overnight, to prevent shrinkage when baking.
- After forming the dough in the tart tin, and docking it, pop it in the freezer for 10-15 minutes before baking. This will assure the dough is very cold before it hits the hot oven, which will also prevent shrinkage.
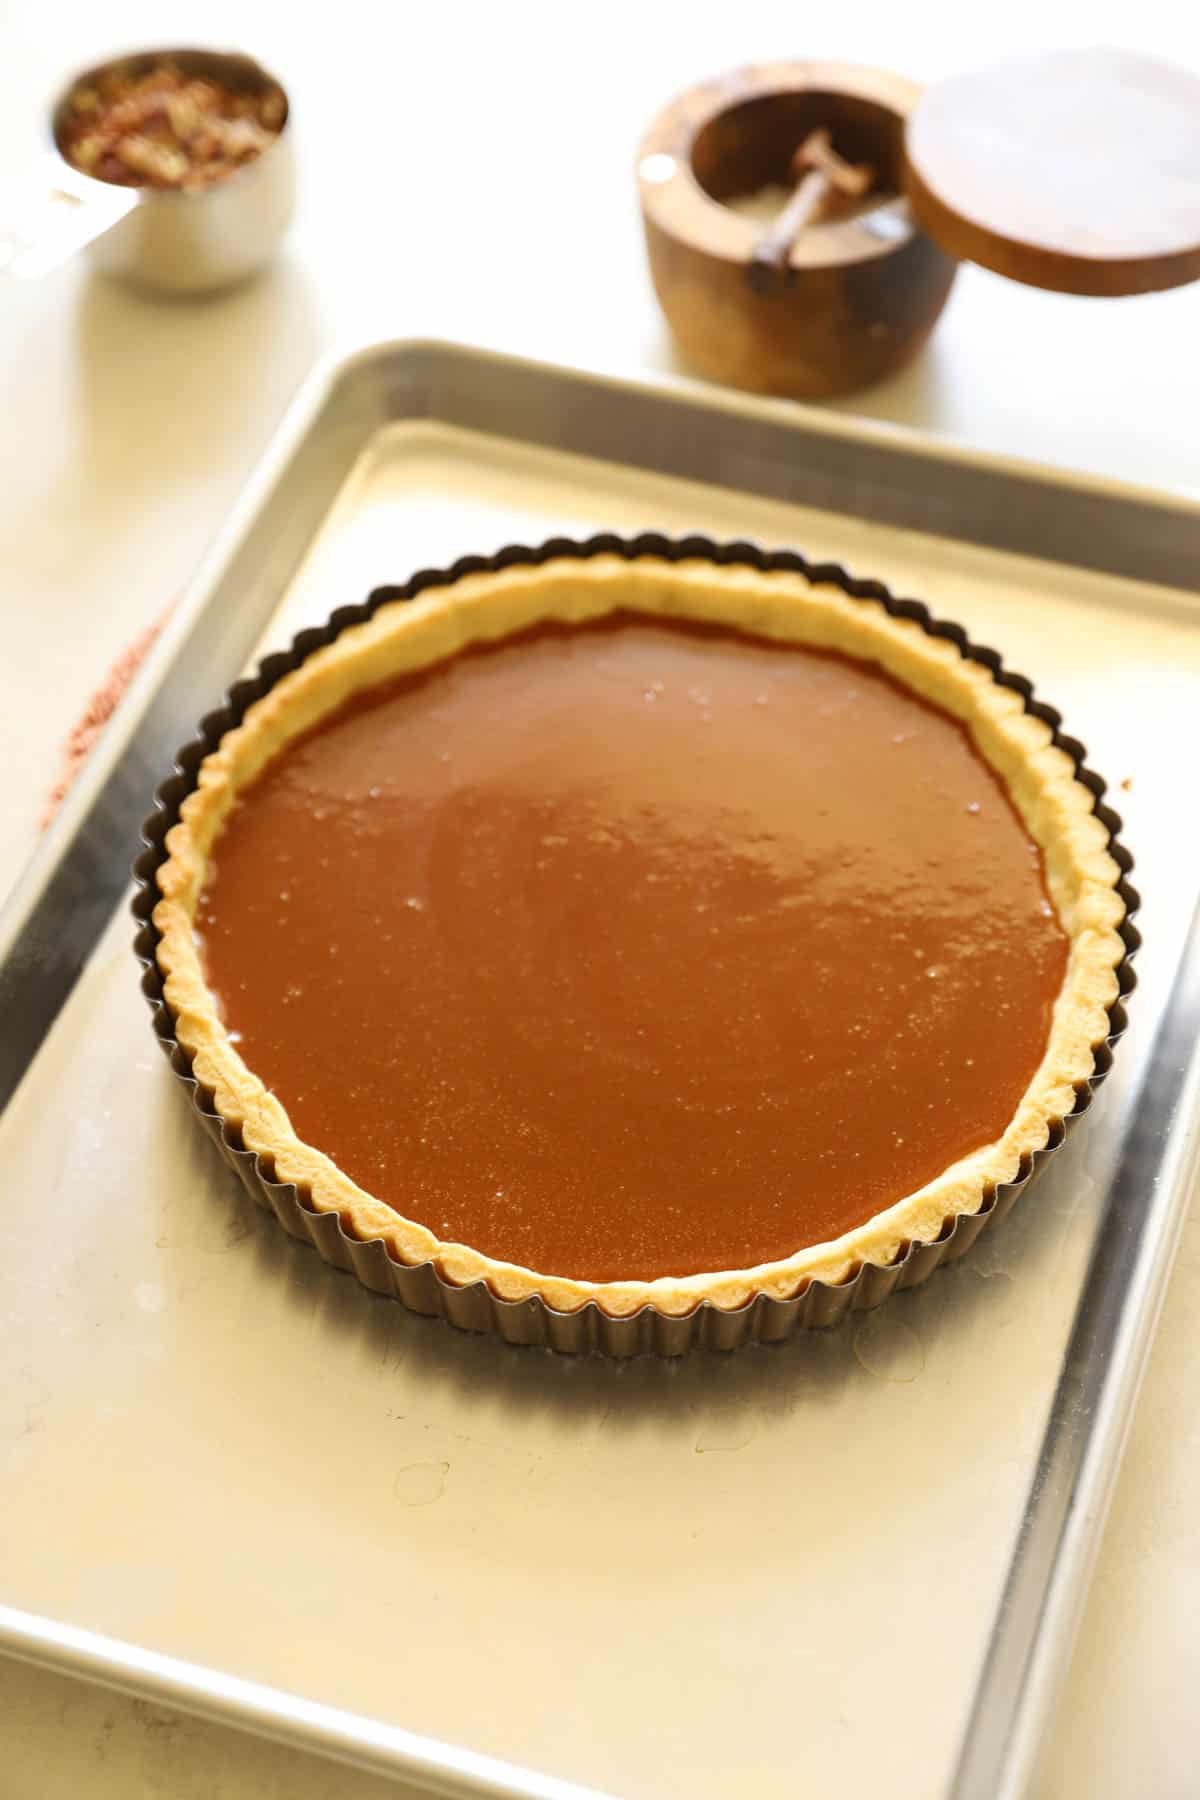
Step#2: Fill the Baked Crust with Caramel
Once your crust is baked and cooled. Add the caramel. The caramel should cool a bit before adding it to the crust so that it sits on top of the crust, and doesn’t seep into the crust. About 10-15 minutes should do the trick.
For more salted caramel desserts try my Salted Caramel Ice Cream or Salted Caramel Apple Crepes.
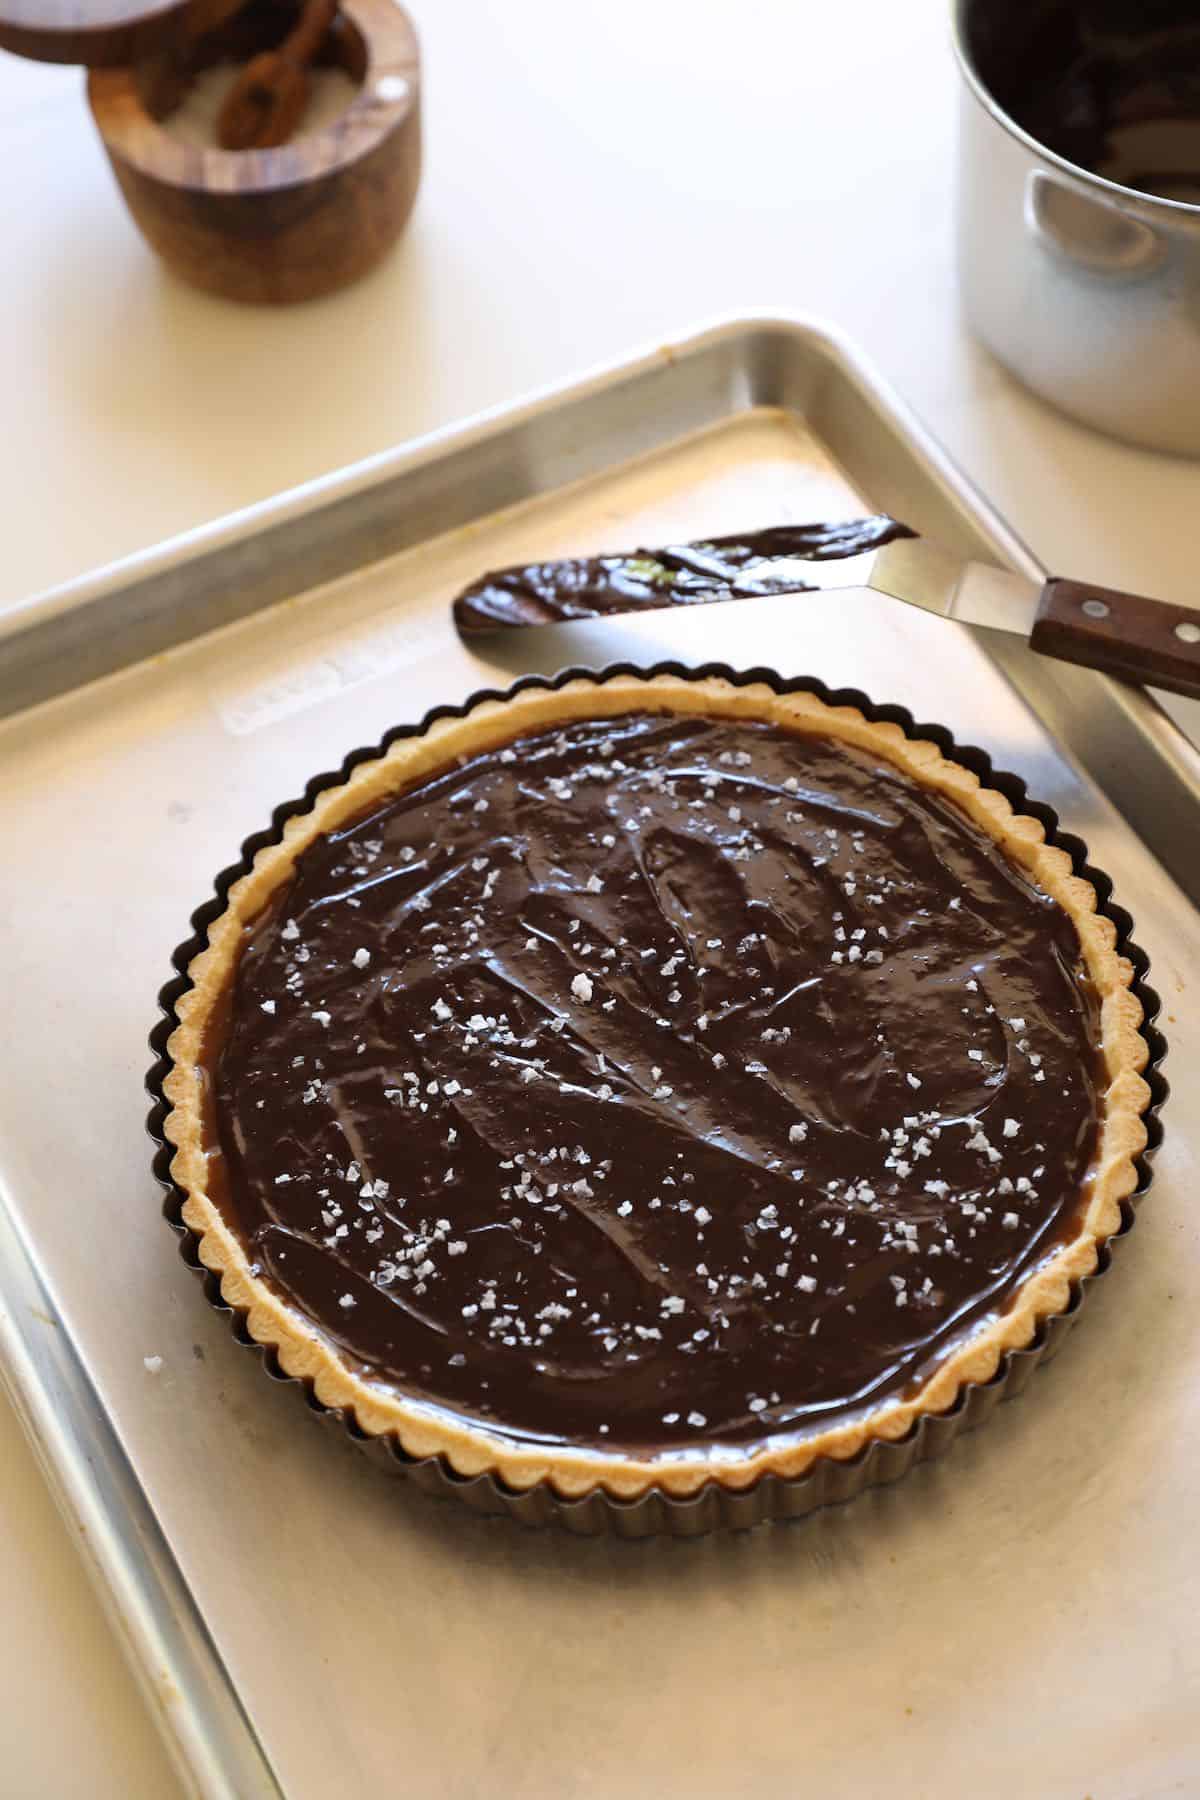
Step#3: Top the Tart with Chocolate
I like to use semi-sweet chocolate chips for this recipe, but you also could use dark chocolate if you prefer. Unfortunately, not all chocolate chips are created equal. For the best flavor and texture for your tart, use Tollhouse Semi-Sweet Chocolate Chips.
Tips for Adding the Chocolate
- Place the tart with the caramel layer in the refrigerator for at least 30 minutes (or the freezer for 10 minutes) to allow the caramel layer to set up and become stiff.
- This will prevent the caramel and chocolate from combining, and preserve the separate layers.
- Allow the chocolate to cool for 5-10 minutes, this will prevent the salt from melting into the tart when you add it.
- Only use Fleur de Sel Sea Salt or Maldon Sea Salt Flakes on your tart, since it’s less salty than other salts, and will provide just the touch of salt and crunch you’ll want for a dessert.
Step#4: Storage and Serving
- Place the tart in the refrigerator for a minimum of 4 hours to set up. It will make it easier to slice this way, or overnight is even better.
- The tart is best enjoyed 24-48-hours after making.
- If preparing more than 24-hours ahead of time don’t add the salt until right before serving, otherwise past 24-hours the salt will begin to melt in the chocolate and condensation will form in its place.
Salted Chocolate Caramel Tart
You'll love the flakey buttery crust, the luscious caramel and of course the salted chocolate on top! And the best part is you can make the whole thing ahead of time, place it in the refrigerator and all you have to do is slice and serve!
Ingredients
Tart Shell
- 1 ¼ cups (150g) flour
- 2 tablespoons (12g) sugar
- ¼ teaspoon (1.25ml) salt
- ½ cup (120 g) butter, chilled and diced into cubes
- 1 egg yolk
- 1-2 tablespoons (30 ml) ice water
Caramel Filling:
- 1 Cup (200g) Sugar
- 1/2 cup (118ml) heavy cream
- 4 Tbsp (56g) butter
Chocolate:
- 1 full (12-ounce) bag of Tollhouse semi-sweet chips
- ½ cup (118ml) heavy cream
- Sprinkle of sea salt flakes
Instructions
- Prepare the crust. Add the dry ingredients to a food processor and pulse until combined.
- Add the chilled butter cubes, in batches, to the food processor, pulsing in between each addition. Until a coarse meal forms.
- In a small glass, mix the egg yolk, with the water, until combined and slowly add it to the food processor, pulsing to combine, until a dough ball forms.
- With floured hands, remove the dough ball, flatten it into a disk, and transfer it to a sheet of parchment paper. Wrap it up and refrigerate for at least 1-2 hours. Or overnight is even better.
- Roll out the dough on a floured surface and fit it into a 9"-removable bottom tart tin. Trim the edges.
- Flip the dough overhang into the tin to form a double crust. Pressing the dough into the sides of the tin, to create a tight fit, and sturdy crust.
- Then take a sharp pairing knife and run it along the top of the tart tin, to trim the edges.
- Pierce the bottom of the tart dough with a fork, all over the bottom, to allow for steam.
- Place the tart tin in the freezer for 10-15 minutes to firm up.
- Meanwhile preheat the oven to 425F.
- Place the tin on a baking sheet and bake for 20 minutes or until golden brown. Set aside to cool.
- To make the caramel. Place the sugar in a medium-sized heavy-bottom sauce pot over a medium-high flame.
- Allow the sugar to melt, undisturbed, swirling it around, and lifting it off the heat as needed to melt without smoking or burning.
- A beautiful amber color will form. Once the sugar is fully melted, add the heavy cream. It will seize up and look like a witch's brew! Don't worry at this point you can stir with a whisk until the caramel settles down.
- Then add the butter, and whisk to combine. Set aside to cool.
- For the chocolate. Simmer the heavy cream in a medium-sized sauce pot. Then add the bag of chocolate chips and turn of the heat. Whisk until the chocolate melts and is smooth and shiny.
- Pour the caramel into the cooled, tart shell. Shake gently to distribute. Then place the tin in the refrigerator for 30 minutes to firm up and set the caramel.
- Then pour the slightly cooled chocolate on top, and smooth it out with an offset spatula. Then sprinkle the sea salt on top.
- Refrigerate the tart for a minimum of 4 hours or overnight.
- Slice and serve!

Beth, I am in the market for a larger food processor. If I were to buy one size, what brand/size would you recommend? For example, what size was the one you used for this recipe? Great video, BTW. Definitely going to try this.
Oh sure this one is my favorite model of food processor. It’s a 7-cup and it works great! And I hope you enjoy the Caramel Tart too! It’s so yummy!
Hello Beth
I’m wondering if I can freeze this
It looks amazing.
I would not put the salt on until I take it out of the freezer.
Thanks for the info
Well I probably wouldn’t free it because of the condensation that will develop on the crust and chocolate in the thawing. BUT these two chocolate desserts you could totally freeze! My Chocolate Banana Bread and my Chocolate Bundt Cake. Both would freeze beautifully! Enjoy!
Beth, definitely will be trying this tart. My question is: I thought that chocolate chips keep their shape… however, in picture the chocolate is smooth in the tart. I am a bit confused.
Please advise. Thank you
Great question! Yes in the oven they will keep their shape, but when placed in hot liquid, like the cream, they melt! But then harden back up when refrigerated, which makes the tart easy to cut into. Hope you enjoy!